There are times a web application may need to log in a user and call different backend Azure AD protected web APIs. The web application would need to obtain different Access Tokens, one for each web API. In this post I will attempt to demonstrate how this can be done using MIcrosoft.Identity.Web nuget package. This sample shows how to get tokens for Microsoft Graph resource and a custom web API resource. The project was developed using Visual Studio 2022 and .Net 6 framework.
App Registrations
I have both a web application and a web API registered in my Azure AD tenant with the following configuration:
Web App
Redirect URI: set the redirect URI for Web platform
Secret: create a client secret in the ‘Certificates & secrets’ blade
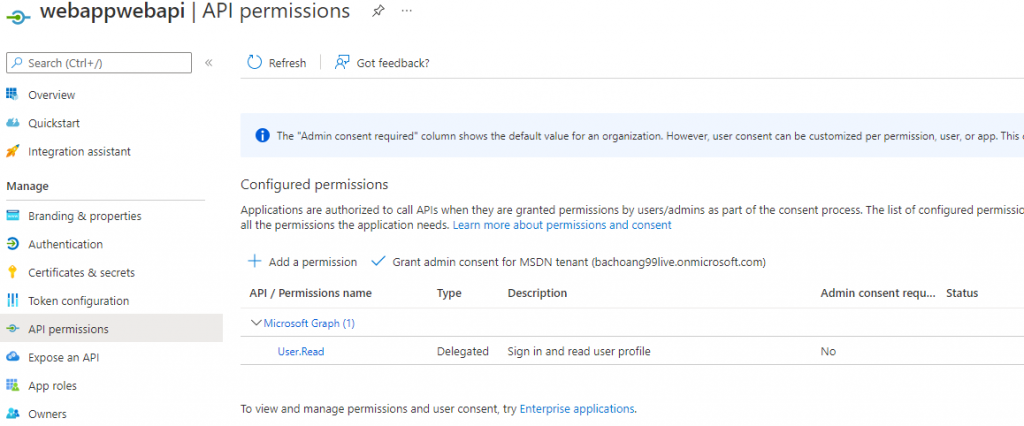
API permission is set as followed

Web API
scope defined for the web API:

Application Code
Add .EnableTokenAcquistionToCallDownstreamApi() in Program.cs file to expose the ITokenAcquisition Service to acquire access tokens for the downstream API (See https://docs.microsoft.com/en-us/azure/active-directory/develop/scenario-web-app-call-api-app-configuration?tabs=aspnetcore#startupcs for more info). Complete code for the project is at this github link.
using Microsoft.AspNetCore.Authorization;
using Microsoft.AspNetCore.Mvc.Authorization;
using Microsoft.Identity.Web;
using Microsoft.Identity.Web.UI;

var builder = WebApplication.CreateBuilder(args);

// Add services to the container.
/*
builder.Services.AddAuthentication(OpenIdConnectDefaults.AuthenticationScheme)
    .AddMicrosoftIdentityWebApp(builder.Configuration.GetSection("AzureAd"));
*/

builder.Services.AddMicrosoftIdentityWebAppAuthentication(builder.Configuration)
    .EnableTokenAcquisitionToCallDownstreamApi()
    .AddInMemoryTokenCaches();

builder.Services.AddAuthorization(options =>
{
    options.FallbackPolicy = options.DefaultPolicy;
});
builder.Services.AddControllersWithViews(options =>
{
    var policy = new AuthorizationPolicyBuilder()
        .RequireAuthenticatedUser()
        .Build();
    options.Filters.Add(new AuthorizeFilter(policy));
});
builder.Services.AddRazorPages()
    .AddMicrosoftIdentityUI();

var app = builder.Build();

// Configure the HTTP request pipeline.
if (!app.Environment.IsDevelopment())
{
    app.UseExceptionHandler("/Home/Error");
    // The default HSTS value is 30 days. You may want to change this for production scenarios, see https://aka.ms/aspnetcore-hsts.
    app.UseHsts();
}

app.UseHttpsRedirection();
app.UseStaticFiles();

app.UseRouting();

app.UseAuthentication();
app.UseAuthorization();

app.MapControllerRoute(
    name: "default",
    pattern: "{controller=Home}/{action=Index}/{id?}");
app.MapRazorPages();
app.MapControllers();
app.Run();
The sample uses ITokenAcqisition to get the access token for the downstream API as followed. The AuthorizeForScopes atrribute decoration on the controller is for handling dynamic consent if the requested API permission has not been consented yet. It’s important to have the same scopes defined in both the AuthorizeForScopes attribute and the GetAccessTokenForUserAsync call in the controller in order for consent to work correctly if needed.
Note: The web app should call GetAccessTokenForUserAsync each time an access token is needed.
using Microsoft.AspNetCore.Authorization;
using Microsoft.AspNetCore.Mvc;
using Microsoft.Identity.Web;

namespace WebAppWebAPIs.Controllers
{
    // https://docs.microsoft.com/en-us/aspnet/core/tutorials/first-mvc-app/adding-controller?view=aspnetcore-6.0&tabs=visual-studio
    [Authorize]
    public class WebAPIController : Controller
    {
        private readonly ILogger<HomeController> _logger;
        readonly ITokenAcquisition tokenAcquisition;
        private IConfiguration _configuration;
        public WebAPIController(ILogger<HomeController> logger, ITokenAcquisition tokenAcquisition, IConfiguration configuration)
        {
            _logger = logger;
            this.tokenAcquisition = tokenAcquisition;
            _configuration = configuration;
        }

        [AuthorizeForScopes(ScopeKeySection = "ApiScope:CalledApiScopes")]
        public async Task<IActionResult> Api()
        {
            string[] scopes = _configuration.GetValue<string>("ApiScope:CalledApiScopes").Split(" "); ;
            string token = await tokenAcquisition.GetAccessTokenForUserAsync(scopes);
            ViewBag.ApiToken = token;
            return View();
        }
...
In the sample I define all my web API scopes in the appsettings.json file:
  "GraphScope": {
    "CalledApiScopes": "user.read.all application.read.all",
    "CalledApiUrl": "https://graph.microsoft.com/v1.0"
  },
  "ApiScope": {
    "CalledApiScopes": "api://18b050ec-9734-43b4-85a1-1b5dad64cea1/hello",
    "CalledApiUrl": "https://myapi.com"
  },
Running the sample:
Change the values in the following sections of the appsettings.json file with your own web application’s registration value and the scopes for your downstream web APIs:
  "AzureAd": {
    "Instance": "https://login.microsoftonline.com/",
    "Domain": "[Enter the domain of your tenant, e.g. contoso.onmicrosoft.com]",
    "TenantId": "[Enter the tenant ID of the registered web app]",
    "ClientId": "[Enter the Client Id (Application ID obtained from the Azure portal), e.g. ba74781c2-53c2-442a-97c2-3d60re42f403]",
    "CallbackPath": "/signin-oidc",
    "SignedOutCallbackPath": "/signout-callback-oidc",
    "ClientSecret": "[Enter the web application Client Secret]"
  },
  "GraphScope": {
    "CalledApiScopes": "user.read.all application.read.all",
    "CalledApiUrl": "https://graph.microsoft.com/v1.0"
  },
  "ApiScope": {
    "CalledApiScopes": "api://18b050ec-9734-43b4-85a1-1b5dad64cea1/hello",
    "CalledApiUrl": "https://myapi.com"
  },
Run the project and browse to https://localhost:7035 and click on either ‘Graph Token’ link or the ‘WebAPI Token’ link in the menu to see the Access Token:

Other Sample
Take a look at https://github.com/Azure-Samples/active-directory-aspnetcore-webapp-openidconnect-v2/tree/master/3-WebApp-multi-APIs for a different sample using Microsoft Graph SDK for .Net to call both Microsoft Graph and Azure Resource Manager endpoint.