How to bundle consent

You have a custom client and a custom API. There is an application registration in Azure AD for each of these apps, one for the custom client, and one for the custom API. You want your users to be able to bundle the consent for these apps.

You might see one of the following errors…

  • AADSTS70000: The request was denied because one or more scopes requested are unauthorized or expired. The user must first sign in and grant the client application access to the requested scope
  • AADSTS650052: The app needs access to a service (\”{name}\”) that your organization \”{organization}\” has not subscribed to or enabled. Contact your IT Admin to review the configuration of your service subscriptions.
    • This is the old error replaced by the new error below
  • AADSTS650052: The app is trying to access a service\”{app_id}\”(\”app_name\”) that your organization %\”{organization}\” lacks a service principal for. Contact your IT Admin to review the configuration of your service subscriptions or consent to the application in order to create the required service principal

Step 1: Configure knownClientApplications for the API app registration

First, you will need to add the custom client app ID to the custom APIs app registration knownClientApplications property…

https://learn.microsoft.com/en-us/azure/active-directory/develop/reference-app-manifest#knownclientapplications-attribute

Step 2: Configure API permissions

Second, make sure all API permissions are configured correctly on the custom client and custom API app registrations. Also make sure that all of the custom API app registration API permissions are also added to the custom client app registration.

Step 3: The sign-in request

Third, your authentication request must use the .default scope. For Microsoft accounts, the scope must be for the custom API. For example. This will also work for school and work accounts.

https://login.microsoftonline.com/common/oauth2/v2.0/authorize
?response_type=code
&Client_id=72333f42-5078-4212-abb2-e4f9521ec76a
&redirect_uri=https://localhost
&scope=openid profile offline_access app_uri_id1/.default
&prompt=consent

However, the client will not be listed as having a permission for the API. This is ok because the client will be listed as knownClientApplications.

If you’re not concerned about supporting Microsoft Accounts, and will only be supporting work and school accounts, then use the following recommended approach. For example…

https://login.microsoftonline.com/common/oauth2/v2.0/authorize
?response_type=code
&Client_id=72333f42-5078-4212-abb2-e4f9521ec76a
&redirect_uri=https://localhost
&scope=openid profile offline_access User.Read https://graph.microsoft.com/.default
&prompt=consent 

The Implementation

If using MSAL.Net for example…

String[] consentScope = { "api://ae5a0bbe-d6b3-4a20-867b-c8d9fd442160/.default" };
var loginResult = await clientApp.AcquireTokenInteractive(consentScope)
    .WithAccount(account)
	 .WithPrompt(Prompt.Consent)
      .ExecuteAsync();

Keep in mind that consent propagation of new servicePrincipals and permissions may take a little time. Your applications must be able to handle this.

Acquiring tokens for more than one resource

If your custom client will also acquire tokens for another resource like Microsoft Graph, you will need to build logic as attempting to acquire these tokens immediately after the consent may fail.

  • Use the default scope
  • Track the acquired scopes until the required scope returns
  • Add a delay if the result still does not have the required scope.

Note: Currently, if acquireTokenSilent fails, MSAL will force you to perform a successful Interaction before it will allow you to use AcquireTokenSilent again, even if you have a valid refresh token to use.

Here is some sample code to handle this …

        public static async Task<AuthenticationResult> GetTokenAfterConsentAsync(string[] resourceScopes)
        {
            AuthenticationResult result = null;
            int retryCount = 0;

            int index = resourceScopes[0].LastIndexOf("/");

            string resource = String.Empty;

            // Determine resource of scope
            if (index < 0)
            {
                resource = "https://graph.microsoft.com";
            }
            else
            {
                resource = resourceScopes[0].Substring(0, index);
            }

            string[] defaultScope = { $"{resource}/.default" };

            string[] acquiredScopes = { "" };
            string[] scopes = defaultScope;
            
            while (!acquiredScopes.Contains(resourceScopes[0]) && retryCount <= 15)
            {
                try
                {
                    result = await clientApp.AcquireTokenSilent(scopes, CurrentAccount).WithForceRefresh(true).ExecuteAsync();
                    acquiredScopes = result.Scopes.ToArray();
                    if (acquiredScopes.Contains(resourceScopes[0])) continue;
                }
                catch (Exception e)
                { }

                // Switch scopes to pass to MSAL on next loop. This tricks MSAL to force AcquireTokenSilent after failure. This also resolves intermittent cachine issue in ESTS
                scopes = scopes == resourceScopes ? defaultScope : resourceScopes;
                retryCount++;

                // Obvisouly something went wrong
                if(retryCount==15)
                {
                    throw new Exception();
                }

                // MSA tokens do not return scope in expected format when .default is used
                int i = 0;
                foreach(var acquiredScope in acquiredScopes)
                {
                    if(acquiredScope.IndexOf('/')==0) acquiredScopes[i].Replace("/", $"{resource}/");
                    i++;
                }

                Thread.Sleep(2000);
            }

            return result;
        }

On the custom API using the On-behalf-of flow

Similarity, the custom API when trying to acquire tokens for another resource might fail immediately after consent.

while (result == null && retryCount >= 6)
            {
                UserAssertion assertion = new UserAssertion(accessToken);
                try
                {
                    result = await apiMsalClient.AcquireTokenOnBehalfOf(scopes, assertion).ExecuteAsync();
                    
                }
                catch { }

                retryCount++;

                if (result == null)
                {
                    Thread.Sleep(1000 * retryCount * 2);
                }
            }

If (result==null) return new HttpStatusCodeResult(HttpStatusCode.Forbidden, "Need Consent");

If this continues to fail and you run out of retries, its probably a good time to throw an error to the client and have it perform a full consent.

Example of client code assuming your API throws a 403…

HttpResponseMessage apiResult = null;
apiResult = await MockApiCall(result.AccessToken);

if(apiResult.StatusCode==HttpStatusCode.Forbidden)
{
  var authResult = await clientApp.AcquireTokenInteractive(apiDefaultScope)
    .WithAccount(account)
    .WithPrompt(Prompt.Consent)
    .ExecuteAsync();
  CurrentAccount = authResult.Account;

  // Retry API call
  apiResult = await MockApiCall(result.AccessToken); 
}          

Recommendations and expected behavior

Building an app for handling bundled consent is not as straight forward. Preferably you have a separate process you can walk your users through to perform this bundled consent, provision your app and API within their tenant or on their Microsoft Account and only get the consent experience once. (Separate from actually signing into the app.) If you don’t have this process and trying to build it into your app and your sign in experience, it gets messy and your users will have multiple consent prompts. I would recommend that you build a experience within your app that warns users they may get prompted to consent (multiple times).

For Microsoft Accounts, I would expect minimum of two consent prompts. One for the application, and one for the API.

For work and school accounts, I would expect only one consent prompt. Azure AD handles bundled consent much better than Microsoft Accounts.

Here is a end to end example sample of code. This has a pretty good user experience considering trying to support all account types and only prompting consent if required. Its not perfect as perfect is virtually non-existent.

string[] msGraphScopes = { "User.Read", "Mail.Send", "Calendar.Read" }
String[] apiScopes = { "api://ae5a0bbe-d6b3-4a20-867b-c8d9fd442160/access_as_user" };
String[] msGraphDefaultScope = { "https://graph.microsoft.com/.default" };
String[] apiDefaultScope = { "api://ae5a0bbe-d6b3-4a20-867b-c8d9fd442160/.default" };

var accounts = await clientApp.GetAccountsAsync();
IAccount account = accounts.FirstOrDefault();

AuthenticationResult msGraphTokenResult = null;
AuthenticationResult apiTokenResult = null;

try
{
	msGraphTokenResult = await clientApp.AcquireTokenSilent(msGraphScopes, account).ExecuteAsync();
	apiTokenResult = await clientApp.AcquireTokenSilent(apiScopes, account).ExecuteAsync();
}
catch (Exception e1)
{
	
	string catch1Message = e1.Message;
	string catch2Message = String.Empty;

	try
	{
        // First possible consent experience
		var result = await clientApp.AcquireTokenInteractive(apiScopes)
		  .WithExtraScopesToConsent(msGraphScopes)
		  .WithAccount(account)
		  .ExecuteAsync();
		CurrentAccount = result.Account;
		msGraphTokenResult = await clientApp.AcquireTokenSilent(msGraphScopes, CurrentAccount).ExecuteAsync();
		apiTokenResult = await clientApp.AcquireTokenSilent(apiScopes, CurrentAccount).ExecuteAsync();
	}
	catch(Exception e2)
	{
		catch2Message = e2.Message;
	};

	if(catch1Message.Contains("AADSTS650052") || catch2Message.Contains("AADSTS650052") || catch1Message.Contains("AADSTS70000") || catch2Message.Contains("AADSTS70000"))
	{
        // Second possible consent experience
		var result = await clientApp.AcquireTokenInteractive(apiDefaultScope)
			.WithAccount(account)
			.WithPrompt(Prompt.Consent)
			.ExecuteAsync();
		CurrentAccount = result.Account;
		msGraphTokenResult = await GetTokenAfterConsentAsync(msGraphScopes);
		apiTokenResult = await GetTokenAfterConsentAsync(apiScopes);
	}
}

// Call API

apiResult = await MockApiCall(apiTokenResult.AccessToken);
var contentMessage = await apiResult.Content.ReadAsStringAsync();

if(apiResult.StatusCode==HttpStatusCode.Forbidden)
{
	var result = await clientApp.AcquireTokenInteractive(apiDefaultScope)
		.WithAccount(account)
		.WithPrompt(Prompt.Consent)
		.ExecuteAsync();
	CurrentAccount = result.Account;

	// Retry API call
	apiResult = await MockApiCall(result.AccessToken);
}

If anyone has better ideas or solutions, please comment on this post.

The identity of the calling application could not be established

You are getting the following error from Microsoft Graph or downstream services that uses Microsoft Graph…

The identity of the calling application could not be established

This error is thrown because the “oid” and “sub” claim is missing from the access token. This is because the servicePrincipal does not exist in the tenant or the tenant is not aware of the application.

Partner Scenario

If this is a Partner application, make sure you follow the Partner pre-consent process.

And do not forget to add your application/servicePrincipal to the AdminAgents group.

https://github.com/microsoft/Partner-Center-Explorer/blob/master/docs/Preconsent.md

Here is an updated script for using Microsoft Graph PowerShell

Connect-MgGraph

$AppId = 'INSERT-APPLICATION-ID-HERE'

$g = Get-MgGroup -All -Filter "displayName eq 'AdminAgents'"
$s = Get-MgServicePrincipal -All -Filter "appId eq '$AppId'"

$params = @{
	"@odata.id" = "https://graph.microsoft.com/v1.0/directoryObjects/$($s.id)"
}

New-MgGroupMemberByRef -GroupId $g.id -BodyParameter $params

Non Partner Scenario

Otherwise, the fastest way to resolve this is to add the servicePrincipal to the tenant. But you will still need to consent to the permissions the application may need to use.

You can build an Admin consent URL and will look something like this…

https://login.microsoftonline.com/common/adminconsent?client_id=INSERT-APPLICATION-ID-HERE

Sign in with a Global Administrator account of the tenant in which you are trying to access resources on.

Using Microsoft Graph PowerShell SDK to manage user consented permissions

The oAuth2PermissionGrant object keeps a record of user consented permissions (Delegated Permissions) in a tenant. There is one OAuth2PermissionGrant object (identified by Consent ID) for each combination of client application, resource application, and user. The sample PowerShell script in this post will perform the following tasks:

  1. Remove all MS Graph Delegated permissions (if any) for the user
  2. Perform user consent for an initial set of MS Graph permission
  3. Update the consented permission list with some additional permissions
  4. Remove some permissions from the consented permission list
  5. Remove (revoke) all consented permissions for the user

Pre-Requisite

This post assumes you already have an app registration created in your tenant and a user you intend to perform consent on.

Note: There might be a short time delay for the permissions to get updated in the portal
[gist id=”9bbae0c0660a83ddf2aadb844b03a454″ file=”OAuth2PermissionGrant.ps1″]

For removing Admin Consented Delegated permission refer to Revoke Admin Consent for a delegated permission on a Service Principal with the MS Graph PowerShell SDK | Azure Active Directory Developer Support Team (aaddevsup.xyz) for more info

Revoke Admin Consent for a delegated permission on a Service Principal with the MS Graph PowerShell SDK

Scenario: You use the Microsoft Graph Explorer tool to test a query. It requires you to consent to a permission so you use your admin account to do this. However, you click the check box to consent for the entire organization… woops! You did not mean to give everyone permissions for “AuditLog.Read.All” so now you need to revoke this permission. The easiest way to revoke consent is to just delete the service principal, however, if there are custom settings or individual consents already applied, then you will lose those as well when the service principal is deleted. What is the solution? Use the Microsoft Graph PowerShell SDK to remove that consented permission from the service principal. This blog post will show you how to revoke permissions using the Microsoft Graph PowerShell SDK. I will use the MS Graph Explorer tool’s service principal as an example however, this technique can be used to revoke permissions for any resource on a Service Principal.

  1. You need to find the service principal in Enterprise Applications blade for your MS Graph Explorer tool. You can find that by going to here after signing in to the portal. Then, in the search box, type in “Graph Explorer” and find the entry that has the Homepage URL of https://developer.microsoft.com/graph/graph-explorer — it will also have the Application ID: de8bc8b5-d9f9-48b1-a8ad-b748da725064. Copy that Object Id to the clipboard.

  2. Enter that object Id in the PowerShell script variable $SPtoRemoveConsentOn as in this image:
  3. Add the app id that owns the permission. For this example, the MS Graph Resource owns the permission that we are removing so that is the variable $resourceAppThatOwnsScope. You can leave that as is for any Microsoft Graph Permission. If you have created your own permission or are removing a permission for a different resoruce, then you will need the app id that owns the permission.
  4. Set the variable $sopeToRemove. For our example, we are removing the scope “AuditLog.Read.All”

That is all that is needed to be set for this example. For the sake of safety, the Update command has been commented out so that you can verify your details before actually executing the script. Once you’re satisfied with the output, you can uncomment the command “Update-MgOauth2PermissionsGrant” to execute the change.

I have included in the script the actual commands that will be ran for each step, so you can compare them with my output. My output ( without running the update ):

You can find my PowerShell script here in my GitHub. Line 42 in the script is the update line that should be uncommented when you’re ready to actually execute the change.

Troubleshooting consent in Azure AD

This is a general guide for troubleshooting consent in Azure AD. It will help resolve majority of the consent related scenarios (Not all of them). In general, the application is trying to sign-in or get an access token for a resource which has not been consented by the user or admin. In general, you want to make sure all of the permissions needed by the application have been consented to.

This article only applies to OpenID Connect and OAuth2 based authentications. SAML based applications which may throw the same type of errors however may have a different solution. Generally, the issue will be inside the SAMLRequest. Either the configuration on the third-party SAML Service Provider or Azure AD does not match.


Overview

You get one of the following similar messages…

  • Need admin approval
  • AADSTS65001: The user or administrator has not consented to use the application with ID ‘{App-Id}’ named ‘{Name-of-App}’. Send an interactive authorization request for this user and resource.
  • AADSTS650056: Misconfigured application. This could be due to one of the following: The client has not listed any permissions for ‘AAD Graph’ in the requested permissions in the client’s application registration. Or, The admin has not consented in the tenant. Or, Check the application identifier in the request to ensure it matches the configured client application identifier. Please contact your admin to fix the configuration or consent on behalf of the tenant.
  • AADSTS90094: An administrator of <tenantDisplayName> has set a policy that prevents you from granting <name of app> the permissions it is requesting. Contact an administrator of <tenantDisplayName>, who can grant permissions to this app on your behalf. 
  • AADSTS90008: The user or administrator has not consented to use the application with ID ‘162841d6-3c61-4676-a2c1-5a9c1e68ccf3’. This happened because application is misconfigured: it must require access to Windows Azure Active Directory by specifying at least ‘Sign in and read user profile’ permission

As you can see from the list above, there are lots of variations of how we basically say, an admin needs to consent to the application.

There are a lot of different reasons for getting a message about admin approval or admin consent is required, or one of the other various messages.

Here are some of the high-level scenarios of what to look for…

  • User.Read permission is missing.
  • User consent is disabled.
  • User Assignment required is enabled.
  • Service principal does not exist in tenant for client app.
  • Service principal does not exist in tenant for resource.
  • Hitting the consent url (prompt=admin_consent & prompt=consent).
  • Scopes requested in sign-in request that have not been consented to yet.
  • The scope/permission requires Admin consent.
  • User Consent Blocked For Risky Apps

Simply adding permissions to an application registration is NOT consenting to the permissions. This is probably the most common mistake. So, what do we mean when we say “consented” to permissions?

Understand Application registrations vs Enterprise applications

In Azure AD, we have an application model that consists of “Application” objects also called “Application registrations” and “ServicePrincipal” objects also called “Enterprise applications” and how their relationship works together based on the required permissions set up on the Application object.

To learn more about that relationship, review the following article…

https://docs.microsoft.com/en-us/azure/active-directory/develop/app-objects-and-service-principals

Assigning permissions to the ServicePrincipal object is what defines when we say “consented” to.

Understand Delegated permissions vs Application permissions

There are two types of permissions: Delegated and Application permissions.

To learn more about permissions in Azure AD, review the following articles…

You need to make sure you apply the correct permission configuration in the Application registration and consent to that permission.

Understand the Azure Active Directory Consent Framework model

There is a reason why we are asking for consent. In most cases, the sign-in request or based on the application configuration, something has not been consented to yet that requires consent. Understand our consent framework…


Make sure the Application has the permission to allow a user to sign in. (I.e. User.Read permission)

First and foremost before we go into any troubleshooting, lets make sure your app allows users to sign in.

If you own the Application registration, at minimum, any application where you expect a user to sign in, you should at least have the Microsoft Graph “User.Read” or “Openid” Delegated permission added to the Application registrations API Permissions and the permission has been consented to…


Troubleshooting

I suppose that’s enough of concepts and theory. Let’s start with the troubleshooting.

Step 1: Get the sign-in request sent to Azure AD.

Based on the parameters being passed to Azure AD, we can start figuring out why the consent screen is being prompted and why it is failing.

First, we need to understand the request sent to Azure AD.

A sign-in request looks something like this…

Azure AD V1 OAuth2 endpoint:

https://{Aad-Instance}/{Tenant-Id}/oauth2/authorize?client_id={App-Id}&response_type=code&redirect_uri={redirect-uri}&resource={App-URI-Id}&scope={Scope}&prompt={Prompt}

Or

Azure AD V2 OAuth2 endpoint:

https://{Aad-Instance}/{Tenant-Id}/oauth2/v2.0/authorize?client_id={App-Id}&response_type=code&redirect_uri={redirect-uri}& scope={Scope}&prompt={Prompt}

If you’re not sure how to get this or see this sign-in request…

  • If you’re using a browser, look at the address bar
  • If you’re not using a browser or still can’t see the address bar in the browser, then a HTTP capture tool like Fiddler will be required.

If you just want to skip finding the root cause and go straight to resolving the issue, go to Step: Perform admin consent.

Here is a quick table for you to use and track the information obtained from the sign-in request.

PropertySign-in request portionValue
Aad-Instance{Aad-Instance}
Tenant-Id{Tenant-Id} portion of the sign-in request 
App-Id{App-Id} portion of the sign-in request 
Scope{Scope} portion of the sign-in request 
App-URI-Id{App-URI-Id} portion of the sign-in request 
Prompt{Prompt} portion of the sign-in request 

For example, your table might look like this…

PropertySign-in request portionValue
Aad-Instance{Aad-Instance}login.microsoftonline.com
Tenant-Id{Tenant-Id} portion of the sign-in requestcommon
App-Id{App-Id} portion of the sign-in request1f92960d-1442-4cd2-8c76-d13c5dcb30bf
Scope{Scope} portion of the sign-in requestOpenid+User.Read+Directory.Read.All
App-URI-IdV1 endpoint: {App-URI-Id} portion of the sign-in request   V2 endpoint: For resources other than Microsoft Graph, this would be the portion before the scope name. For example… https://analysis.windows.net/powerbi/api/App.Read.All App.Read.All is the scope name so the App-Uri-Id is https://analysis.windows.net/powerbi/apihttps://graph.microsoft.com
Prompt{Prompt} portion of the sign-in request 

The information obtained from this sign-in request will be used throughout the troubleshooting steps. I will reference them like this…

{App-Id} from the table above.

Step 2: Do you allow users to consent?

First check if User consent is allowed in your organization…

  1. Sign in to the Azure portal @ https://portal.azure.com
  2. Go to Azure Active Directory
  3. Go to Enterprise applications
  4. Go to User settings
  5. Review “Users can consent to apps accessing company data on their behalf
    1. If “Yes” is selected, then users can consent to permissions which do not require Admin consent. Move on to the next step.
    2. If “No” is selected, Users will always get the “Need admin approval” message. An admin must perform admin consent.
      Go to Step: Perform admin consent
    Note: If an admin believes he has already consented to these permissions, most likely either not all of the required permissions listed in the sign-in request were consented to or the wrong application was used based on the {App-Id} from the table above.
  • Step 3 will cover the App-Id in more detail.
  • Step 4 will cover the permissions in more detail.

Step 3: Verify the application being used.

Verify if the application exists in the tenant.

  1. Sign in to the Azure portal @ https://portal.azure.com
  2. Ensure you switch to the correct tenant based on the {Tenant-Id} from the table above.
  3. Go to Enterprise applications.
  4. Switch Application Type to All Applications and search for the {App-Id} from the table above.
  5. If the application is not found, this would be the cause of you getting the consent messages. Go ahead and skip to Step: Perform admin consent.

If the application is found, go to the next step.

Step 4: User assignment required

While in the Enterprise application, go to Properties and review the User assignment required setting.

If user assignment is required, an admin must consent to this application. Go to Step: Perform admin consent.

If user assignment is not required, go to next step.

There is always confusion that when you consent to an application for all users in the organization that this will allow all users to access the application. This is not true; we will still follow the user assignment rules. Only those users assigned to the application can access it.

Otherwise, if you really do not want to perform admin consent, then the only other option would be to turn off user assignment required, have the user consent when they access the application, and turn user assignment required back on.

Step 5: Verify the permissions.

Let’s next verify that the scopes (or also called permissions) in the sign-in request are listed in the permissions section of the Enterprise App…

  1. If the application is found from the step above (Step 3), go ahead and select that application.
  2. Go to permissions…
  3. Compare what is listed on the permissions page and what is listed as {Scope} from the table above in the sign-in request. The permissions listed on this page are the permissions that have been consented.Note: Pay extra attention to the permission type. Keep in mind that Delegated permissions are for when users sign in and Application permissions are for when the service principal is used to authenticate via the client credential flow. Note: OpenID Connect scopes are generally not listed in the Enterprise application. Don’t worry if the following are not listed…
  • Openid: Sign users in
  • Email: View users’ email address
  • Profile: View users’ basic profile
  • Offline_access: Maintain access to data you have given it access to

Note: if {Scope} from table above is blank or contains less than what is listed on the permissions page, go ahead to the next step.

If there are other scopes in {Scope} from the table above that are not on the permissions page, then go to Step: Perform admin consent. These missing permissions still need to be consented.

Step 6: Verify the resource exists in your tenant.

Easiest way to do this is generate a request that looks like this…

https://{Aad-Instance}/{Tenant-Id}/oauth2/authorize?response_type=code&client_id={App-Id}&resource={App-Uri-id}

You might get one of 4 behaviors…

  • You will be allowed to sign-in (This is the behavior you want to see) Your good to go to next step. In most cases, if you see the “code” parameter in the address bar, this means authentication piece was successful.
  • AADSTS650052: The app needs access to a service (\”https://api.contosocloud.williamfiddes.onmicrosoft.com\”) that your organization \”mycloude5.onmicrosoft.com\” has not subscribed to or enabled. Contact your IT Admin to review the configuration of your service subscriptions.   This means the resource does not exist in your organization. To resolve this, use the following consent URL… https://login.microsoftonline.com/{Tenant-Id}/oauth2/authorize?response_type=code&client_id={App-Uri-id}&prompt=admin_consent
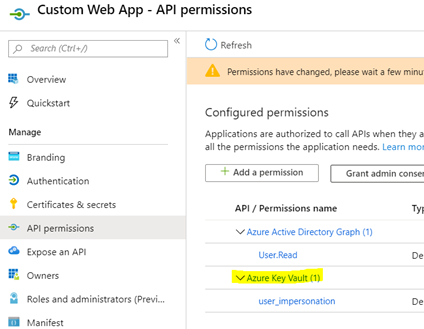
  • AADSTS650057: Invalid resource. The client has requested access to a resource which is not listed in the requested permissions in the client’s application registration. Client app ID: {App-Id}({App-Display-Name}). Resource value from request: ‘{App-Uri-Id}‘. Resource app ID:{Resource-App-Id}. List of valid resources from app registration: 00000002-0000-0000-c000-000000000000 In order for a client application to sign-in and get an access token for a resource, that resource must be assigned to the client applications required API permissions… For example, for a client application to access Azure Key Vault…
    Only the application owner can do this.
  • AADSTS500011: The resource principal named ‘{App-Uri-Id}‘ was not found in the tenant named ‘{Tenant-Id}‘. This can happen if the application has not been installed by the administrator of the tenant or consented to by any user in the tenant. You might have sent your authentication request to the wrong tenant.This means either the {App-Uri-Id} specified is not valid at all or is only available as a single tenant application. Otherwise meaning this resource can not be accessed by external organizations or does not exist. You will need to work with the application owner. You will need to verify that {App-Uri-Id} and {Tenant-Id} is correct. If the {App-Uri-Id} is owned by a different {Tenant-Id} then the app registration for {App-Uri-Id} must be set up as a multi-tenant application. Otherwise the {Tenant-Id} must be the same tenant as where the app registration for {App-Uri-Id} is located.

Step 7: Verify if the prompt parameter is being passed.

Sometimes, the way in which your signing into the application is always passing the prompt parameter of consent or admin_consent. Once the application has been consented to, make sure the prompt parameter is not specified. Otherwise, your users might always get the consent error.

You sign-in request might look something like this…

https://login.microsoftonline.com/contoso.onmicrosoft.com/oauth2/authorize?client_id=1f92960d-1442-4cd2-8c76-d13c5dcb30bf&response_type=code&redirect_uri=https://www.contoso.com&scope=openid+profile+User.Read+Directory.Read.All&prompt=consent

So simply remove the prompt parameter and now it should look something like this…

https://login.microsoftonline.com/contoso.onmicrosoft.com/oauth2/authorize?client_id=1f92960d-1442-4cd2-8c76-d13c5dcb30bf&response_type=code&redirect_uri=https://www.contoso.com&scope=openid+profile+User.Read+Directory.Read.All

Step: Perform admin consent.

  1. Have the admin (user with the Global/Company administrator role or a Application Administrator role) access the application normally.
  2. When the consent screen appears, review the request permissions.
    Note: If an admin is not sure what the permissions allow, then the admin must work with the application vendor to understand the permissions and what they are used for. Microsoft support may not know what these permissions do or why the permissions are needed.
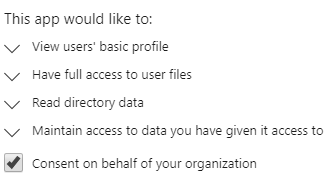
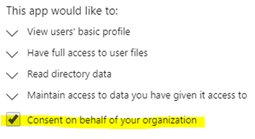
  3. If the admin approves the permissions requested, ensure the checkbox is selected to “Consent on behalf of your organization”  

Step: Force Admin Consent

If the admin does not get the consent screen,

Remember step 1? Grab that sign-in address and add &prompt=consent

So, for example, the sign-in request the admin should use will look something like this…

https://login.microsoftonline.com/contoso.onmicrosoft.com/oauth2/authorize?client_id=1f92960d-1442-4cd2-8c76-d13c5dcb30bf&response_type=code&redirect_uri=https://www.contoso.com&scope=openid+profile&tresource=https://graph.microsoft.com&prompt=consent

If the permissions needed are not in the application registration, then the V2 endpoint can be used… (V2 endpoint requires each permission scope to be passed in the scope parameter)

https://login.microsoftonline.com/contoso.onmicrosoft.com/oauth2/v2.0/authorize?client_id=1f92960d-1442-4cd2-8c76-d13c5dcb30bf&response_type=code&redirect_uri=https://www.contoso.com&scope=openid+profile+User.Read+Directory.Read.All&prompt=consent

Permission scopes used by the application must be provided by the application owner.


Other tips

  • Consent for Application permissions will always require admin consent from a Global/Company administrator. Application permissions must be added within the application registration on the applications owning tenant.
  • Application admins can also consent to Delegate permissions which require admin consent.
  • When using the adminconsent URL, the permissions must already be configured with the application registration. Otherwise meaning, the application owner must have their application correctly configured with Azure AD. adminconsent URL looks something like this… https://login.microsoftonline.com/{Tenat-Id}/adminconsent?client_id={App-Id}

For more information about troubleshooting consent issues…

You can use the Azure AD Audit logs to get more details…

  1. Sign in to the Azure Portal @ https://portal.azure.com (Use a account that has permission to read Audit logs. Like a Global Admin or Security Reader).
  2. Go to Azure Active Directory.
  3. Go to Audit logs.
  4. Set your filter to…
    1. Category: ApplicationManagement
    2. Status: Failure
    3. Activity: Consent to application
  5. Find and select the app that’s failing to consent.
  6. Observe the STATUS REASON. This might give you more details. For certain scenarios like “Microsoft.Online.Security.UserConsentBlockedForRiskyAppsException” will require you to perform a Admin consent even though you may allow users to consent and the permission normally does not require an admin to consent.

For more information, see the following…

https://docs.microsoft.com/en-us/azure/active-directory/manage-apps/application-sign-in-unexpected-user-consent-error#requesting-not-authorized-permissions-error

https://docs.microsoft.com/en-us/azure/active-directory/manage-apps/application-sign-in-unexpected-user-consent-prompt

receiving error AADSTS50105: The signed in user ‘{EmailHidden}’ is not assigned to a role for the application

Problem:

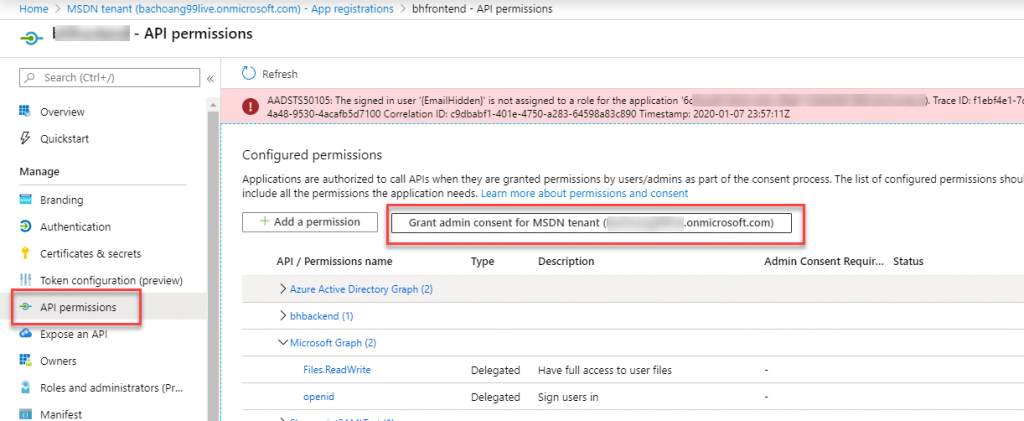
A tenant admin may receive the error “AADSTS50105: The signed in user ‘{EmailHidden}’ is not assigned to a role for the application…” when clicking on the “Grant Admin Consent” button in Azure AD’s App Registration portal as shown in the screen shot below:

Why is this happening?

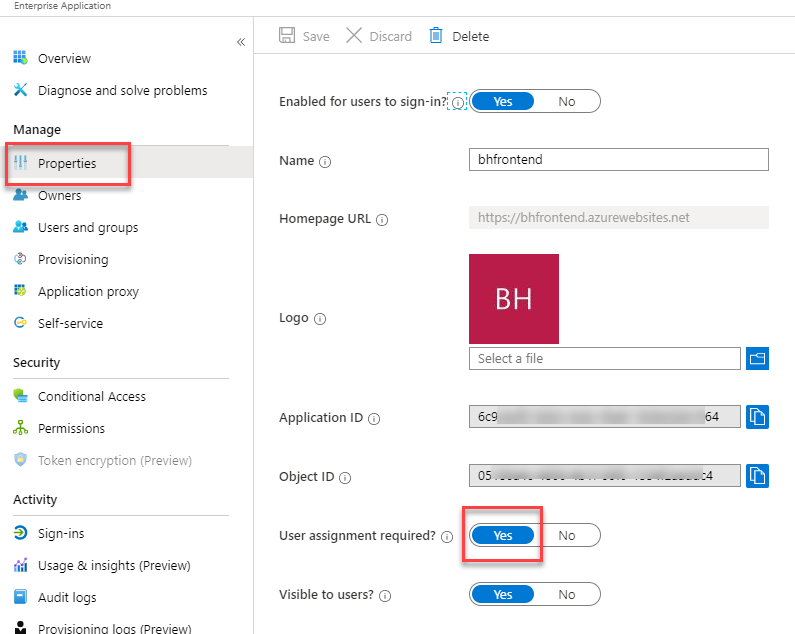
This error typically happens when the Enterprise Application portion (or Service Principal) of the registered application has the setting ‘User Assignment Required’ set to Yes

So how do I resolve this issue?

You can follow the steps below to work around this issue:

  1. Change the ‘User assignment required’ to No and save the change
  2. Go back to the App Registration portal and perform Granting Admin consent to the application. It should work this time
  3. Set the ‘User assignment required’ back to Yes again

AADSTS650056: Misconfigured application. This could be due to one of the following: The client has not listed any permissions for ‘AAD Graph’ in the requested permissions in the client’s application registration.

Let’s get started…

You are getting the following similar message…

AADSTS650056: Misconfigured application. This could be due to one of the following: The client has not listed any permissions for ‘AAD Graph’ in the requested permissions in the client’s application registration. Or, The admin has not consented in the tenant. Or, Check the application identifier in the request to ensure it matches the configured client application identifier. Please contact your admin to fix the configuration or consent on behalf of the tenant.


Ensure you are accessing the application from the sign-in address provided by the application owner. Otherwise meaning, sign in to the application through its normal process. In most cases this will auto-resolve naturally. If it doesn’t, then this post can help troubleshoot and resolve it.


If your organization owns the application (meaing the application registration is in your organization)…

At minimum, we do recommended the User.Read or openid delegated permission from Microsoft Graph is added.

Ensure the application and all of its permissions are consented to. You can verify this by looking at the Status column of the Application registration within API Permissions. For example, this User.Read permission has not been consented to yet…

If it is successfully consented, then it will look something like this…

For application owners developing a Multi-tenant application, you will make your customers lives much easier when consenting to your application when you can add the User.Read delegated permission in addition to your other permission requirements.

In some scenarios, the application might be third-party however it may be registered in your organization. Confirm if this application is listed in your App registrations (Not Enterprise applications).

If you continue to see this error message. Then you may need to build the consent URL described below.


If your organization is not the application owner and using it as a third-party application…

If you’re the Global/Company administrator, you should see the consent screen. Make sure you check the box for “Consent on behalf of your organization

If you don’t see the consent screen, delete the Enterprise application, and try again.

For example…

If you continue to see this error message. Then you may need to build the consent URL described below.


Manually build the consent URL to be used.

If the application is designed to access a specific resource, you may not be able to use the Consent buttons from the Azure portal, you will need to manually generate your own consent URL and use this.

When using our authorization V1 endpoint, it will look something like this…

https://login.microsoftonline.com/{Tenant-Id}/oauth2/authorize
?response_type=code
&client_id={App-Id}
&resource={App-Uri-Id}
&scope=openid
&prompt=consent

For example…

https://login.microsoftonline.com/contoso.onmicrosoft.com/oauth2/authorize
?response_type=code
&client_id=044abcc4-914c-4444-9c3f-48cc3140b6b4
&resource=https://vault.azure.net/
&scope=openid
&prompt=consent

When using our authorization V2 endpoint, it will look something like this…

https://login.microsoftonline.com/{Tenant-Id}/oauth2/v2.0/authorize
?response_type=code
&client_id={App-Id}
&scope=openid+{App-Uri-Id}/{Scope-Name}
&prompt=consent

For example…

https://login.microsoftonline.com/contoso.onmicrosoft.com/oauth2/v2.0/authorize
?response_type=code
&client_id=044abcc4-914c-4444-9c3f-48cc3140b6b4
&scope=openid+https://vault.azure.net/user_impersonation
&prompt=consent

If the application is accessing itself for the resource, then the {App-Id} and {App-Uri-Id} will be the same.

You will need to get the {App-Id} and the {App-Uri-Id} from the application owner. {Tenant-Id} will be your tenant identifier. This will either be yourdomain.onmicrosoft.com or your directory ID…