Walkthrough: how to retrieve an Azure Key Vault secret from an Azure Function App using client credentials flow with certificate

Introduction:

This post builds on the information from the previous post and I will assume that you already have an Azure Key Vault, an AAD Application registration, and a certificate file. We will cover the following steps in this blog in order to use a certificate from an Azure Function App:

  1. Create an Azure Function App
  2. Upload the certificate to the Function App
  3. Configure the Function App to load certificate file
  4. Create an Azure Function to consume the certificate

Create an Azure Function App

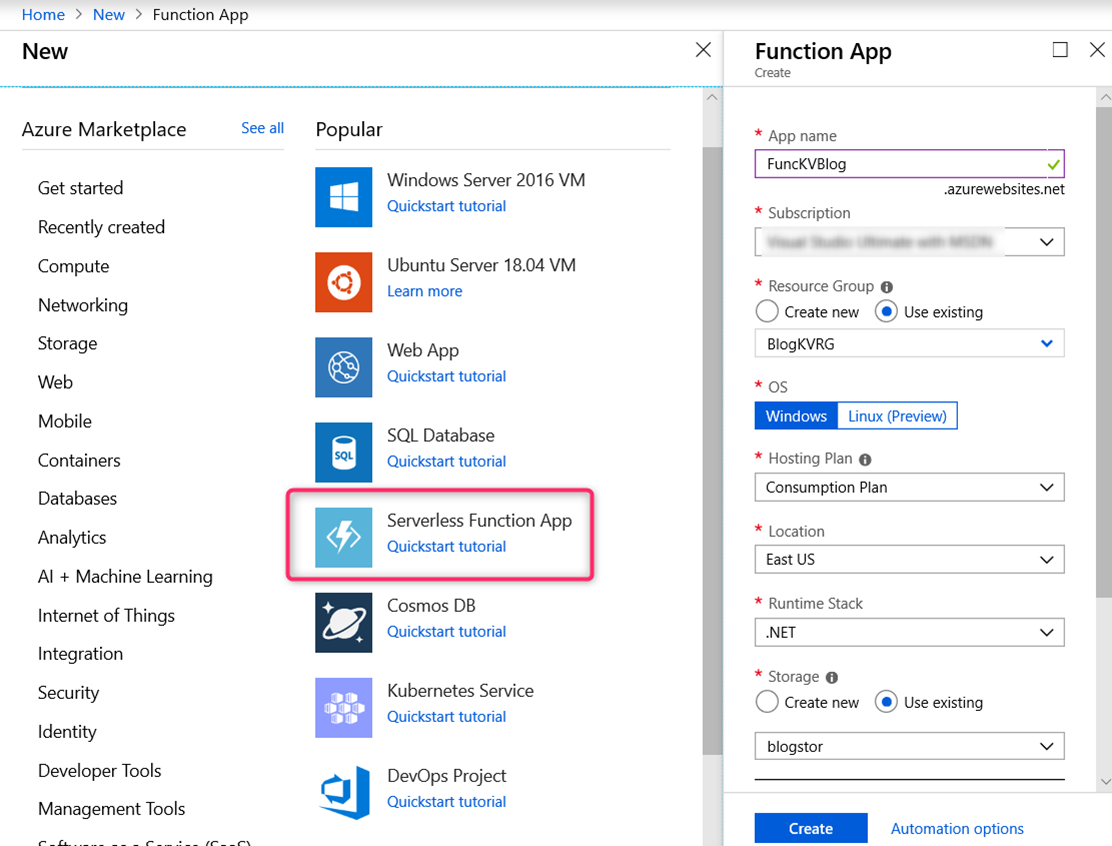
From the Azure Market Place in the Azure portal, create an Azure Function App. The Hosting Plan can either be Consumption Plan or App Service Plan.
Upload the certificate to the Azure Function App

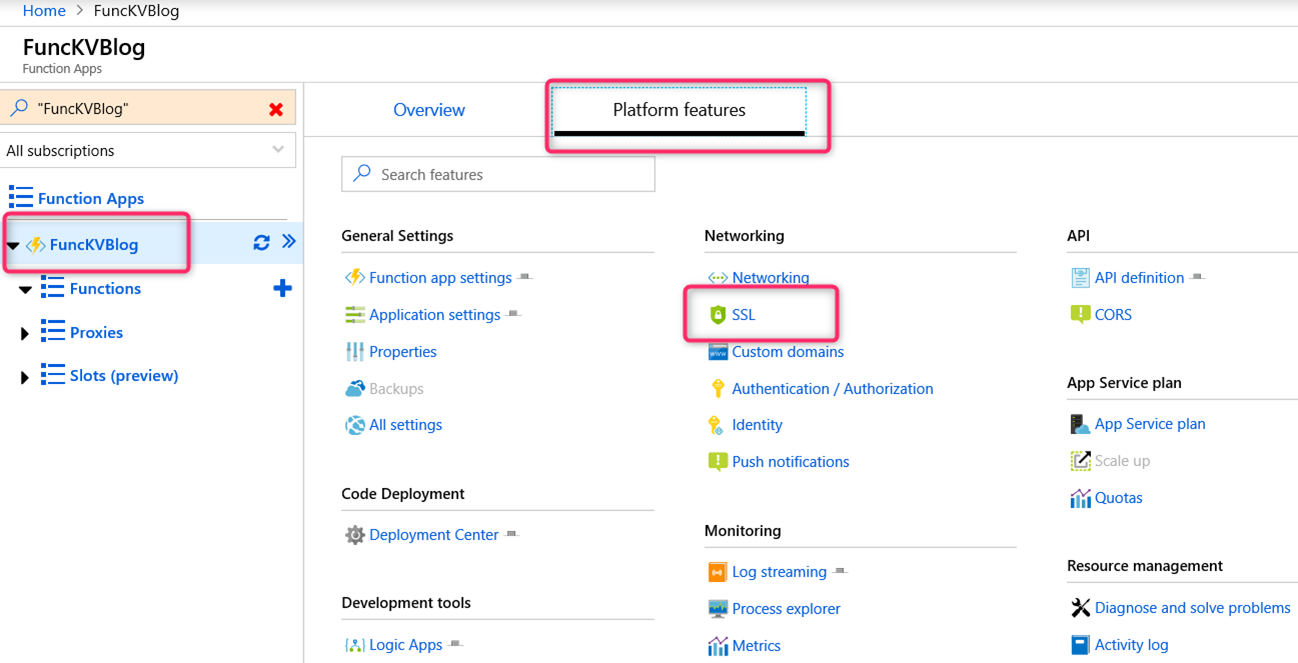
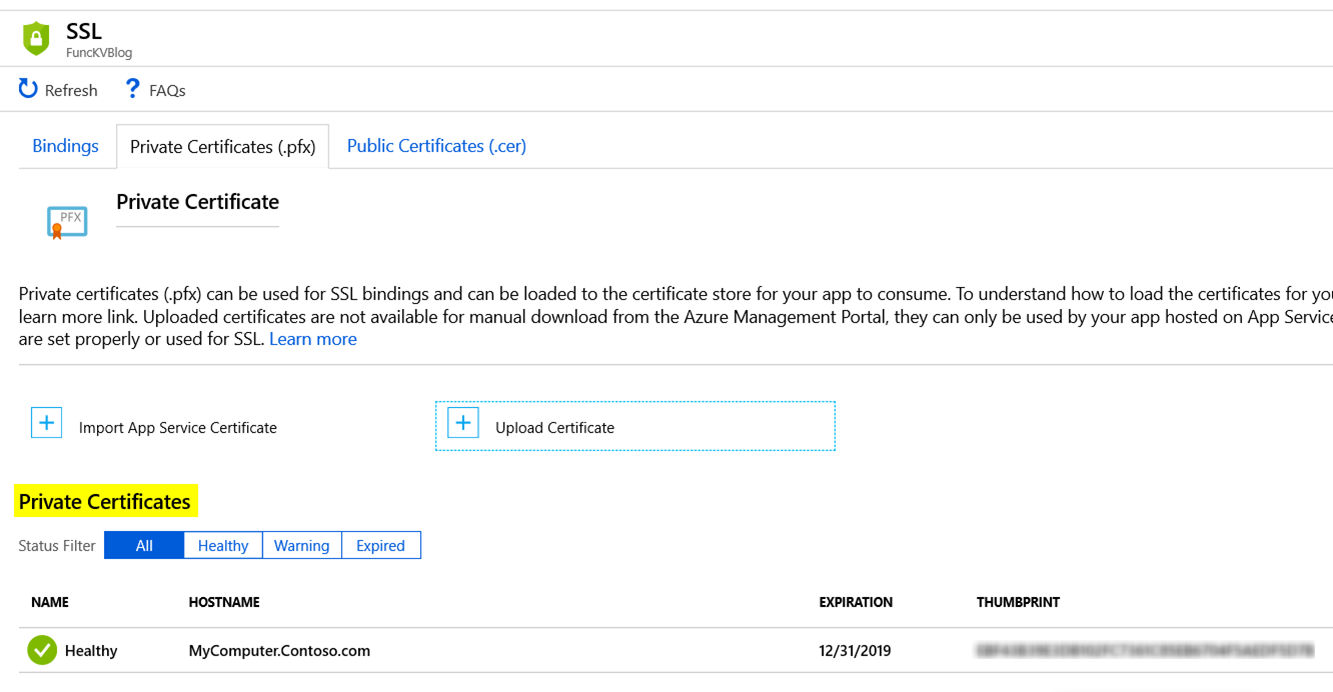
Go to the Function App resource we just created => click on Platform features tab => click on SSL link
From the SSL blade => click on Private Certificates (.pfx) tab => click the Upload Certificate link
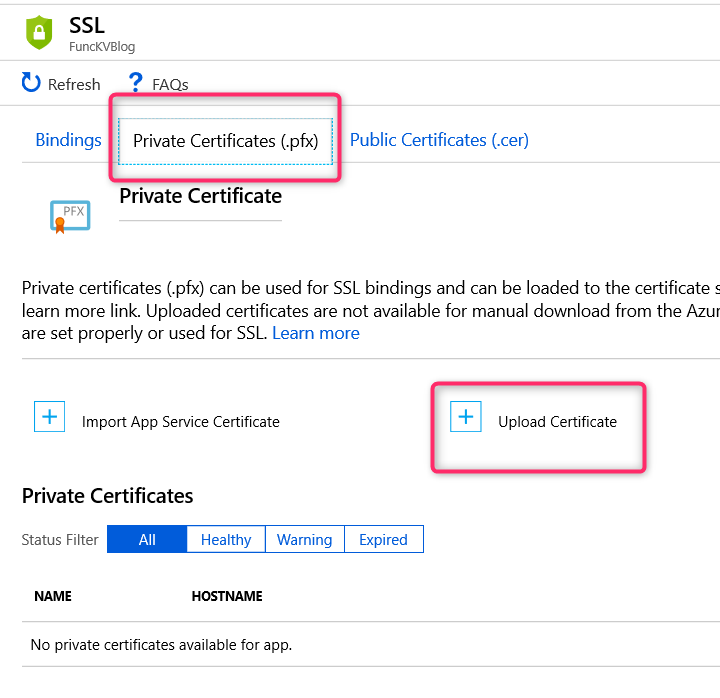
Go through the Certificate Upload wizard to provide a pfx file and password. Once the upload is complete, the certificate info should appear under the Private Certificate section
Configure the Function App to load the certificate

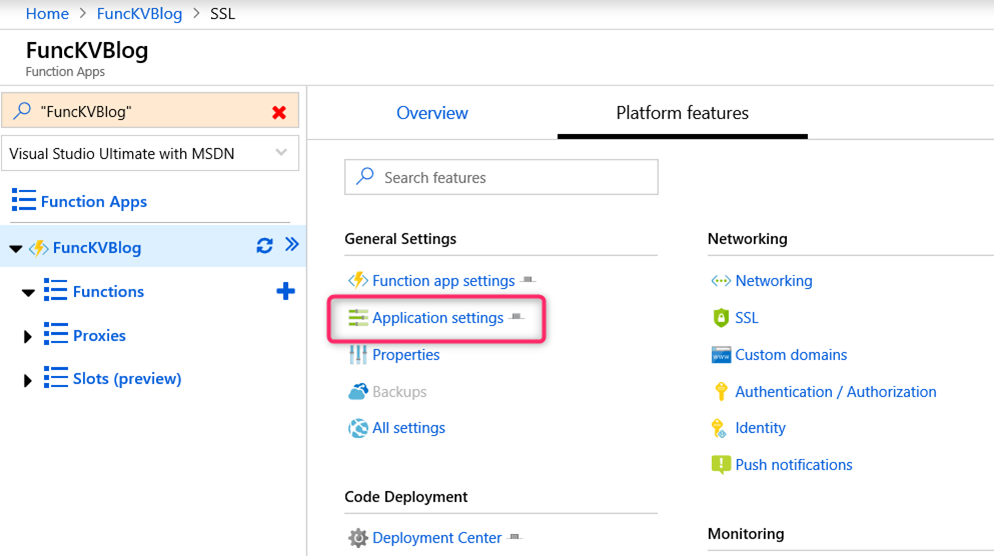
From the Function App blade, click on the Application settings link under the Platform features tab
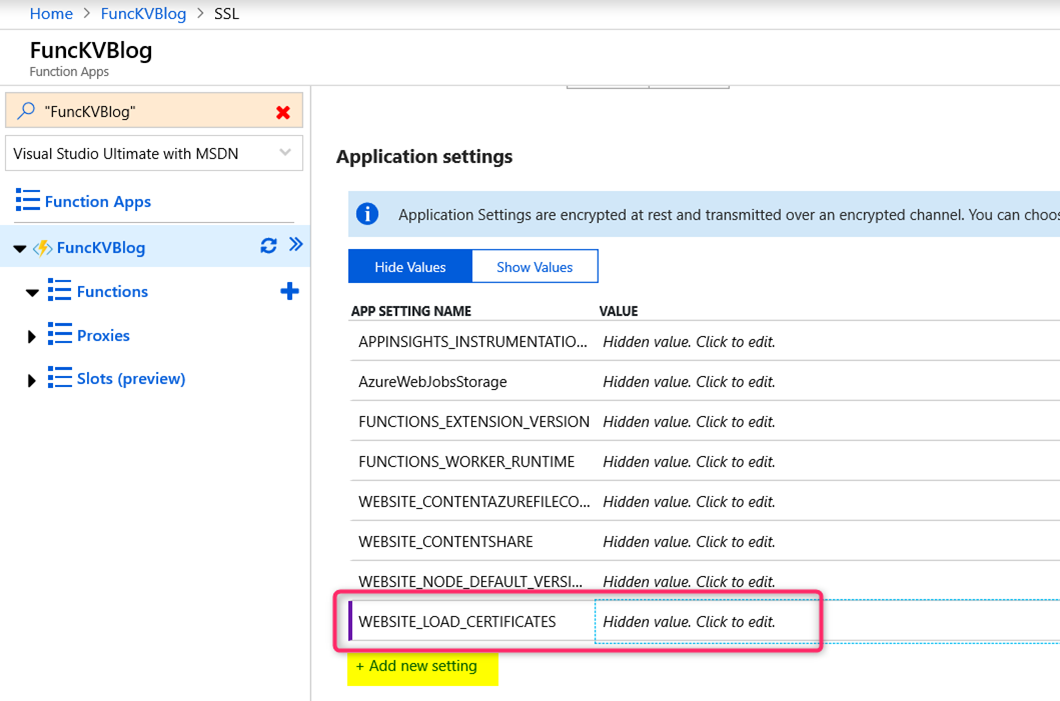
Under Application settings section, add a new setting called WEBSITE_LOAD_CERTIFICATES and set the value to be the certificate thumbprint. Click on Save button to save the new setting
Create an Azure Function

From Visual Studio 2017, create a new Azure Functions project. If you don’t see the “Azure Functions” template, you may need to install “Azure Functions and Web Jobs Tools” extension. See https://docs.microsoft.com/en-us/azure/azure-functions/functions-develop-vs for more info.
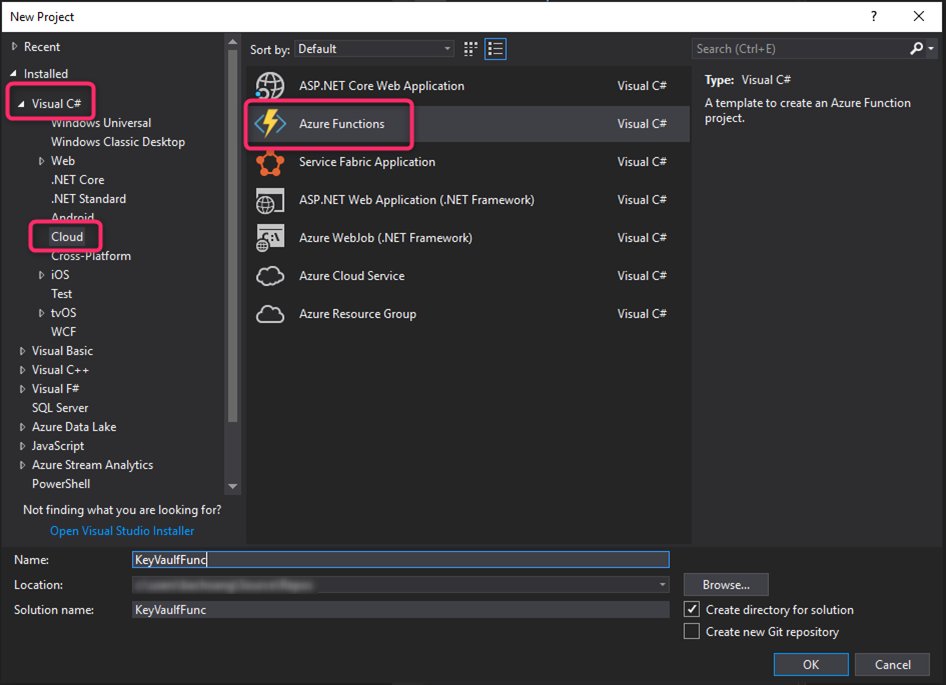
For the Function trigger, I just choose Timer trigger for the purpose of this blog. You an choose any trigger you like. Trigger is just a mean to invoke an Azure Function. If you have a storage account then go ahead and configure the storage account for the Function under Storage Account setting. The schedule setting uses CRON expression to define a timer schedule for the Function App. The prepopulated expression 0 */5 * * * * means that the Function is invoked every 5 minutes.
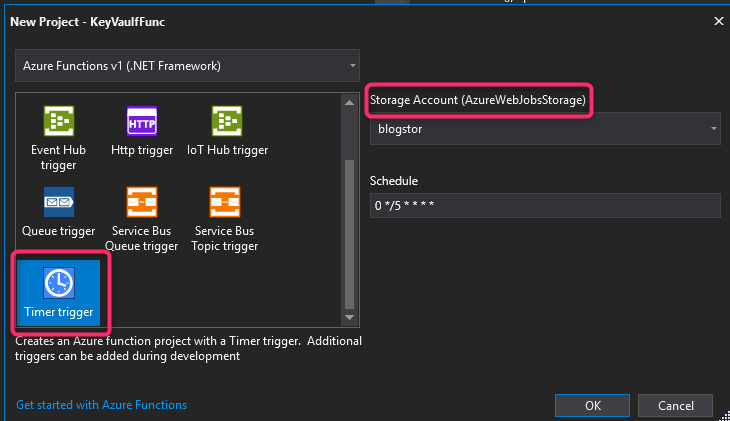
Now we need to write the code for this Function:

  1. Install the following Nuget packages from the Package Manager Console:

Install-Package Microsoft.IdentityModel.Clients.ActiveDirectory

Install-Package Microsoft.Azure.KeyVault

  1. Replace the code in Function1.cs with the following code:

[gist id=”069082b4a4a2df7b0e3f9ef4ccf4498b” file=”Function1.cs”]

  1. Build and publish this Azure Function to our Azure Function App by right-click on the Project name and select “Publish…”

    Note: If you have not done this already, make sure you log into Visual Studio with your Azure AD account.
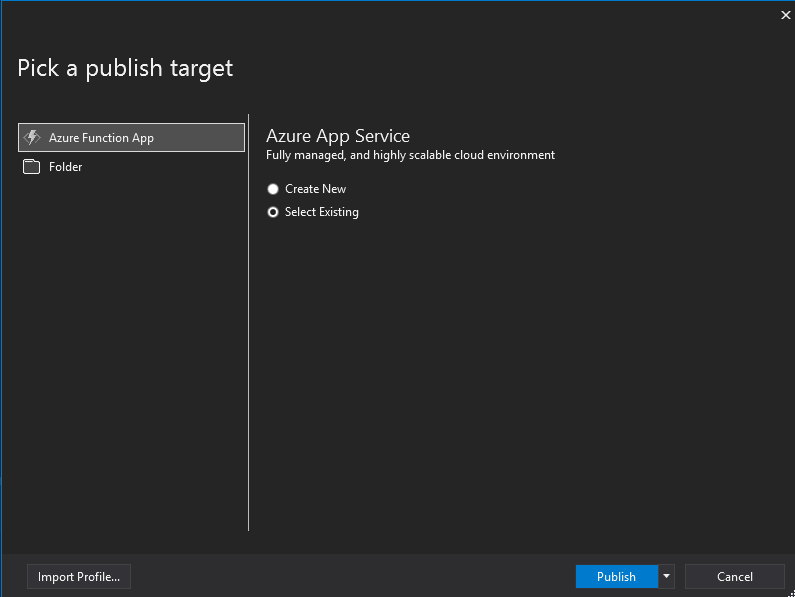

Select the target to be our existing Azure Function App and click “Publish”
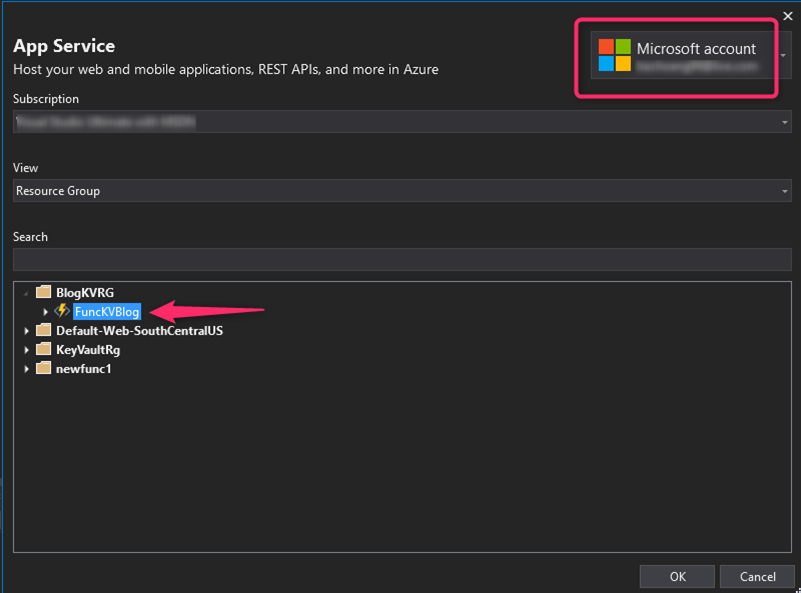
Select the right Azure Function App under the right Resource Group and click OK to publish

Once the publishing is finished, we should see our Function 1 appearing in the Azure portal. You can click on the “Run” button to see the output in the Logs section at the bottom.
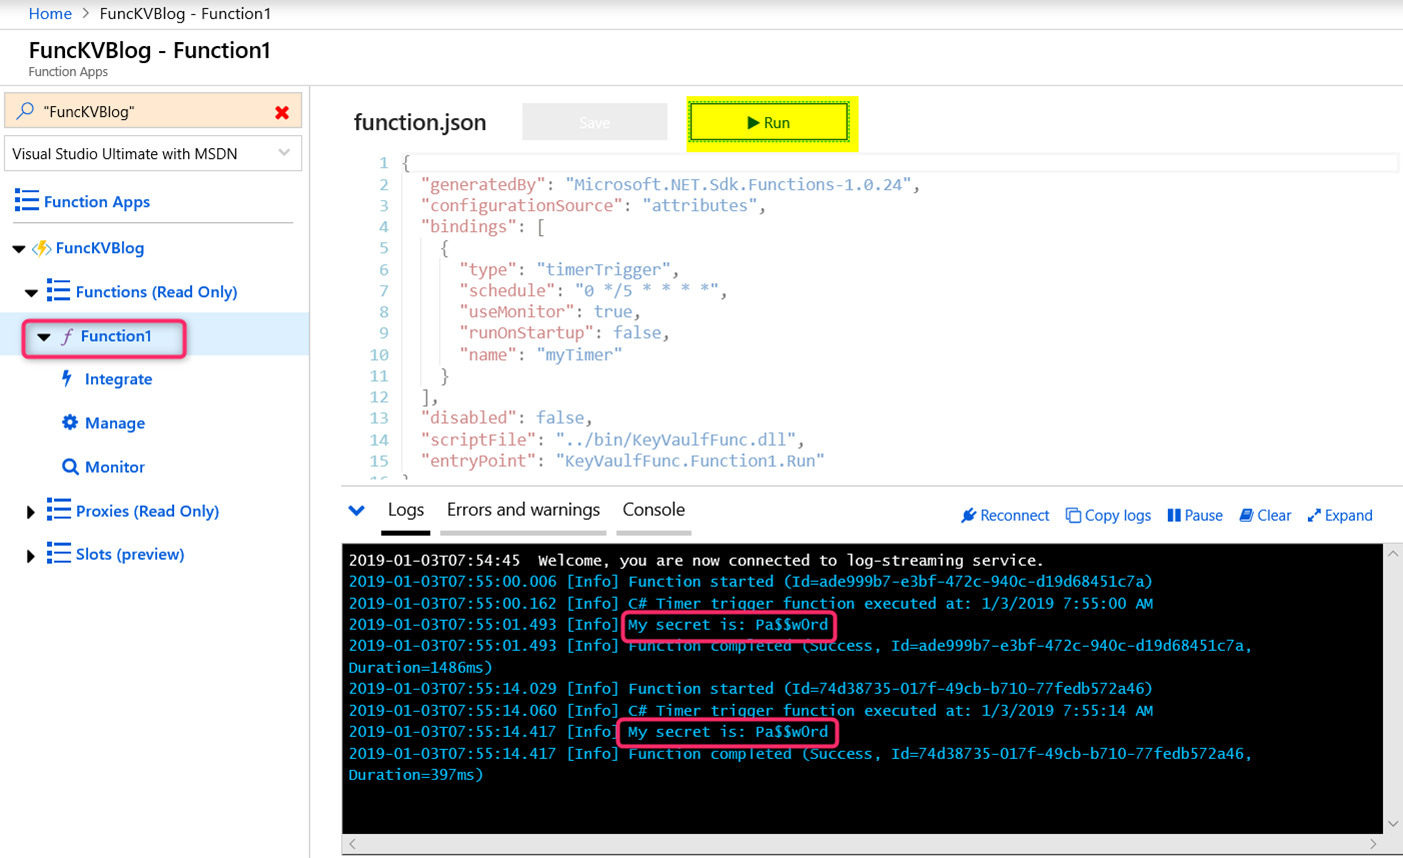
References

https://docs.microsoft.com/en-us/azure/azure-functions/functions-develop-vs

https://azure.microsoft.com/en-us/blog/using-certificates-in-azure-websites-applications/
Walkthrough: how to retrieve an Azure Key Vault secret from a console app using client credentials flow with certificate

Introduction

This is a code walkthrough to show you how to create a .Net console application to authenticate to Azure Active Directory using OAuth2 Client Credentials flow to get an access token to Azure Key Vault. It then uses the access token to call Azure Key Vault to get a secret. The following steps will be performed in this post:

  1. Create an Azure Key Vault
  2. Create a new self-signed certificate to use in client credentials flow
  3. Create a new Application Registration
  4. Create a new console app to retrieve a secret from Azure Key Vault

Create an Azure Key Vault

You can create an Azure Key Vault from the Azure portal if you don’t have one already. Refer to https://docs.microsoft.com/en-us/azure/key-vault/key-vault-get-started for more info. I use the Powershell script below to create a new Azure Key Vault and then set a new secret.

[gist id=”f712488ddd72ab9eed7c6b0e2115ce61″ file=”CreateKeyVault.ps1″]

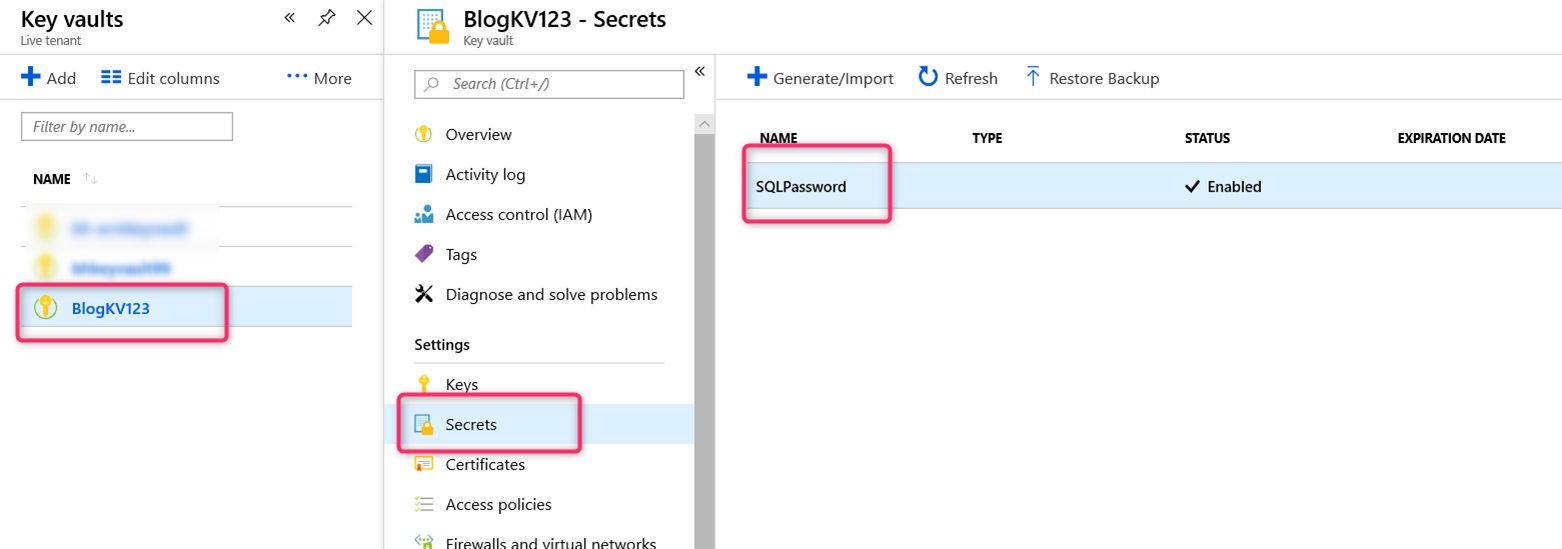
The above script creates an Azure Key Vault called BlogKV123 with a secret called SQLPassword:

Create a new self-signed certificate

I use the Powershell script below to create a new exportable self-signed certificate. See https://docs.microsoft.com/en-us/azure/key-vault/key-vault-use-from-web-application for more info.

[gist id=”e5f4671e35a97f3b3e8a579b9a2c05b9″ file=”CreateSelfSignedCert.ps1″]

Create a new Application Registration

We need to create a new Application Registration in the Azure Active Directory’s App Registration blade and then upload the certificate cer file created above to the Keys section of the Application. In addition, we also need to give our Application (really its Service Principal) access permission to the Azure Key Vault to read its secret info. I use the following Powershell script from https://docs.microsoft.com/en-us/azure/key-vault/key-vault-use-from-web-application to do this.. Take note of the certificate thumbprint output below as you will need it later for the application code.

[gist id=”c5a8c49ed9e831e98925e25cf3b2ffd7″ file=”CreateAADAppwithKeyVault.ps1″]

The script above should create a “Web app / API” Application type and upload the certificate file to the Application in the Keys => Public Keys section as in the screen shot below.  The thumbprint info should match the output above in the Powershell console.

Take note of the Application ID and the thumbprint as you will use it in your console app later.

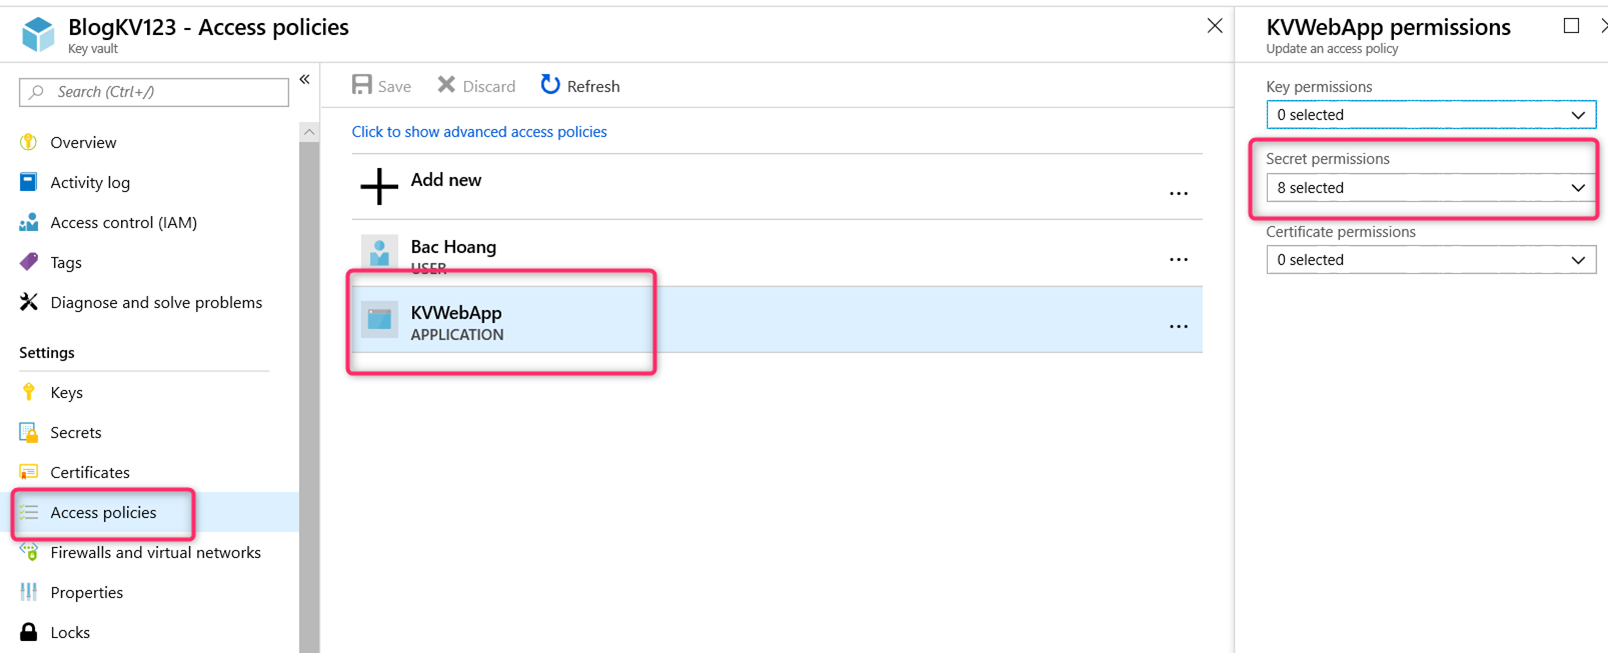
Over in the Azure Key Vault blade, you should see the Service Principal for our Application listed in the Access policies section with all the given secret operation permission

Create a Console Application

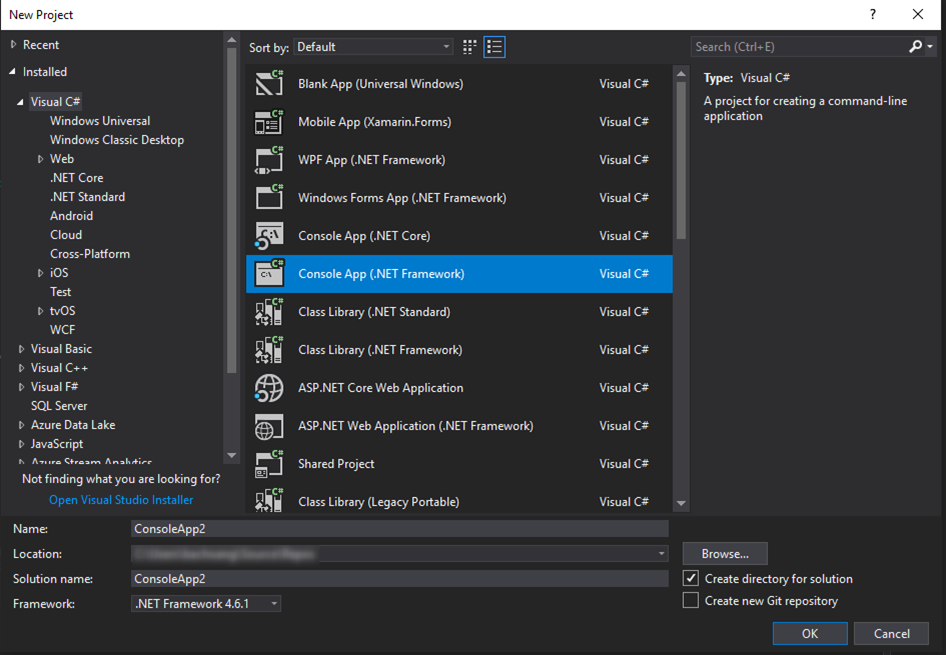
  1. From Visual Studio 2017 Create a new .Net console app:

  1. Install the following Nuget packages from the Package Manager Console:

Install-Package Microsoft.IdentityModel.Clients.ActiveDirectory

Install-Package Microsoft.Azure.KeyVault

  1. Replace the code in Program.cs with the following code (Use both the Application ID and the certificate thumbprint from above on line 14 and 15 respectively):

[gist id=”8e986c31c71da41d696ac4d4b175df2a” file=”Program.cs”  ]

  1. Run the application and you should get the output ‘Pa$$w0rd’ printed out.

References:

https://docs.microsoft.com/en-us/azure/key-vault/key-vault-get-started

https://www.rahulpnath.com/blog/authenticating-a-client-application-with-azure-key-vault/

https://docs.microsoft.com/en-us/azure/key-vault/key-vault-use-from-web-application

Using Postman to Call the Microsoft Graph API Using Client Credentials

Introduction

This blog post is to help users stand up an Azure Active Directory Application Registration, explain what permissions will be needed to added to the AAD Application Registration, how to make rest calls to get an access token, and then finally call the Microsoft Graph API to do whatever call you would like to do.


Please note, that not all permissions are going to be within Azure. i.e. If you are making a Microsoft Graph call to Outlook and would like access to a calendar using a delegated permission, and the user making the call doesn’t have access to said calendar, the call still will not work as the user does not have access to the calendar.


Also Please note that there are two different versions of the Graph API, the Azure Active Directory Graph API and the Microsoft Graph API.

In addition to that, note that the Microsoft Graph API has two endpoints right now, the beta endpoint and the V1 endpoint, do not confuse this with the v1 and v2 endpoints for Azure portal as the azure v1 and v2 endpoints are not related to the Microsoft Graph’s v1 and beta endpoints.


Setting Up the AAD Application

The first step to getting access to the Microsoft Graph REST API is to setup an AAD Application Registration.

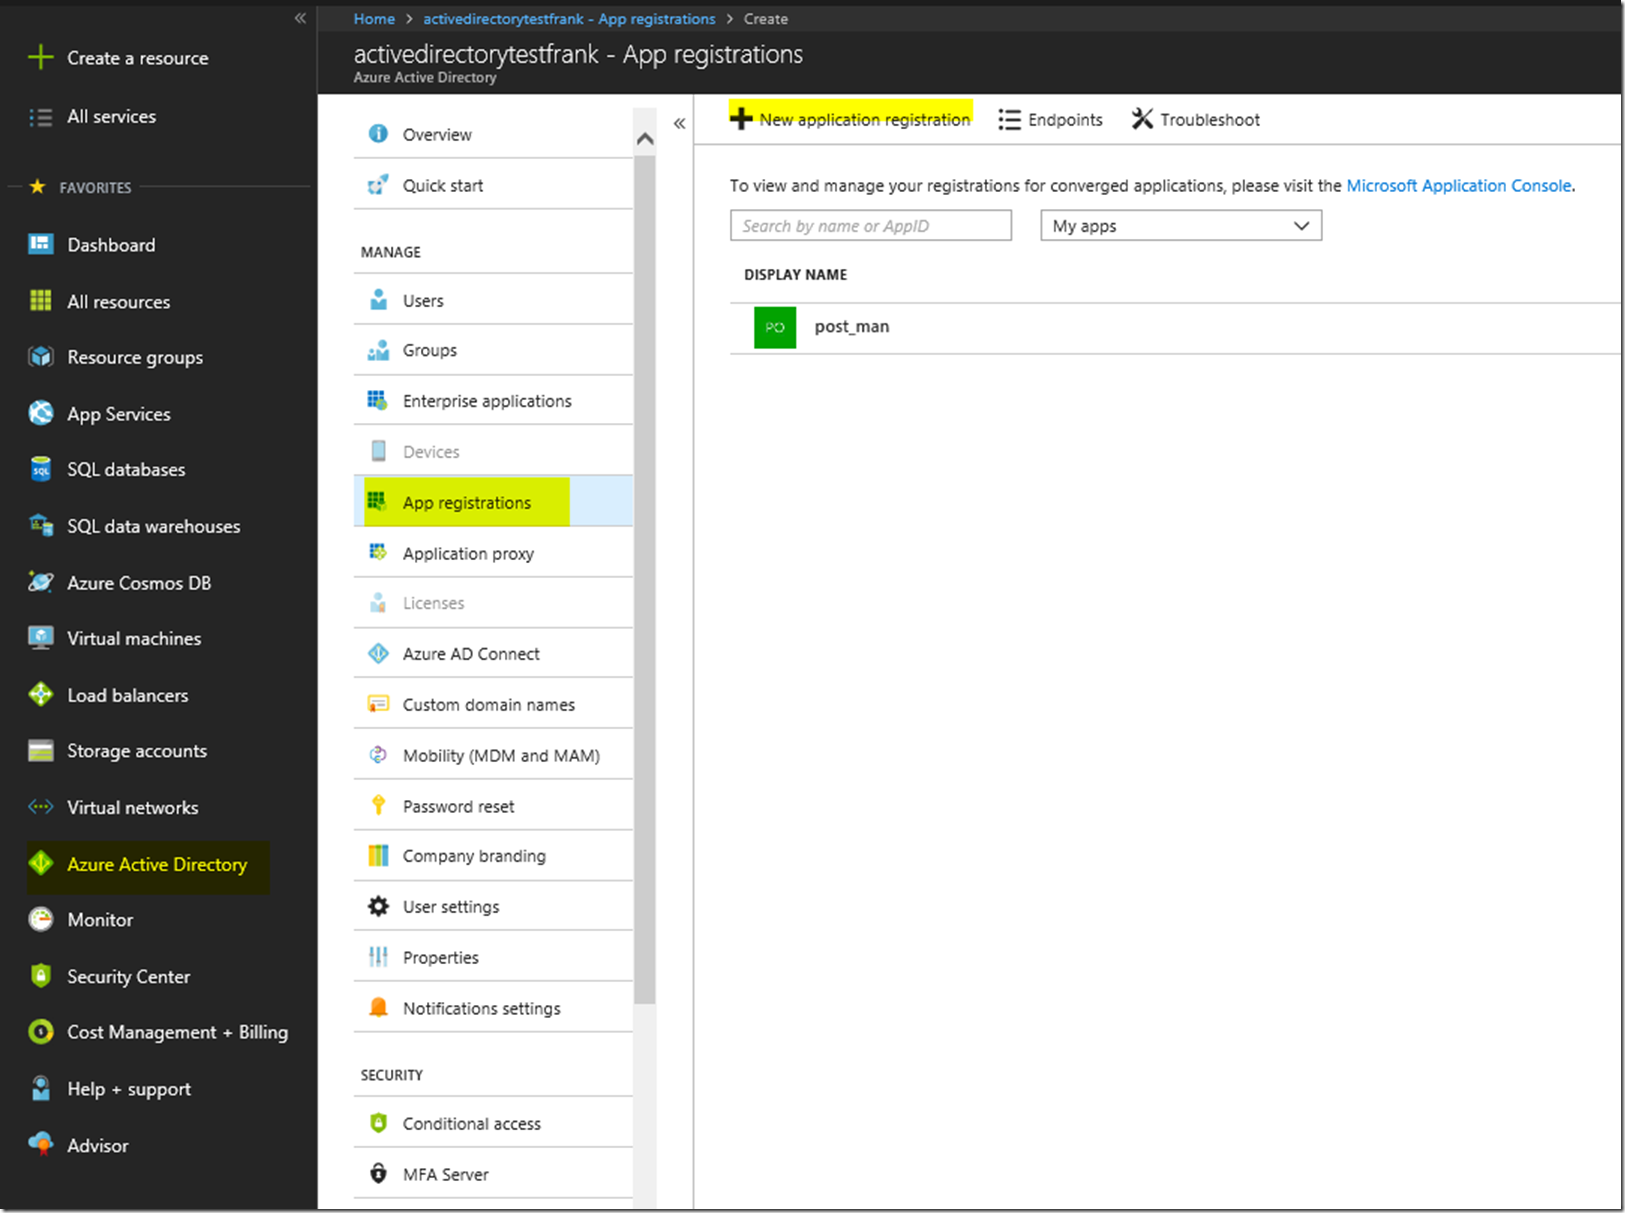
First we are going to want to create the AAD Application registrations in the portal. For this we will need to configure the application to be able to work with Postman so that we can make the call to the Microsoft Graph API. First we go to the Azure Active Directory Blade, go to App Registrations, and then create a new application registration.

2018-03-31 19_16_00-Create - Microsoft Azure - Internet Explorer

From there we are going to want to create a web app with any name. Here I have set the name as web app, and set the Sign-On URL as the callback for Postman: https://www.getpostman.com/oauth2/callback, it is unimportant what the callback url is, but for our case we are using that callback URL for consistency sake. Just make sure that the callback you put down for your AAD Application Registration is the same in your postman call. This is unimportant for the grant type client credentials but more important for other grant type flows.

image

You will have to click out of the sign-on URL to make it check whether or not if it’s correct.

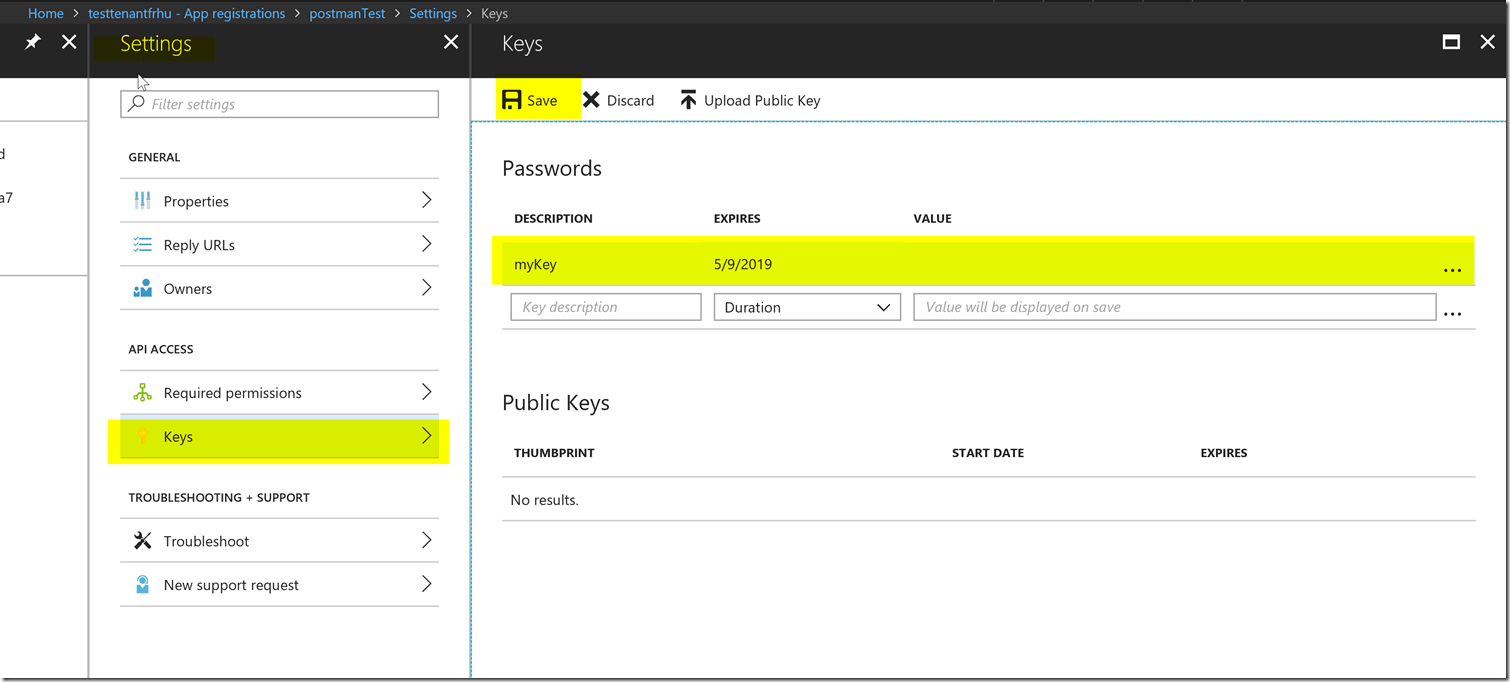
After that we have created our web app, we will want to create a secret. Please keep track of the secret as you won’t be able to see the secret again. You will have to press save in order for the secret to generate.


image

With this information in hand, we will be able to move forward and connect to this AAD registration. But without the correct permissions we won’t be able to get an access token to make calls to the Microsoft Graph API.


Finding Which Permissions We Need for a Microsoft Graph Call

Assuming we would like to have granular control on what the AAD Application registration has access to and what it doesn’t have access to. We are going to want to make sure that the AAD Application registration only has the permissions it needs to make the MSFT Graph API calls that we are wanting to make.

There has been a separate blog post on finding the correct permissions for your graph API call listed below :

https://blogs.msdn.microsoft.com/aaddevsup/2018/05/21/finding-the-correct-permissions-for-a-microsoft-or-azure-active-directory-graph-call/


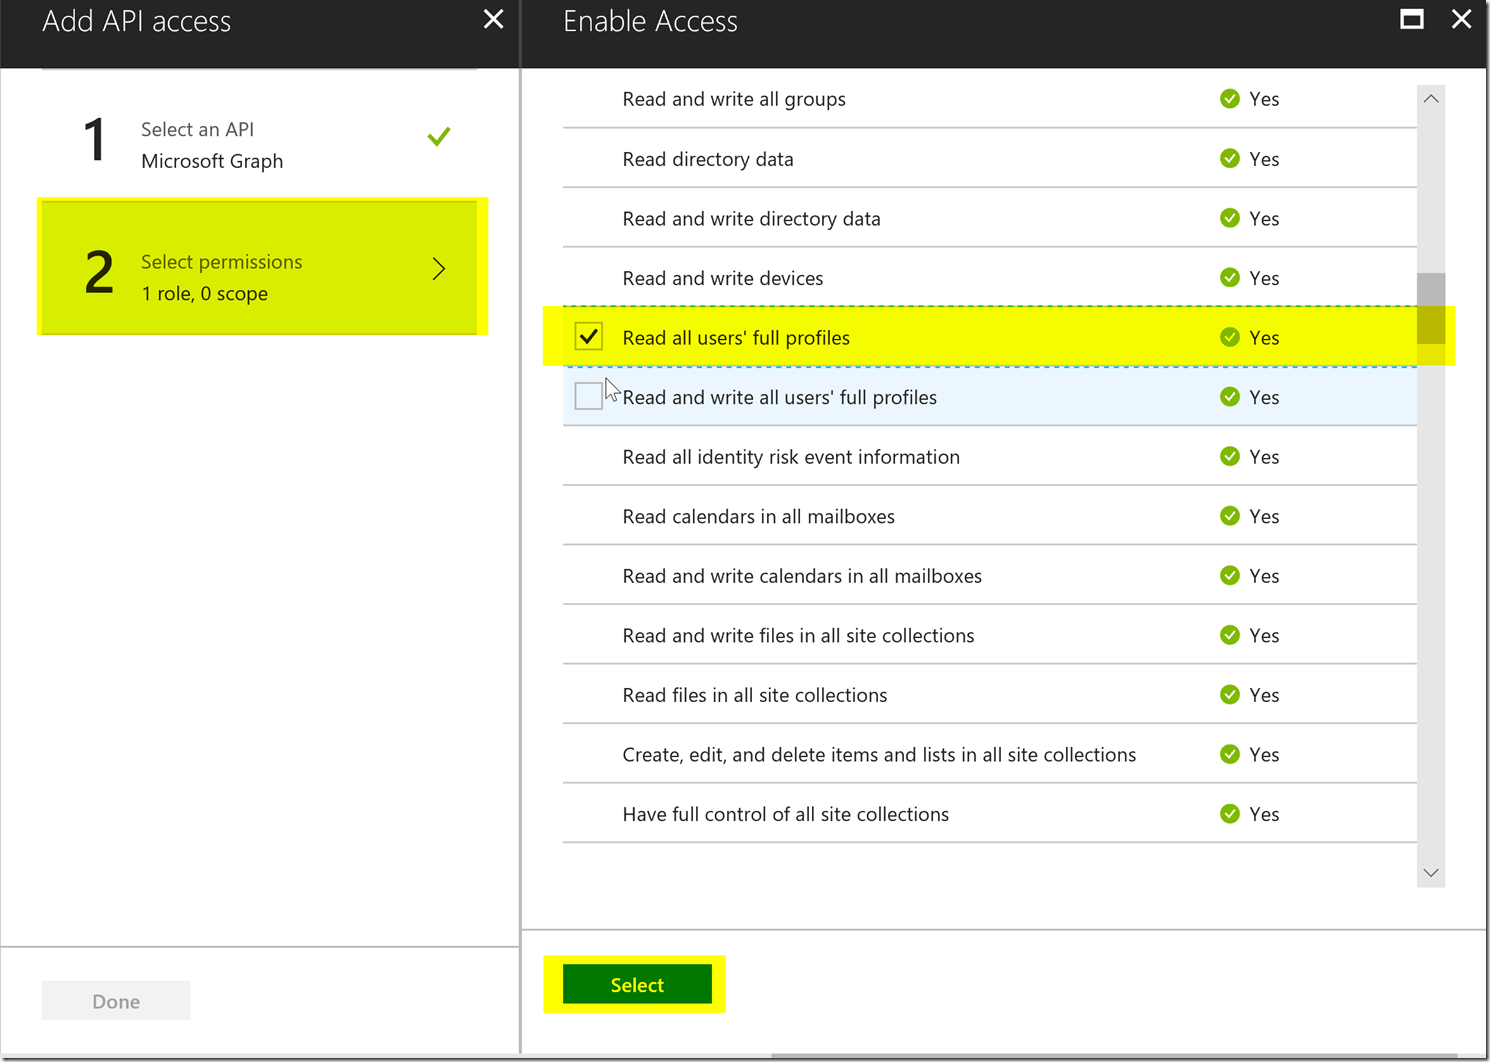
For this client credentials flow, we will want to set the required permission for Read all users’ full profiles under Application Permissions. If you check the delegated permission you won’t get the correct permissions because the client credentials flow only gets the application permissions. This permission is shown below.


image


Accessing the AAD App Registration and Calling the Microsoft Graph API


Now lets get a secret for our AAD Application registration by going to the keys blade and adding a secret. Please make sure to keep track of this key as you will not be able to retrieve it again once you leave the blade.


image


Be sure to press the save button in order to see the value after putting in the description for your key.


Now our AAD Application registration is ready to go and we can utilize postman to get an access token using the AAD Application registration to use the list users functionality in the Microsoft Graph API.


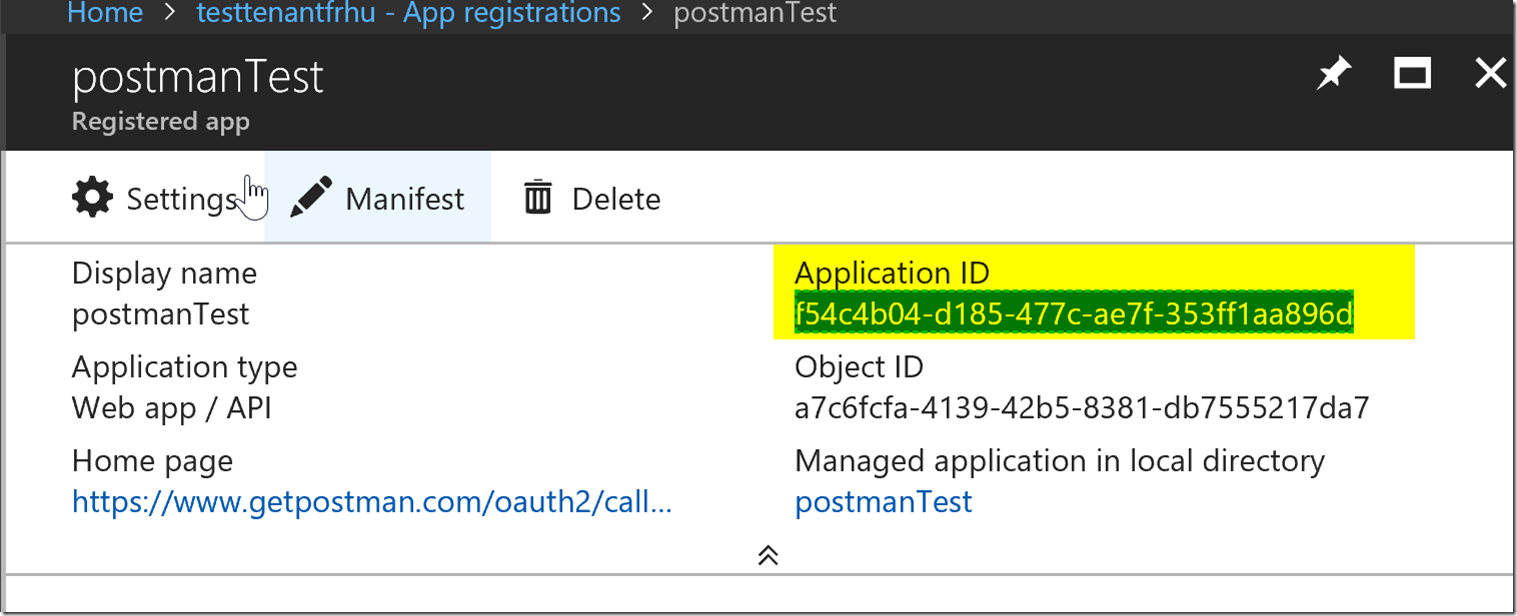
Please keep track of the client id as well which is the application id for your app registration. This is shown below.

image


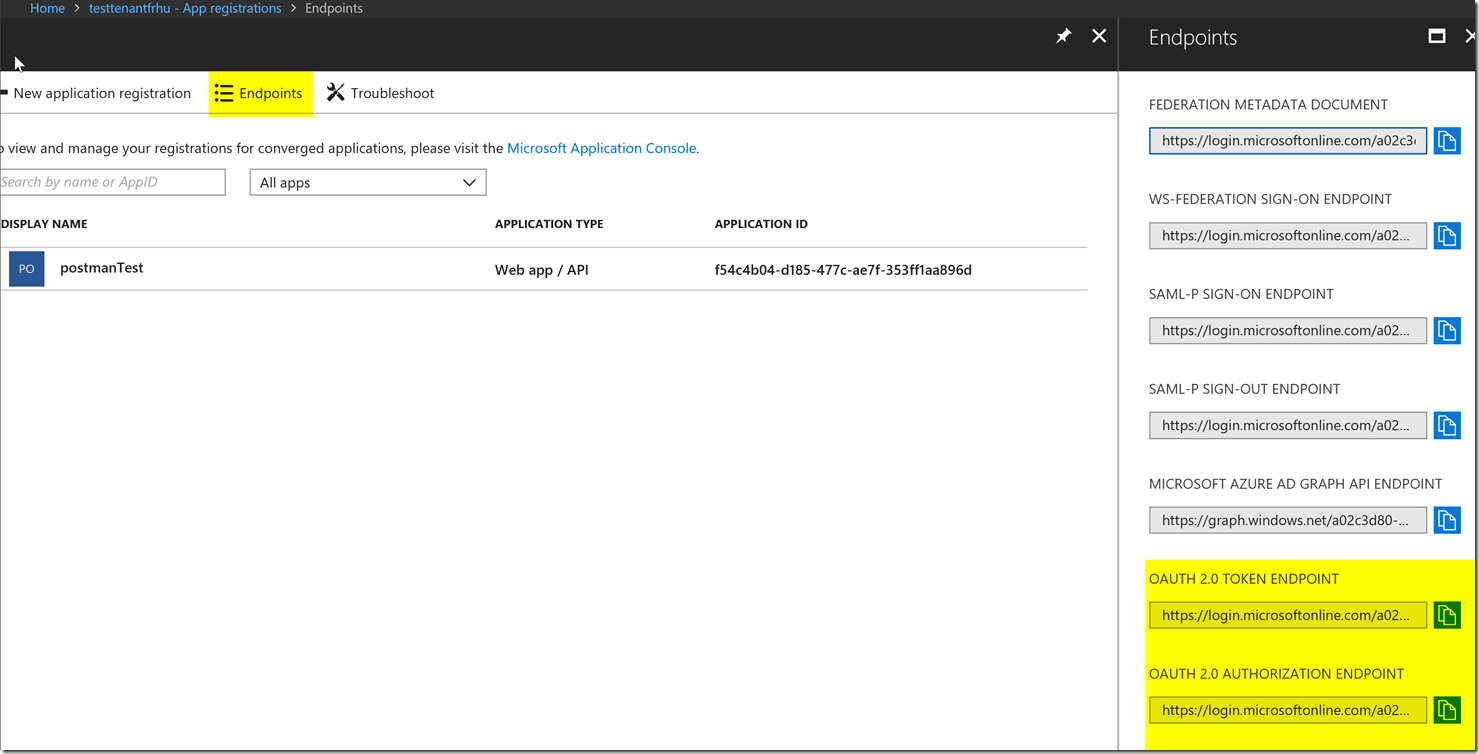
We are going to want to get our token and authorize endpoints, we can find this next to the new application registration button in the App Registrations blade shown in the picture below.


image


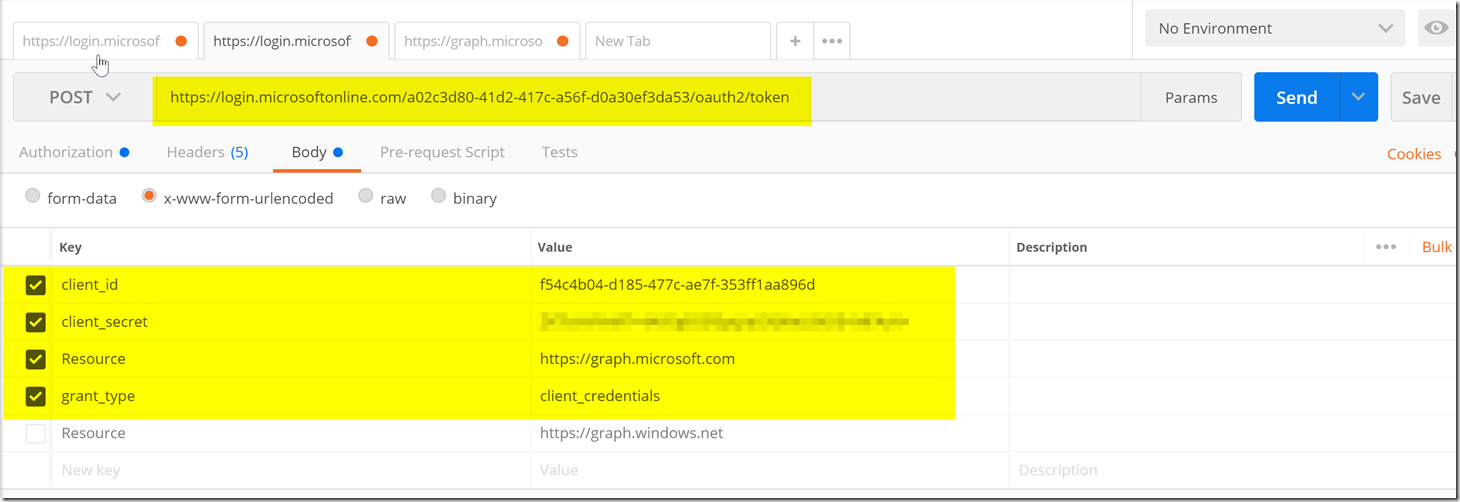
Now we can go to our postman to try to get an Access token. Below is a screenshot of how the postman should be setup with the variables we got from the steps above.


We will use the token endpoint as the URL to post, we will then add the client id, client secret, resource, and grant type in the body of x-www-form-urlencoded fields.


The only item that isn’t gotten in the steps above is the resource which is different depending on what you’re trying to access. Here we are trying to access the Microsoft Graph which is https://graph.microsoft.com you will need to look through your respective documentation to find what the resource url is for the resource you’re trying to utilize if it’s not the Microsoft Graph.


image


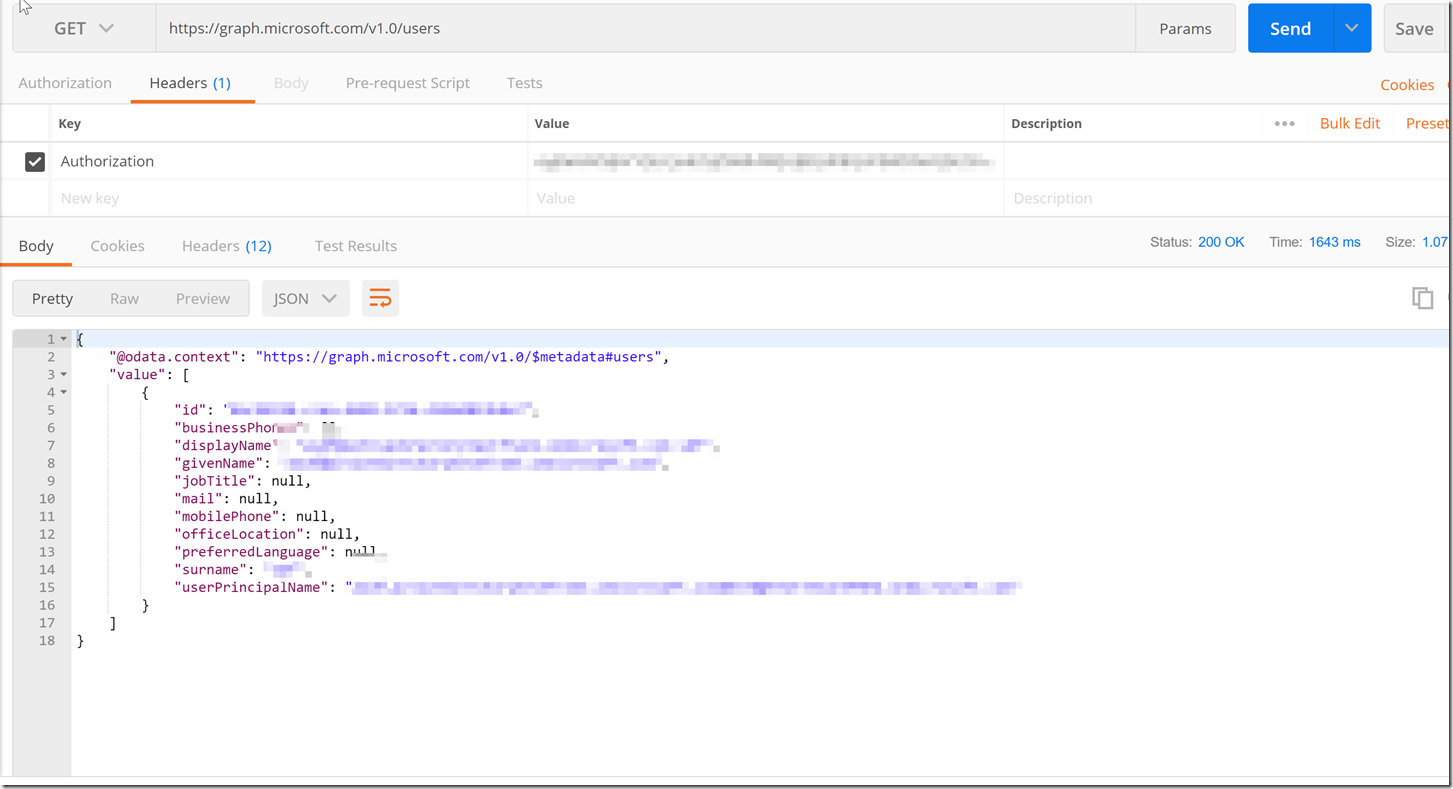
After this we have now received an Access token back from the token endpoint for your Azure Active Directory tenant. With this access token we can create a new request with a single authorization header and the list user calls to the Microsoft Graph API.


image


We to have a header with the value as “Bearer <access token>” with the key “Authorization”.


image


We have now gotten the list of users from the tenant that the AAD Application Registration.


Conclusion

After going through the steps to create an AAD Application registration, finding what call we want to make, finding what permissions we need to make the call and then getting all the configurations we need to get an access token from the token endpoint. We were able to get an access token from the token endpoint and then make a call to the Microsoft Graph API with our access token to list the users in our tenant. I hope that you can utilize this flow to make the other calls to the Microsoft Graph API. If you have any issues feel free to open a support ticket and one of our support engineers will reach out to you as soon as possible, please be sure to have a fiddler trace of the error that you are experiencing.