How to Resolve IDX10501 Errors in a B2C Microsoft.Identity.Web Application

Consider the situation where you are developing an ASP.NET Core application that needs to support Azure B2C. Following the official Microsoft Document, you implement the Microsoft.Identity.Web library and three built-in User Flows. All is working well, but you also need to implement a Custom Policy. You find the following documentation which shows how to make a request with the B2C policy specified:

https://learn.microsoft.com/en-us/azure/active-directory-b2c/enable-authentication-web-application-options#pass-the-azure-ad-b2c-policy-id

You try to implement this guidance. Everything compiles ok, but when you test the app, you encounter an IDX10501 error after the custom policy redirects back to the application. I might look like this:

IDX10501: Signature validation failed. Unable to match key: kid: '[PII of type 'System.String' is hidden. For more details, see https://aka.ms/IdentityModel/PII.]'. Number of keys in TokenValidationParameters: '0'. Number of keys in Configuration: '1'. Exceptions caught: '[PII of type 'System.Text.StringBuilder' is hidden. For more details, see https://aka.ms/IdentityModel/PII.]'. token: '[PII of type 'System.IdentityModel.Tokens.Jwt.JwtSecurityToken' is hidden. For more details, see https://aka.ms/IdentityModel/PII.]'.

This article is precisely about how to deal with this situation.

The Reason For The Error:

First, let’s understand why this error is being thrown when the custom policy redirects back to your app. In ASP.NET Core, whenever a user is authenticated and authorized, and there is a redirect back to the Web App containing an ID Token, the ASP.NET Core middleware will try to validate this ID Token to make sure that the redirect is genuine. In order to validate the ID Token, the Middleware needs the public key of the signing certificate which was used to sign the ID Token. The Middleware gets this public key by querying AAD B2C. Specifically, there is a “metadata” endpoint in AAD B2C used by the Middleware which provides authentication information including any public keys for signing certificates.

You may remember when creating your custom policy that you needed to create or upload a signing certificate. This signing certificate is different from that used for built-in user flows in AAD B2C. This means that the public keys accessible from the metadata endpoint for your AAD B2C will not contain the public key for your custom policy. The custom policy actually has it’s own metadata endpoint.

The endpoint which the Middleware uses is configured by Microsoft.Identity.Web and set at application startup. Since the metadata URL is already set, invoking a custom policy during runtime will result in a scenario where the Middleware is looking at the wrong metadata URL while validating the returning token.

The Solution:

In short, we need to configure the correct metadata endpoint for our additional Custom Policy.

We do this by creating a second authentication scheme to handle the custom policy. With this additional authentication scheme, we can set the correct metadata endpoint at startup. Below is a brief overview of the steps involved in actually carrying this out:

  1. Add an additional redirect URI to your App Registration
  2. Configure an additional B2C authentication scheme in your application
  3. Add an action to the desired controller
  4. Implement the created action in the Layout

Before continuing, please review the following prerequisites.

Note: an example application that demonstrates the results of the following steps can be found at the following link
https://github.com/mbukovich/ExtraB2CPolicyMVC

Prerequisites:

Add an Additional Redirect URI to your App Registration

Using the same App Registration referred to in the Prerequisites, we will need to add another Redirect URI for the custom policy. The reason we cannot use the existing redirect URI for this situation is that doing so will confuse the Web App. We will be setting up two different authentication schemes, but when the B2C policy redirects back to the Web App, the Middleware will not know which authentication scheme to use. Thus, we need a separate redirect URI to clearly distinguish redirects from the existing and new authentication schemes.

Go to the Azure Portal at portal.azure.com, and navigate to your app registration. Once there, click on the “Authentication” blade on the left side of the screen. Under the existing redirect URI, add a new one. Copy and past the existing URI into the new one, and add a ‘-‘ to the existing URL and then whatever string you would like to define the callback endpoint for your application. In my example, my new redirect URI is “https://localhost:44321/signin-oidc-editemail”. Don’t forget to click “Save”!

Important Note:

You will need a separate redirect URI for each Authentication Scheme. This means if you are adding 2 Custom Policies (or more), then you will need to add 2 (or more) Authentication Schemes (one for each Policy), which means 2 (or more) redirect URIs.

Configure an Additional B2C Authentication Scheme

This process hinges around adding an action to your controller that will issue a challenge to the user. However, before we create this action, we need to properly configure the app with an additional authentication scheme. This means configuring the appsettings.json file as well as the Startup.cs file.

appsettings.json

Add the following JSON to your appsettings.json file:

"<name-of-your-configuration>": {
    "Instance": "https://<B2C-tenant-name>.b2clogin.com",
    "ClientId": "<client-id-of-your-app-registration>",
    "CallbackPath": "/<endpoint-of-your-new-redirect-uri>",
    "SignedOutCallbackPath": "/signout/<built-in-sign-in-sign-up-policy>",
    "Domain": "<B2C-tenant-name>.onmicrosoft.com",
    "SignUpSignInPolicyId": "<built-in-sign-in-sign-up-policy>"
},

This is how the appsettings.json file looks in my example application:

{
  "AzureADB2C": {
    "Instance": "https://markstestorganization1.b2clogin.com",
    "ClientId": "09717d12-ca7f-4388-8393-dafe42c0c3a5",
    "CallbackPath": "/signin-oidc",
    "SignedOutCallbackPath": "/signout/B2C_1_signupsignin1",
    "Domain": "markstestorganization1.onmicrosoft.com",
    "SignUpSignInPolicyId": "B2C_1_signupsignin1",
    "ResetPasswordPolicyId": "B2C_1_PasswordReset1",
    "EditProfilePolicyId": "B2C_1_editProfileTest1"
  },
  "AzureADB2CEditEmail": {
    "Instance": "https://markstestorganization1.b2clogin.com",
    "ClientId": "09717d12-ca7f-4388-8393-dafe42c0c3a5",
    "CallbackPath": "/signin-oidc-editemail",
    "SignedOutCallbackPath": "/signout/B2C_1_signupsignin1",
    "Domain": "markstestorganization1.onmicrosoft.com",
    "SignUpSignInPolicyId": "B2C_1_signupsignin1"
  },
  "Logging": {
    "LogLevel": {
      "Default": "Information",
      "Microsoft": "Warning",
      "Microsoft.Hosting.Lifetime": "Information"
    }
  },
  "AllowedHosts": "*"
}

Important Notes:

  • The name of the second B2C configuration is arbitrary; you can name it whatever you want. We will using this extra configuration for a single custom policy, and if you want to add more custom policies, you will need to add an additional B2C configuration in the AppSettings.json file. For this reason, I recommend giving the JSON object a name associated with the Custom Policy.
  • CallbackPath takes the String from the end of your Redirect URI from the previous step. Since my redirect URI is “https://localhost:44321/signin-oidc-editemail”, then my CallbackPath is “/signin-oidc-editemail”.
  • You need to include your standard built-in sign-up-sign-in user flow in the Authentication Scheme in case the user tries to use your Custom Policy without being signed-in.

Startup.cs

Now we need to configure an additional authentication scheme in the startup.cs file. Within the “ConfigureServices” function, add the following code (added to line 52 in my example app):

// Create another authentication scheme to handle extra custom policy
services.AddAuthentication()
       .AddMicrosoftIdentityWebApp(Configuration.GetSection("<name-of-json-configuration>"), "<Arbitrary-name-for-Auth-Scheme>", "<Arbitrary-name-of-Cookie-Scheme>");

services.Configure<OpenIdConnectOptions>("<Arbitrary-name-for-Auth-Scheme>", options =>
    {
        options.MetadataAddress = "<Metadata-Address-for-Custom-Policy>";
    });

You will need to choose an arbitrary name for your authentication scheme, and an arbitrary name for the associated cookie scheme. Microsoft.Identity.Web will create the new authentication scheme and cookie scheme with the names you specified. You will also need to replace the text, “<name-of-json-configuration>,” with the name of the json configuration from the previous step. In my case, this would be “AzureADB2CEditEmail.”

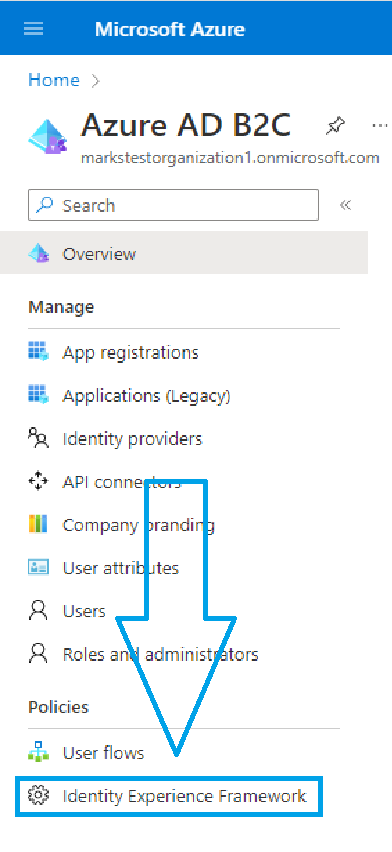
It is also very important to get the meta data address. This will be used by the middleware to get the information necessary to validate ID Tokens returned by the Custom Policy. The meta data address can be found in the Azure B2C Portal. On the left side of the screen, under “Policies,” click on “Identity Experience Framework” as indicated in the image below.
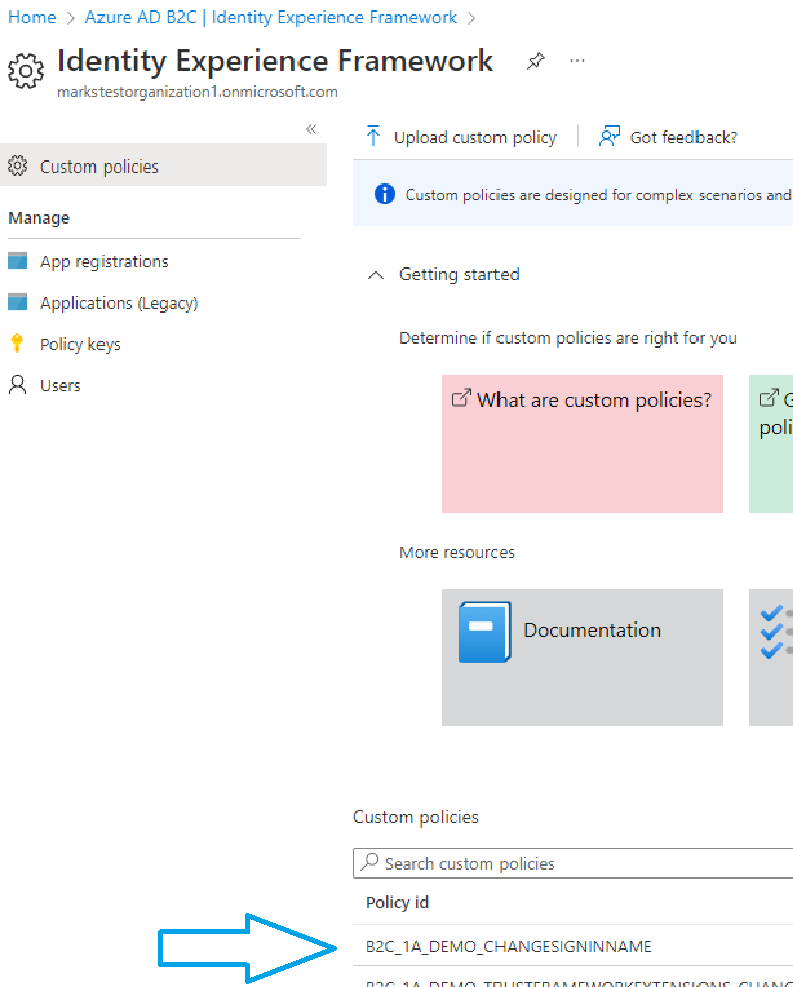
You will see your custom policies listed at the bottom of the page; click on the custom policy you are using for this guide. In my case it is “B2C_1A_DEMO_CHANGESIGNINNAME.”
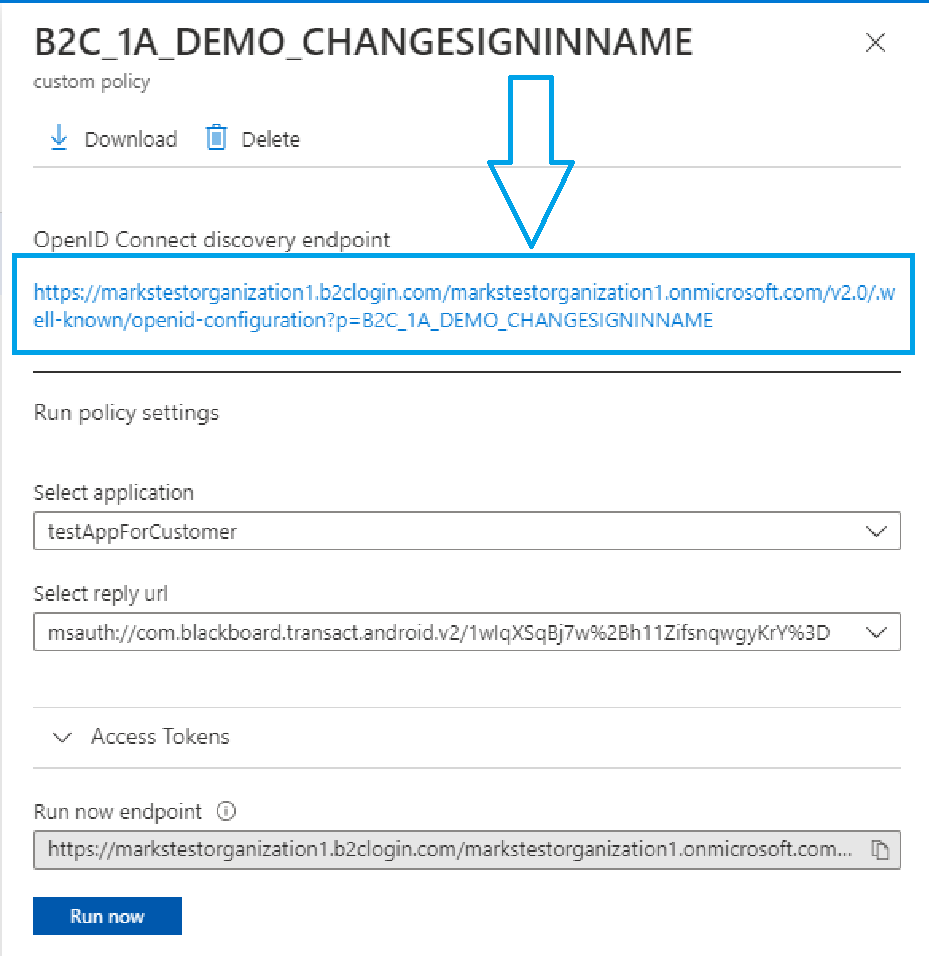
In the dialog that opened up on the right side of the screen, the meta data address is the URL listed under “OpenId Connect Discovery Endpoint.” Copy this URL and paste it in for the value of the MetadataAddress variable.
Add Action to the Controller

Now we add an action to the desired controller to challenge the user with the Custom B2C Policy. In my example, I add the action to my Home Controller for the sake of simplicity. Add the following code to your controller and adjust the values and action name to meet your scenario (this code snippet can be found on line 40 of the “HomeController.cs” file in the “Controllers” folder in my example project):

[Authorize]
public IActionResult EditEmail()
{
    var redirectUrl = Url.Content("~/");
    var properties = new AuthenticationProperties { RedirectUri = redirectUrl };
    properties.Items["policy"] = "B2C_1A_DEMO_CHANGESIGNINNAME";
    return Challenge(properties, "B2CEditEmail");
}

Important Notes:

  • Please rename the function to something that describes the action in your scenario.
  • Change “B2C_1A_DEMO_CHANGESIGNINNAME” to the name of your custom policy.
  • Change “B2CEditEmail” to whatever you named your custom policy authentication scheme. This is how the middleware will know which scheme and meta data address to use.

Implement the Action in the Layout

Now we need to implement the action in the layout so that the user can actually invoke the custom policy. In my example, I added a button alongside existing B2C buttons based on the tutorial mentioned in the prerequisites section; however, you can handle this in whatever way suits your layout and business requirements best.

If you want to follow the same idea that I used, then you can use the following snippet as an example of another list item added to the partial layout created in Step 4 of the tutorial linked in the 5th Prerequisite for this guide. (link: https://learn.microsoft.com/en-us/azure/active-directory-b2c/enable-authentication-web-application?tabs=visual-studio#step-4-add-the-ui-elements)

<li class="navbar-btn">
    <form method="get" asp-area="" asp-controller="Home" asp-action="EditEmail">
        <button type="submit" class="btn btn-primary" style="margin-right:5px">Edit Email</button>
    </form>
</li>

I added the snippet above to line 13 of the “_LayoutPartial.cshtml” file in the “Views/Shared” folder of my example project. Notice that the “asp-controller” property is set to “Home” in order to reference the Home Controller, and the “asp-action” property is set to “EditEmail” to reference the action created in the Home Controller.

If you have an existing app that doesn’t utilize the partial layout, and you just want a quick link to test the custom policy, you can use the following tag which creates a basic link. Replace the indicated values being sure to reference the correct controller if you didn’t add your action to the Home Controller:

<a asp-area="" asp-controller="Home" asp-action="replace-with-your-controller-action">Replace with text that describes the action</a>

Congratulations! Now you can run the Web App and test the solution.

Update Asp.Net or Asp.Net Core app session to last longer than Azure AD tokens

Azure AD tokens (ID tokens, access tokens, and SAML tokens) by default last one hour. Asp.Net and Asp.Net Core Middleware sets their authentication ticket to the expiration of these tokens by default. If you do not want your web application to kick the user out redirecting them to Azure AD to sign-in again, you can customize the Middleware authentication ticket.

This can also help resolve AJAX issues (getting CORS error to login.microsoftonline.com) where your app is both a Web App and Web API.


For Asp.Net…

In most cases within your Startup.Auth.cs under ConfigureAuth, you should have a line that says “app.UseCookieAuthentication()”

Update it so that it looks something like this… (This should work for all token types)

app.UseCookieAuthentication(new CookieAuthenticationOptions()
{
  CookieManager = new Microsoft.Owin.Host.SystemWeb.SystemWebChunkingCookieManager(),
  Provider = new CookieAuthenticationProvider()
  {
    OnResponseSignIn = (context) =>
    {
      context.Properties.ExpiresUtc = DateTimeOffset.UtcNow.AddHours(12);
    }
  }
});

You should also decouple the token lifetime from the Web App…

app.UseOpenIdConnectAuthentication(
                new OpenIdConnectAuthenticationOptions
                {
                    UseTokenLifetime = false,

Asp.Net Core…

In Asp.Net Core, we essentially need to add the OnTokenValidated event to update the ticket properties to set when the ticket will expire before it decides to redirect to Azure AD to sign-in again.

services.Configure<OpenIdConnectOptions>(AzureADDefaults.OpenIdScheme, options =>
{
    // decouple the token lifetime from the Web App
    options.UseTokenLifetime = false;

    // other configurations...
    // ...

    var onTokenValidated = options.Events.OnTokenValidated;
    options.Events ??= new OpenIdConnectEvents();
    options.Events.OnTokenValidated = async context =>
    {
        await onTokenValidated(context);
        context.Properties.ExpiresUtc = DateTimeOffset.UtcNow.AddHours(12);
    };
});

Below are a few examples on how to do this…

If you’re using the following similar code to add Azure AD authentication…

services.AddAuthentication(AzureADDefaults.AuthenticationScheme)
  .AddAzureAD(options => Configuration.Bind("AzureAd", options))

Then add the following…

services.Configure<OpenIdConnectOptions>(AzureADDefaults.OpenIdScheme, options =>
{
  // decouple the id_token lifetime from the Web App
  options.UseTokenLifetime = false;

  //…

    var onTokenValidated = options.Events.OnTokenValidated;
    options.Events ??= new OpenIdConnectEvents();
    options.Events.OnTokenValidated = async context =>
    {
        await onTokenValidated(context);
        context.Properties.ExpiresUtc = DateTimeOffset.UtcNow.AddHours(12);
    };
});

So your configuration would look something like this inside your startup.cs…

public void ConfigureServices(IServiceCollection services)
{
  //...

  services.AddAuthentication(AzureADDefaults.AuthenticationScheme)
    .AddAzureAD(options => Configuration.Bind("AzureAd", options))
    .AddCookie();

  //...

  services.Configure<OpenIdConnectOptions>(AzureADDefaults.OpenIdScheme, options =>
  {
    // decouple the token lifetime from the Web App
    options.UseTokenLifetime = false;

    //...
    var onTokenValidated = options.Events.OnTokenValidated;
    options.Events ??= new OpenIdConnectEvents();
    options.Events.OnTokenValidated = async context =>
    {
        await onTokenValidated(context);
        context.Properties.ExpiresUtc = DateTimeOffset.UtcNow.AddHours(12);
    };
  });

  //...
}

If you’re using “Microsoft.Identity.Web” to add your Azure AD configuration, then you could update your code to look something like this…

//…
using Microsoft.Identity.Web;
//…
public class Startup
{
  // ...
  public void ConfigureServices(IServiceCollection services)
  {
    // ...
    services.AddAuthentication(OpenIdConnectDefaults.AuthenticationScheme)
      .AddMicrosoftIdentityWebApp(options =>
      {
        Configuration.Bind("AzureAD", options);

        // decouple the token lifetime from the Web App
        options.UseTokenLifetime = false;

        var onTokenValidated = options.Events.OnTokenValidated;
        options.Events ??= new OpenIdConnectEvents();
     
        options.Events.OnTokenValidated = async context =>
        {
            await onTokenValidated(context);
            context.Properties.ExpiresUtc = DateTimeOffset.UtcNow.AddHours(12);
        };
      });
    // ...
}			

If you’re implementing your own custom OpenIdConnectOptions to configure Azure AD authentication, then add the following…

services.Configure<OpenIdConnectOptions>(options =>
{
  //…
  options.Events.OnTokenValidated = async context =>
  {
    context.Properties.ExpiresUtc = DateTimeOffset.UtcNow.AddHours(12);
  };
});

If you’re integrating a Asp.Net Core WS-Fed application, then it might look something like this…

public void ConfigureServices(IServiceCollection services)
{
  services.AddAuthentication(WsFederationDefaults.AuthenticationScheme)  
    .AddCookie()
    .AddWsFederation(options =>
    {
      options.SignInScheme = CookieAuthenticationDefaults.AuthenticationScheme;

      // decouple the token lifetime from the Web App
      options.UseTokenLifetime = false;

      // MetadataAddress for your Azure Active Directory instance.
      options.MetadataAddress = "https://login.microsoftonline.com/common/federationmetadata/2007-06/federationmetadata.xml";

      // Wtrealm is the app's identifier in the Active Directory instance.
      // For ADFS, use the relying party's identifier, its WS-Federation Passive protocol URL:
      options.Wtrealm = "https://localhost:44307/";

      // For AAD, use the Application ID URI from the app registration's Overview blade:
      options.Wtrealm = "https://contoso.onmicrosoft.com/wsfedapp";

      // Set the Authentication Ticket to expire at a custom time      
      var onTokenValidated = options.Events.OnTokenValidated;
      options.Events ??= new OpenIdConnectEvents();
      
      options.Events.OnSecurityTokenValidated = async context =>
      {
        context.Properties.ExpiresUtc = DateTimeOffset.UtcNow.AddHours(12);
      }

More Information…

Notice that these are actually setting the “Ticket” expiration. You can set this expiration to whatever you like.

Keep in mind if you’re modifying these expirations, the user will continue to access your web app even if they have been deleted or disabled in Azure AD.

How to inject custom data into the ‘state’ parameter in an OpenID Connect MVC Application

It’s often desirable for an Azure Active Directory (Azure AD)- integrated application to maintain application state when sending request to Azure AD for login. The recommended way to achieve this is to use the ‘state’ parameter as defined in the OpenID Connect standards. Also mentioned in our documentation, the ‘state’ parameter is used for both preventing cross-site request forgery attacks and to maintain user’s state before authentication request occurs:

For an ASP.NET or ASP.NET CORE web application using OpenID Connect OWIN middleware, the ‘state’ parameter is maintained automatically by the middleware when sending out an authentication request as followed.

GET https://contoso.b2clogin.com/contoso.onmicrosoft.com/oauth2/v2.0/authorize?p=b2c_1a_signup_signin
&client_id=<Application ID>
&redirect_uri=<Some redirect URL>
&response_mode=form_post
&response_type=id_token
&scope=openid
&state=OpenIdConnect.AuthenticationProperties%3dgAAAALy6…i
&nonce=defaultNonce


Upon receiving the response from Azure AD, the middleware takes care of validating the ‘state’ parameter to prevent cross-site forgery attack. Because this work is done automatically by the middleware framework, this begs the question: How can application developers still utilize this same ‘state’ parameter to maintain user state without compromising the middleware’s security feature?

The way to do this is…

The OpenID Connect OWIN middleware use .Net framework’s Data Protection API to encrypt the value stored in the ‘state’ parameter. Thinking along the same line we can use the following code in OpenIdConnectNotifications’s RedirectToIdentityProvider event to inject custom data into the ‘state’ parameter:

var stateQueryString = notification.ProtocolMessage.State.Split('=');
var protectedState = stateQueryString[1];
var state = notification.Options.StateDataFormat.Unprotect(protectedState);
state.Dictionary.Add("MyData", "123");
notification.ProtocolMessage.State = stateQueryString[0] + "=" + notification.Options.StateDataFormat.Protect(state);

And we can use the following code to read our custom data back in the AuthenticationFailed event, MessageReceived event, or at any other relevant place in the code after we receive a response from Azure AD:

string mycustomparameter;
var protectedState = notification.ProtocolMessage.State.Split('=')[1];
var state = notification.Options.StateDataFormat.Unprotect(protectedState);
state.Dictionary.TryGetValue("MyData", out mycustomparameter);

Reference:

https://stackoverflow.com/questions/37489964/custom-parameter-with-microsoft-owin-security-openidconnect-and-azuread-v-2-0-en/37520329#37520329

Infinite sign in loop between MVC application and Azure AD

In a previous post I talked about an infinite redirect loop issue between an MVC application and Azure AD when performing sign in. In this post, we will look at another scenario which can lead to the same type of problem.

Background

Applications running an old version of OWIN middleware can run into this issue because of a known Katana bug. Due to a cookie mismanagement issue in the old version of OWIN, an asp.net application is not able to recognize an authenticated request from Azure AD so it keeps sending the request back to Azure AD for login leading to the infinite loop issue.

Error Message

Customer may see this error message in the browser:  “We couldn’t sign you in.  Please try again.”

How to recognize the Katana bug…

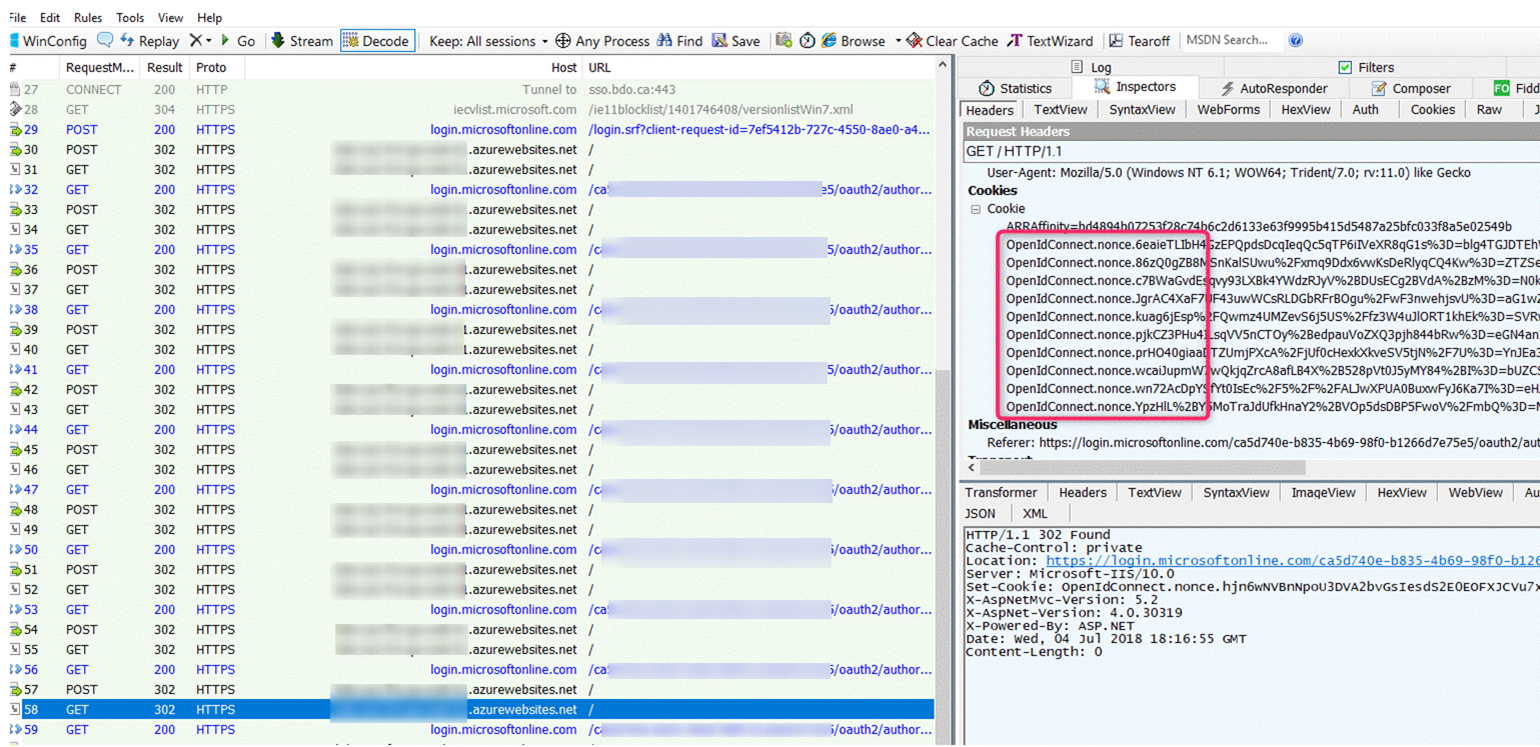
Capture a Fiddler trace and examine one of the later redirect frames back to the web application. Note in the screen shot below, the request in frame 58 contains multiple OpenIdConnect nonce cookies (red-circled). In a working scenario, we should only have one OpenIdConnect nonce cookie set at the beginning before authentication. After the request is successfully authenticated, this nonce cookie is destroyed and asp.net sets its own session cookie. Because of this bug, we see there is a build up of these nonce cookies.

Resolving the issue…

The problem has been fixed in ASP.NET core and in the new version of Katana Owin for ASP.NET.  To resolve this issue, you can upgrade your application to use ASP.NET Core. If you must continue stay on ASP.NET, perform the following:

  1. Update your application’s Microsoft.Owin.Host.SystemWeb package be at least version 3.1.0.0 and
  2. Modify your code to use one of the new cookie manager classes, for example something like the following:
app.UseCookieAuthentication(new CookieAuthenticationOptions 
{ 
    AuthenticationType = "Cookies", 
    CookieManager = new Microsoft.Owin.Host.SystemWeb.SystemWebChunkingCookieManager() 
});

or

app.UseCookieAuthentication(new CookieAuthenticationOptions() 
{ 
    CookieManager = new SystemWebCookieManager() 
});

Note: In some cases where the application is hosted under a virtual directory or Application instead of the root of the web site, the above solution may not work. See https://stackoverflow.com/questions/44397715/infinite-re-direct-loop-after-aad-authentication-when-redirect-is-specified and https://github.com/aspnet/AspNetKatana/issues/203 for more info. For instance, suppose you have the following environment

Root of web site: https://mysite – this runs under Application Pool 1

Application test2 under the root root: https://mysite/test2 – this runs under Application Pool 2

Your Asp.NET application is runs under https://mysite/tes2 Application with the following code:

        public void Configuration(IAppBuilder app)
        {
            // For more information on how to configure your application, visit https://go.microsoft.com/fwlink/?LinkID=316888
            app.SetDefaultSignInAsAuthenticationType(CookieAuthenticationDefaults.AuthenticationType);
            app.UseCookieAuthentication(new CookieAuthenticationOptions());
            app.UseOpenIdConnectAuthentication(
                new OpenIdConnectAuthenticationOptions
                {
                    // Sets the ClientId, authority, RedirectUri as obtained from web.config
                    ClientId = clientId,
                    Authority = authority,
                    RedirectUri = "https://mysite/test2",
                    // PostLogoutRedirectUri is the page that users will be redirected to after sign-out. In this case, it is using the home page
                    PostLogoutRedirectUri = redirectUri,
                    Scope = OpenIdConnectScope.OpenIdProfile,
                    // ResponseType is set to request the id_token - which contains basic information about the signed-in user
                    ResponseType = OpenIdConnectResponseType.IdToken,
                    // ValidateIssuer set to false to allow personal and work accounts from any organization to sign in to your application
                    // To only allow users from a single organizations, set ValidateIssuer to true and 'tenant' setting in web.config to the tenant name
                    // To allow users from only a list of specific organizations, set ValidateIssuer to true and use ValidIssuers parameter
                    
                   
                    // OpenIdConnectAuthenticationNotifications configures OWIN to send notification of failed authentications to OnAuthenticationFailed method
                    
                    Notifications = new OpenIdConnectAuthenticationNotifications
                    {
                        AuthenticationFailed = OnAuthenticationFailed
                    }
                    
                    
                }
            );
        }

And you are using the following code for trigger the Sign In flow:

        public void SignIn()
        {
            if (!Request.IsAuthenticated)
            {
                HttpContext.GetOwinContext().Authentication.Challenge(
                    new AuthenticationProperties { RedirectUri = "/" },
                    OpenIdConnectAuthenticationDefaults.AuthenticationType);
            }
        }

The above scenario can result in an authentication infinite loop with a build-up of multiple OpenIdConnect.nonce cookies as well. The difference here is that Asp.NET does not appear to set its authenticated session cookies. This particular problem can be resolved using the following code change to set the redirect URLs in both the OpenID Connect initialization code and the Challenge method (note the trailing slash in the redirect URL):

app.UseOpenIdConnectAuthentication(
                new OpenIdConnectAuthenticationOptions
                {
                    // Sets the ClientId, authority, RedirectUri as obtained from web.config
                    ClientId = clientId,
                    Authority = authority,
                    RedirectUri = "https://mysite/test2/",
                    // PostLogoutRedirectUri is the page that users will be redirected to after sign-out. In this case, it is using the home page
                    PostLogoutRedirectUri = redirectUri,
                    Scope = OpenIdConnectScope.OpenIdProfile,
...
        public void SignIn()
        {
            if (!Request.IsAuthenticated)
            {
                HttpContext.GetOwinContext().Authentication.Challenge(
                    new AuthenticationProperties { RedirectUri = "/test2/" },
                    OpenIdConnectAuthenticationDefaults.AuthenticationType);
            }
        }


References

https://varnerin.info/infinite-redirects-with-aspnet-owin-and-openid-connect/

Updated 11/16/2020 – add info regarding virtual Directory / Application

Troubleshooting Asp.Net OWIN and Asp.Net Core Authentication sign-in failures with Azure Active Directory

Let get started!

This article assumes you are using your own code to perform the authentication to Azure Active Directory.

IMPORTANT: So if your using Azure App Services or Azure Function Apps Authentication/Authorization feature, this article is not for you.

You are developing a Asp.Net OWIN or Asp.Net Core Authentication web application and integrating it with Azure Active Directory. You run into some issues during the sign-in process with no error message or any hint on what the problem might be. Some of the behaviors that you might see are…

  • The dreaded infinite loop between your web app and Azure Active Directory.
  • After signing into Azure Active Directory, you land back on to your Web Application like it never signed in.
  • You land on your error page with no useful error message.

The purpose of this article is not to show you how to resolve the failed sign-in attempt. Rather, I want to show you how to troubleshoot and maybe expose the hidden error message. Once you have unraveled the hidden error message, hopefully that will lead you down a path to resolve the failed sign-in attempt.


This is where the OnAuthenticationFailed notification comes in handy…

In Asp.Net, you want to make sure your code looks something like this for the for the AuthenticationFailed event notification event notification (in startup.auth.cs)…
[gist id=”5773aac85537d35ca0f0d496d1e7b581″ file=”AspNet_OWIN_OnAuthenticationFailed.cs”]


In Asp.Net Core, you want to make sure your code looks something like this for the for the OnAuthenticationFailed event notification event notification (in startup.cs)…
[gist id=”813dd19091dfa8650895182cb45d5d1c” file=”AspNetCore_Auth_OnAuthenticationFailed.cs”]


You can of course tweak this so that you can either send the error message to your logs or send it to a custom error page.

At minimum, we should see the error message in the address bar…

or in the case of the infinite loop, see it in the Fiddler capture…


For more information about using Fiddler, check out our Blog post here…

For a list of Azure Active Directory errors and and some tips on how to resolve, check out the following article…
https://docs.microsoft.com/en-us/azure/active-directory/develop/reference-aadsts-error-codes

Infinite redirect between OpenID Connect Application and Azure AD

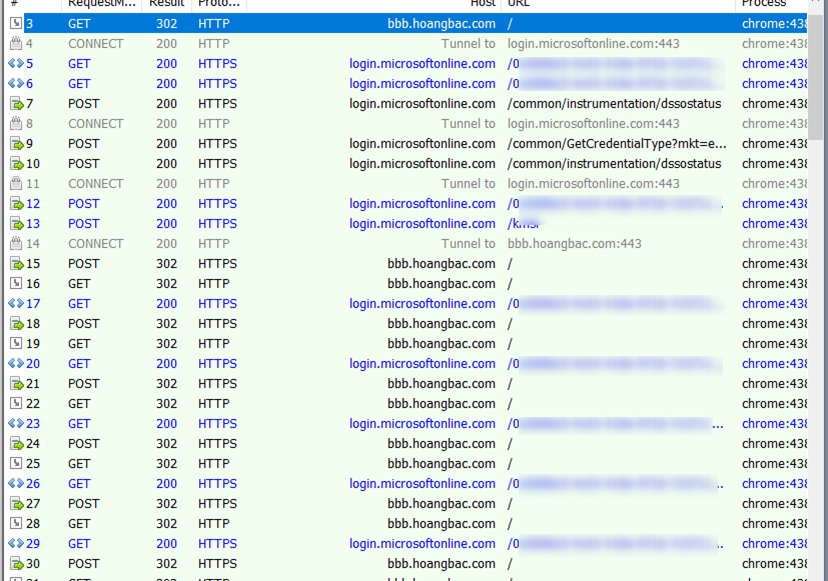
Recently I came across an interesting infinite redirection problem between an OpenID Connect (OIDC) Application and Azure AD as demonstrated in the Fiddler screen shot below. After authentication to Azure AD, we are stuck in an infinite loop between the web site and Azure AD. Eventually the browser gives up and throws an error. This problem only occurs if I start browsing to the site by http protocol (frame 3). If I use https, everything works fine.

Looking at the above Fiddler trace, what I notice unusual about this trace is that the problem starts at frame 16. The response in this frame should be a 200 OK instead of a 302 redirect back to Azure AD. This is the starting point for the infinite loop.

Let’s dive into the analysis

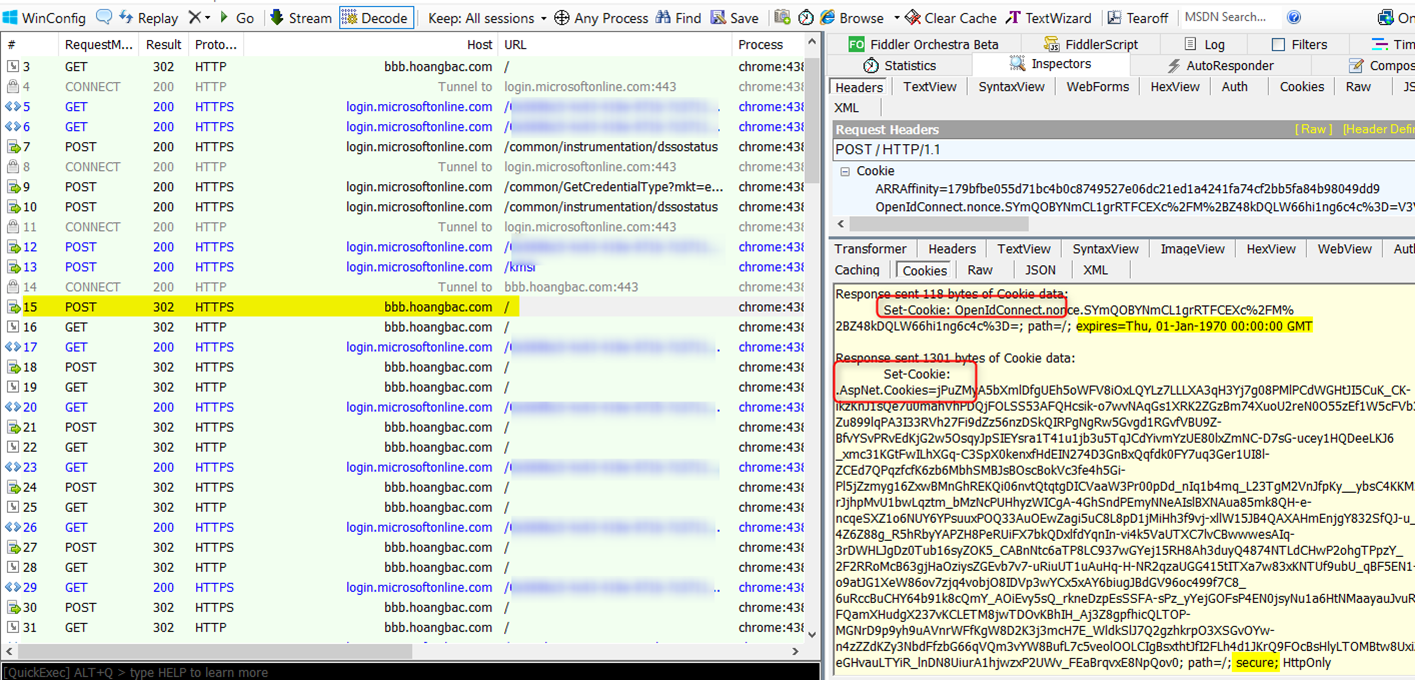
Looking at frame 15 below, we POST the id token to the site. After validating the token is good, the application invalidates the nonce cookie by setting its ‘expires’ attribute to a time in the past – Jan 1970 (expected). The application then sets up an authenticated session with the client by setting the “.AspNet.Cookies” cookie. Note there is a ‘secure‘ attribute on this cookie, which means that the cookie is only sent for secure https request. The POST request results in an HTTP redirect back to the site. See the problem? The redirection happens over http because this is the original scheme used to browse to the site (frame 3).

Hover over image to enlarge

In frame 16 the browser sends an http request back to the site. This request lacks the authentication “.AspNet.Cookies” cookie (remember the secure attribute?) therefore it is redirected back to Azure AD for log in, and we keep repeating the same sequence over and over again leading to the infinite loop.

Hover over image to enlarge

Doing some research shows that this problem was reported widely by multiple people in the following forum:

https://stackoverflow.com/questions/31588552/owin-and-azure-ad-https-to-http-redirect-loop

https://github.com/aspnet/Security/issues/219

What’s the solution?

The ideal way to resolve this issue is to force https navigation to the site. It’s always a good idea to use https scheme when browsing to web sites that require authentication. There are multiple ways to force https navigation mentioned in the above links. If your scenario requires the initial navigation to happen over http, you can customize the Cookies Authentication middleware to allow the authentication AspNet cookie for both http and https scheme by setting the CookieSecure attribute to CookieSecureOption.Never as followed in the Startup.Auth.cs file:

public void ConfigureAuth(IAppBuilder app)
        {
            app.SetDefaultSignInAsAuthenticationType(CookieAuthenticationDefaults.AuthenticationType);
            app.UseCookieAuthentication(new CookieAuthenticationOptions
            {
                CookieSecure = CookieSecureOption.Never
            });

            app.UseOpenIdConnectAuthentication(
                new OpenIdConnectAuthenticationOptions
                {
                    ClientId = clientId,
                    Authority = authority,
…
}

Retrieving user information from Azure AD’s UserInfo Endpoints

In OpenId Connect (OIDC) we have the UserInfo endpoint, that’s specifically for the OIDC protocol and we cannot use with OAuth2 protocol.

To use this endpoint in Azure AD we need a token, and without specifying the “Resource” parameter.

How to obtain a token (V1)

For the sake of this example we’ll use the auth code grant flow to request tokens, using Microsoft Identity Platform V1 endpoint.

In a browser we can request a token like the samples below.

  1. Request Code – without specifying the “Resource” parameter, like:
    https://login.microsoftonline.com/{tenant}/oauth2/authorize?client_id={appid}&scope=openid%20offline_access%20profile&redirect_uri={redirect_uri}&response_type=code

    Response:
    https://localhost:44555/?code=AQABAAIAAAAP0wLlqdLVToOpA4kwzSnx6BjceMnEMcvAOdHgnHs3FJWDCqJbpVc5kQWtNUD8X-bUSCT1iiYd_vmY-G6nA2RPJK7C1GnSclx3UmUvIQWrANdZfoEZGY_sfTOvZ5Y6S3FVZExIue-vj89JAcJ40nMRBN…
  2. Request Token – using Code returned request Access Token again, without specifying the “resource” parameter, request to token endpoint should look like:
This image has an empty alt attribute

Response has an Access Token, that cannot be decoded:

Call the endpoint

Do the request to UserInfo endpoint (https://login.microsoftonline.com/common/openid/userinfo) using the access token, like you can see below:

Response:

Call UserInfo with Microsoft Identity Platform V2 endpoint

Above we described how to call the endpoint using the V1 endpoint, the same can be achieved using the V2 endpoints also.

When using this authentication endpoints we’ll need to get a token with the MS Graph scope and call the UserInfo endpoint – https://graph.microsoft.com/oidc/userinfo.

How to get UserInfo details from the JWT Token

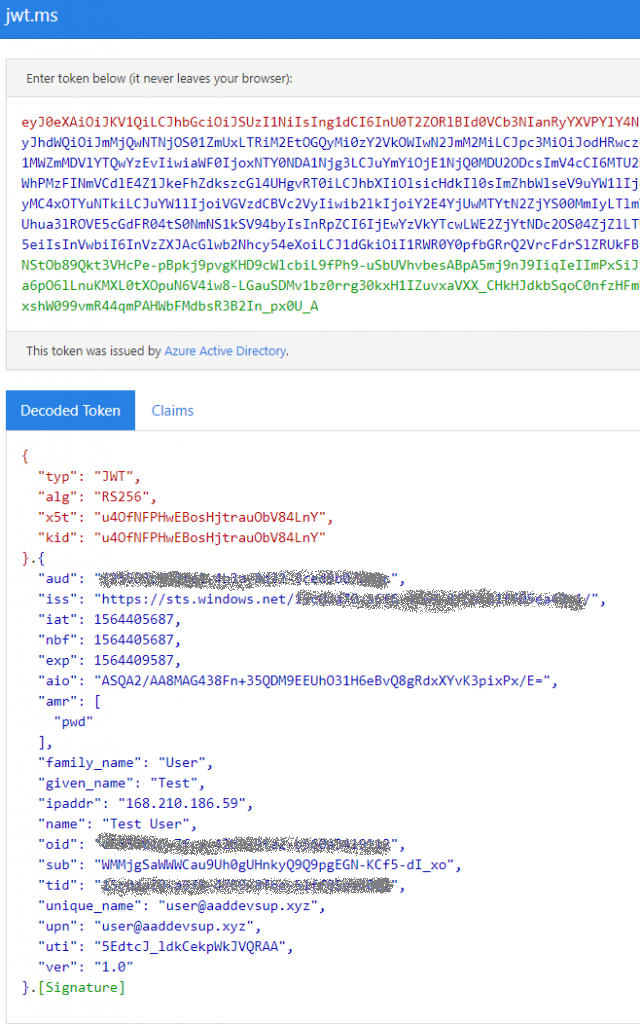
If you are requesting a id_token to begin with, you can just decode it and save yourself an additional call in your application.

Below we can see a decoded id_token and information that it has.

Existing endpoints

The information of the UserInfo endpoint that you should use depends on the authentication endpoints version. And the best way to get that info is to call the metadata endpoints.

  Metadata UserInfo
V1 https://login.microsoftonline.com/{tenant}/.well-known/openid-configuration https://login.microsoftonline.com/common/openid/userinfo (Azure AD UserInfo)
V2 https://login.microsoftonline.com/{tenant}/v2.0/.well-known/openid-configuration https://graph.microsoft.com/oidc/userinfo
(MS Graph UserInfo)

Reference

Microsoft identity platform UserInfo endpoint