Introduction
This post covers an end to end scenario where a front end console application authenticates to Azure AD B2C using client credentials OAuth2 grant flow and calls a .Net backend web API. The samples in this post are built on .Net 6 framework.
App Registrations
There are 2 App Registrations required in this tutorial: a front-end console app and a back-end web API. The samples also require either a user flow or a custom policy. I use a “sign-up or sign-in” user flow for both applications.
Back-end web API:
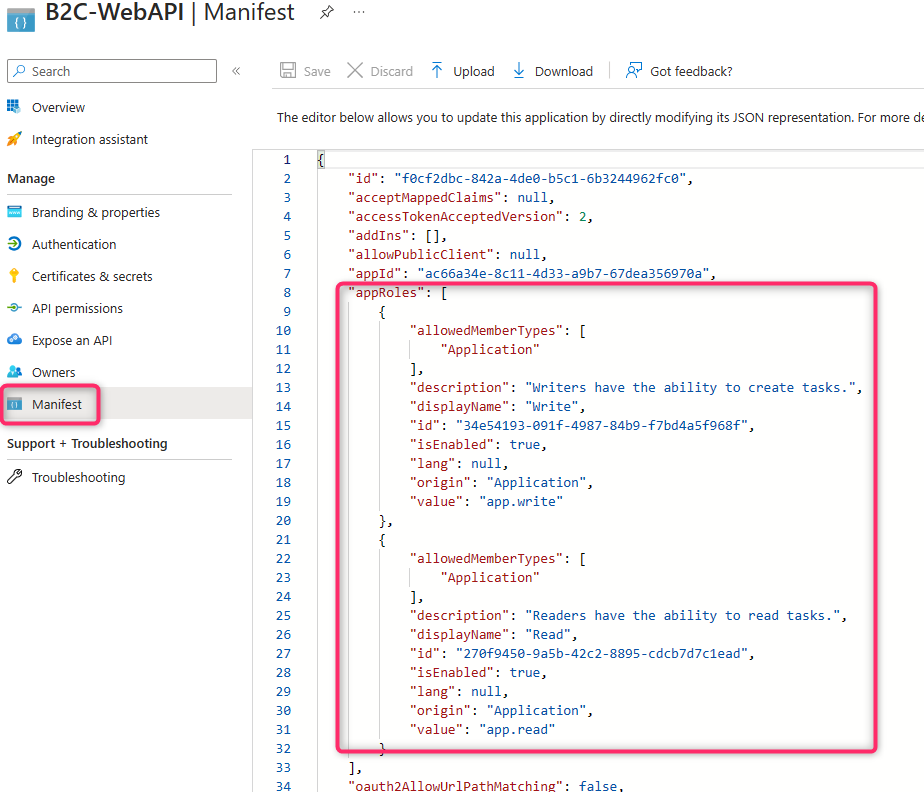
Follow steps 2.1 and 2.2 from this documentation to register and expose an application scope (permission) for the web API. For my web API sample, I have the following app roles defined:
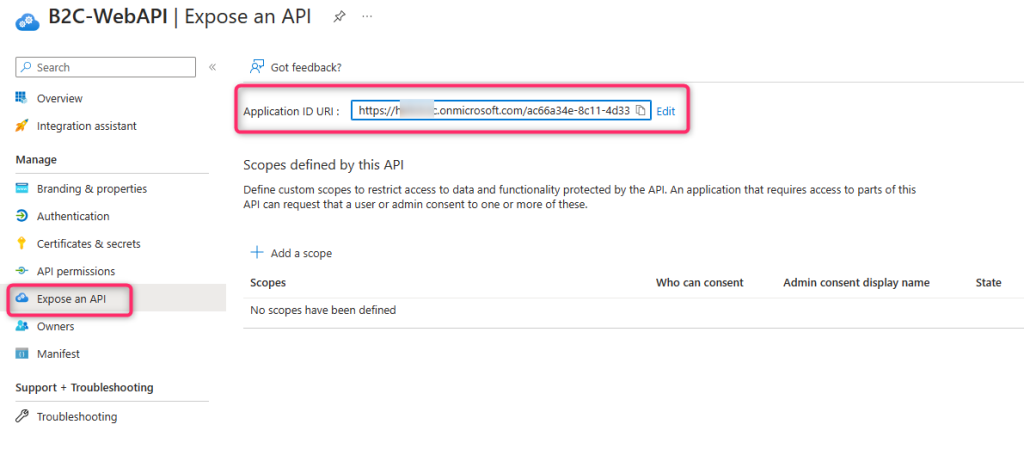
Take note of the Application ID URI of the Web API in the “Expose an API” section since this is used in the console application.
Front-end console application:
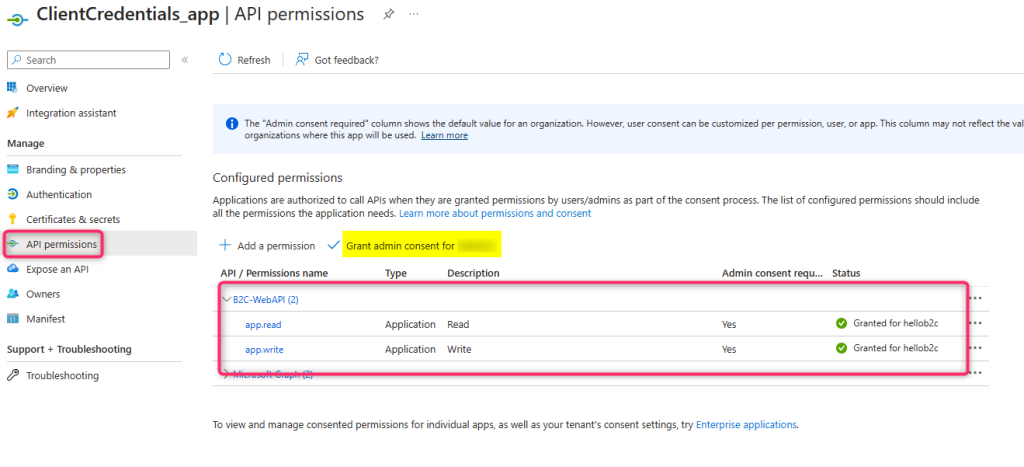
Follow step 2 from this documentation to register a client application, create an application secret, and configure its API permission to add application permissions from the web API. Grant Admin Consent to those permissions.
Note: Azure AD B2C provides the application permissions in the access token’s ‘scp’ claim.
Application Code
Front-end Console application
Complete sample for the console app is here. The application uses MSAL.Net to authenticate to Azure AD B2C using client credentials grant flow and calls the web API
Below is the Program.cs file. Fill out line 6 to 11 with information from your console application registration. For the scopes in line 13, this is the web API scope in this format: “<web API Application ID URI>/.default”. The webApiUrl variable on line 14 is the web API’s protected endpoint, which can be called with a Bearer token in the Authorization header. The code has logging functionality commented out. You can enable logging to gain insight if you encounter any problems with AAD Authentication.
// See https://aka.ms/new-console-template for more information
using Microsoft.Identity.Client;
using System.Net.Http.Headers;
using File = System.IO.File;

var clientId = "<Client App ID>";
var clientSecret = "<Client App Secret>";
var tenantName = "<tenant>.onmicrosoft.com";  //for example "contosob2c.onmicrosoft.com"
var PolicySignUpSignIn = "<sign-up or sign-in userflow>"; //for example "b2c_1_susi"
var AuthorityBase = $"https://<tenant>.b2clogin.com/tfp/{tenantName}/";  // for example "https://contosob2c.b2clogin.com/tfp/contosob2c.onmicrosoft.com/"
var Authority = $"{AuthorityBase}{PolicySignUpSignIn}";

string[] scopes = { $"<web API URI>/.default" };
string webApiUrl = "https://localhost:7137/WeatherForecast";
string accessToken = "";

// for logging purpose
/*
void Log(LogLevel level, string message, bool containsPii)
{
    string logs = $"{level} {message}{Environment.NewLine}";
    File.AppendAllText(System.Reflection.Assembly.GetExecutingAssembly().Location + ".msalLogs.txt", logs);
}
*/

IConfidentialClientApplication app;
app = ConfidentialClientApplicationBuilder.Create(clientId)
               .WithClientSecret(clientSecret)
               .WithB2CAuthority(Authority)
               // for logging purpose
               // .WithLogging(Log, LogLevel.Verbose, true)
               .Build();

try
{
    var result = await app.AcquireTokenForClient(scopes).ExecuteAsync();
    accessToken = result.AccessToken;
}
catch (Exception ex)
{
    Console.WriteLine (ex.Message);
    Console.WriteLine(ex.StackTrace);

}


var httpClient = new HttpClient();
HttpResponseMessage response;
try
{
    var request = new HttpRequestMessage(HttpMethod.Get, webApiUrl);
    request.Headers.Authorization = new AuthenticationHeaderValue("Bearer", accessToken);
    response = await httpClient.SendAsync(request);
    var content = await response.Content.ReadAsStringAsync();
    Console.WriteLine("Http Response Code: " + response.StatusCode.ToString());
    Console.WriteLine("Http Respone: " + content);
}
catch (Exception ex)
{
   Console.WriteLine(ex.ToString());
}
Web API
Use the following steps to create a .Net 6 web API with Azure AD B2C authentication. Documentation for dotnet utility is here
- from the command prompt run ‘dotnet new webapi -au IndividualB2C -f net6.0 -o “c:\temp\b2cwebapi”‘ to create a web API project
- In the appsettings.json file change the section named from “AzureAd” to “AzureAdB2C”
- Fill out the AzureAdB2C section with information from the web API app registration. Fill out the scopes section with any permissions exposed by the web API. These are in the token’s ‘scp’ claim.
The complete web API project is here.
The project has a protected controller with the following attributes:
[Authorize]
[ApiController]
[Route("[controller]")]
[RequiredScope(RequiredScopesConfigurationKey = "AzureAdB2C:Scopes")]
public class WeatherForecastController : ControllerBase
Here is the Program.cs file:
using Microsoft.AspNetCore.Authentication;
using Microsoft.AspNetCore.Authentication.JwtBearer;
using Microsoft.Identity.Web;

var builder = WebApplication.CreateBuilder(args);

// Add services to the container.
builder.Services.AddAuthentication(JwtBearerDefaults.AuthenticationScheme)
    .AddMicrosoftIdentityWebApi(builder.Configuration.GetSection("AzureAdB2C"));

builder.Services.AddControllers();
// Learn more about configuring Swagger/OpenAPI at https://aka.ms/aspnetcore/swashbuckle
builder.Services.AddEndpointsApiExplorer();
builder.Services.AddSwaggerGen();

var app = builder.Build();

// Configure the HTTP request pipeline.
if (app.Environment.IsDevelopment())
{
    app.UseSwagger();
    app.UseSwaggerUI();
}

app.UseHttpsRedirection();

app.UseAuthentication();
app.UseAuthorization();

app.MapControllers();

app.Run();