In Azure SQL, an access token can be used to authenticate a user or service principal. In this blog post, I will show you what is required for both and give some methods for acquiring the access token based on the scenario to set the access token parameter in the connection object.
Requirements: You have an Azure tenant and an Azure SQL database already configured and basic understanding of SSMS and creating queries, executing SQL commands. If you do need help creating one, you can follow this tutorial here. We are not going to be using any of the standard Connections strings that you find in the “Connection strings” blade for the server. Instead, we will use something like this ( with your values configured ):
Server=tcp:{sql server name}.database.windows.net, {port – default is 1433};Initial Catalog={database name};Persist Security Info=False;MultipleActiveResultSets=False;Encrypt=True;TrustServerCertificate=False
So, if my sql instance is called “RaysSQL” and my database called “RaysTest” and I left the default port at 1433 when creating the instance, my connection string would be this:
Server=RaysSQL.database.windows.net,1433;Initial Catalog=RaysTest;Persist Security Info=False;MultipleActiveResultSets=False;Encrypt=True;TrustServerCertificate=False
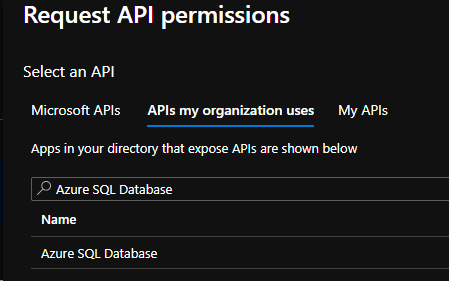
First, lets setup Azure SQL to allow access by a specific user. To begin with, you will need an app registration created ( since we will be connecting from code ) to allow the application to obtain an access token for the user to the database. In the App Registrations pane, create a new app registration, select “Accounts in this organization directory only”, and for the Redirect URI, select “Web” and enter “http://localhost” ( this is the redirect my sample app is using ). Next, take note of the application id ( client id ) as this will be needed for the sample app. Then, go to “Certificates & secrets” and configure a client secret. Take note of that new secret as well as you will need it for the sample. Finally, go to API permissions blade, click on the “Add a permission” button and in the Request API permissions slide out, click on “APIs my organization uses” and search for “Azure Sql Database”.
Click on Delegated permissions and add the permission “user_impersonation”.
For this first scenario, I am going to take an existing Azure user that is in my tenant and add him to the database and give him the db_datareader role ( to allow the user to run select queries ). Make sure that the user is valid and can sign in to the portal properly. Then, in SSMS, connect to the database and run these 2 commands ( where my dev@mytenant.com is my users login that I am going to add to the database ):
CREATE USER [dev@mytenant.com] FROM EXTERNAL PROVIDER;

EXECUTE sp_addrolemember db_datareader, [dev@mytenant.com];
Now that the user has been added, you can obtain an access token for this user. Lets take a look at the sample app code: The application has a class I called Azure_SQL. In this class is where you will configure the settings for your tenant and application.
		private const string TENANT_ID = "{your tenant id or domain name}";
		private const string CLIENT_ID = "{your app id or client id}"; // Azure_SQL
		private const string CLIENT_SECRET = "{the client secret you configured}";
		private const string REDIRECT_URI = "http://localhost";
		private const string CONNECTION_STRING = "Server=tcp:RaysSQL.database.windows.net,1433;Initial Catalog=RaysTest;Persist Security Info=False;MultipleActiveResultSets=False;Encrypt=True;TrustServerCertificate=False";
		private static readonly string[] scopes = new string[] { "https://database.windows.net/.default" };
I then have a series of methods to get access tokens via different ways but we will first focus on the user scenario and for that, we would be using the method “GetAccessToken_UserInteractive()” This will use MSAL which will prompt the user to sign in using the default browser ( since this is a console application ). Once the sign in is complete, you can close the browser window.
		public static async Task<string> GetAccessToken_UserInteractive()
		{

			IPublicClientApplication app = PublicClientApplicationBuilder
				.Create(CLIENT_ID)
				.WithAuthority(AzureCloudInstance.AzurePublic, TENANT_ID)
				.WithRedirectUri(REDIRECT_URI)
				.Build();

			string accessToken = string.Empty;

			AuthenticationResult authResult = null;
            IEnumerable<IAccount> accounts = await app.GetAccountsAsync();

            try
            {
				authResult = await app.AcquireTokenSilent(scopes, accounts.FirstOrDefault()).ExecuteAsync();
				accessToken = authResult.AccessToken;
            } catch (MsalUiRequiredException)
            {
				authResult = await app.AcquireTokenInteractive(scopes).ExecuteAsync();
				accessToken = authResult.AccessToken;
			} catch (Exception ex)
            {
				Console.WriteLine($"Authentication error: {ex.Message}");
            }

			Console.WriteLine($"Access token: {accessToken}\n");

			return accessToken;
		}
I then have a method to make a database call, passing in the access token as a parameter which will retrieve the list of fake users in my sample table. That method is called GetUsernames(string access_token). This is the main muscle of the app. It will take any access token ( that is valid for accessing this database ) and run the query.
		public static Dictionary<Guid,string> GetUsernames(string access_token)
		{
			using (var connection = new SqlConnection(CONNECTION_STRING))
			{
				connection.AccessToken = access_token;

                try
                {
					connection.Open();

                } catch (Exception ex)
                {
					Console.WriteLine($"DB Connection error: {ex.Message}");
                }
				var cmd = connection.CreateCommand();
				cmd.CommandText = "SELECT TOP 10 id, user_name from Users Order by user_name ASC";
				Console.WriteLine($"Executing command: {cmd.CommandText}...\n");

				var reader = cmd.ExecuteReader();
				var users = new Dictionary<Guid, string>();

				if (reader.HasRows)
                {
					while (reader.Read())
					{
						users.Add(reader.GetGuid(reader.GetOrdinal("id")), reader.GetString(reader.GetOrdinal("user_name")));
					}
                }

				return users;
			}
		}
As you can see, I am simply making a new SqlConnection using the custom connection string and then on the connection object, we set the access token and the connection will use that token for authentication. In Program.cs, in Main(), I create a variable for the access token, a variable to receive the query results and then set the access_token = Azure_SQL.GetAccessToken_UserInteractive().Result; I set the users variable to the GetUserNames method, passing the access token. I then loop through the users variable to output the data to the console.
using System;
using System.Collections.Generic;
using System.Linq;

namespace Console_Connect_SQL
{
    class Program
    {
        static void Main(string[] args)
        {
            Console.WriteLine("Hello World!\n");

            string access_token = string.Empty;
            Dictionary<Guid, string> users = new Dictionary<Guid, string>();

            // get the data from the database with a user signin....
            Console.WriteLine("Signing in as a user...\n");
            access_token = Azure_SQL.GetAccessToken_UserInteractive().Result;
            users = Azure_SQL.GetUsernames(access_token);

            foreach(KeyValuePair<Guid,string> user in users)
            {
                Console.WriteLine($"ID: {user.Key.ToString()} USER: {user.Value.ToString()}");
            }
        }
    }
}
Fun tip: the console application will output the access_token. You can copy that token and go to https://jwt.ms , paste it in the top and see what the values are in the token.
Note: Managed SQL instances, as in this blog example, do not support authentication based on an Azure Group: Azure Active Directory authentication – Azure SQL Database | Microsoft Docs
For logging in as a service principal ( app registration – using the client credentials grant flow ) it is pretty much the same process as above. Create an app registration for the service principal, create the client secret ( I am using the same app registration for both so that is why I have the client secret on my app registration ). Then, when running the sql script to create the user, you will just use the app registrations display name as the user. In the code, the main difference is, you will be using the client id and the client secret to sign in instead of prompting the user. So, using the same app registration we have created above, you can use this code to get an access token:
		public static async Task<string> GetAccessToken_ClientCredentials()
		{

			IConfidentialClientApplication app = ConfidentialClientApplicationBuilder
				.Create(CLIENT_ID)
				.WithClientSecret(CLIENT_SECRET)
				.WithAuthority(AzureCloudInstance.AzurePublic, TENANT_ID)
				.WithRedirectUri(REDIRECT_URI)
				.Build();

			string accessToken = string.Empty;

			AuthenticationResult authResult = null;

			try
			{
				authResult = await app.AcquireTokenForClient(scopes).ExecuteAsync();
				accessToken = authResult.AccessToken;
			}
			catch (MsalClientException ex)
			{
				Console.Write($"Error obtaining access token: {ex.Message}");

			}

			Console.WriteLine($"Access token: {accessToken}\n");

			return accessToken;
		}
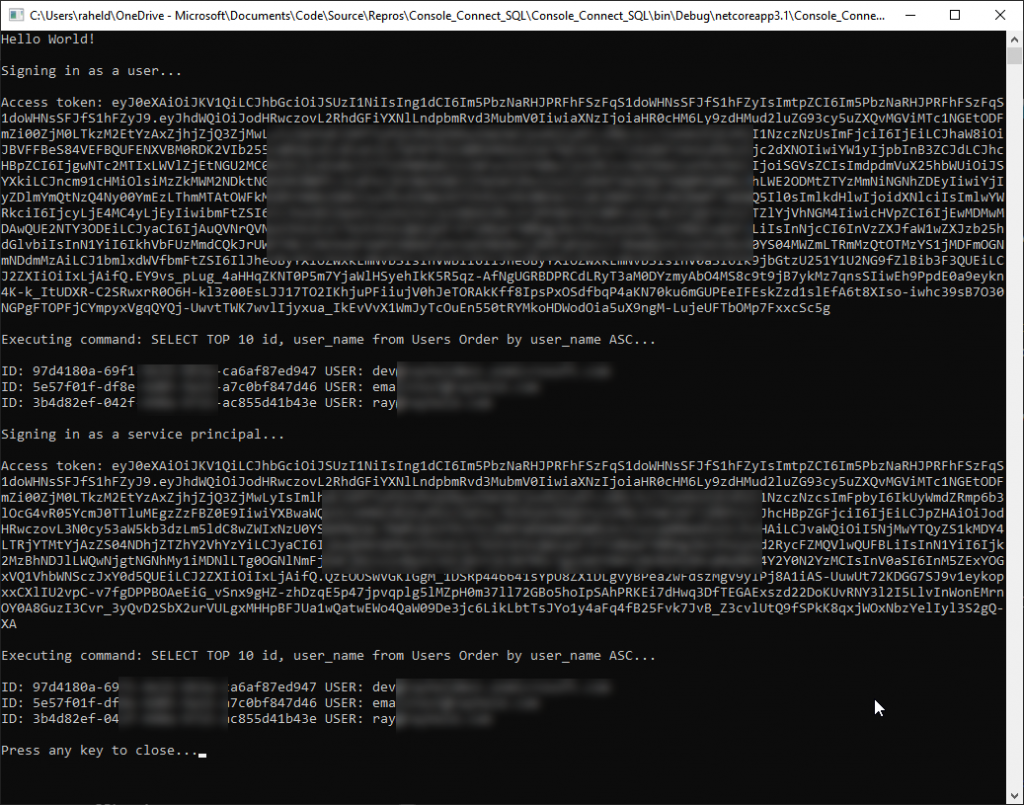
The sample code will execute two times. First, it will prompt for a user sign in to show the user flow and it executes the desired query ( make sure you have a table with some records in it and the query is valid ). Then, it will execute as a service principal and again, run a query and output the data.
My sample data is using the “users” format to make it easy to populate a pre-existing data structure. If you want to create the same data as I have, the GitHub will have a SQL script to both create the table and populate it will some sample users.
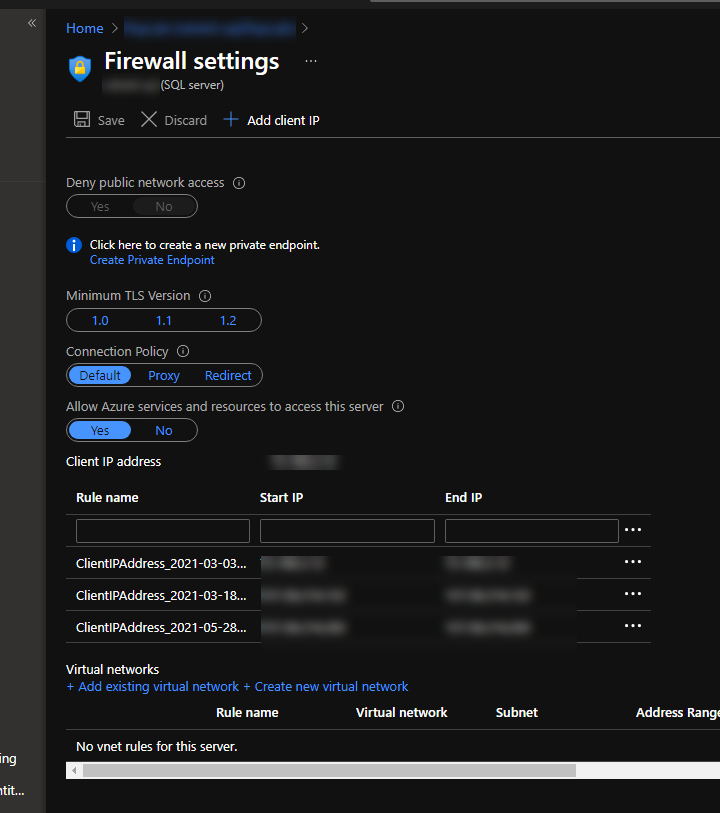
Another note, Azure SQL does have a firewall configured so you will need to add your IP address in the portal. If you log in with SSMS with a user in the same tenant, you may be prompted to add your IP address automatically.
That is it. In summary, there isn’t much you need to do on the Azure SQL side except for running the script to either add a user or a service principal to be able to login to the database and then the script to add that user or service principal to a role that would allow the action you need such as the db_datareader role to allow SELECT queries to be ran.
Love the article. I have an application, that customer purchase. The app uses entity framwork core and migrations to create its database. Recently a customer asked if they could use their azure sql server to run the database from. I am using ef core 6, MSAL (4.46.1) and Microsoft.Data.SqlClient (5.0.0). I have setup an azure sql server, registered my app as a multi tenant app, and created an azure ad user who has azure ad admin rights on the sql server. I can get an access token, set it into the sql connection, and when I call Migrate on the db context, it fails with “login failed for principal”. Are there any good straight forward references to use to get this working? I have a small sample application.
It sounds like the service principal is not a user in the database. You will need to open a support ticket the Azure SQL team for assistance with that.
I like the clarity of the article, precise guide for using token based authentication with SqlClient. However, I am wondering how SqlClient manages token expiry. There will be point in time when token gets expired. In that case, is there a way available SqlClient notifies application to provide a new access token?
Since you are generating the token and using that for the sql client, the sql client will not be checking the lifetime of the token. You can either 1) keep track of the life of the token yourself or 2) catch the error that is raised when the token has expired and then acquire a new token.