Use logging to troubleshoot Azure AD protected Web API Authentication or Authorization errors

The sample web API application in this blog uses .Net 6 Framework and Microsoft.Identity.Web nuget package to Azure AD protect the Web API. I use Serilog framework for logging the debug output both to the console window and to the local file. This sample assumes you already have a web API application registered in Azure AD. If you are not familiar with how to do that refer to my previous blog on the same web API protection topic. To troubleshoot web API Authentication/Authorization issues, we can take advantage of the following JWTBearerEvents to get insight into why a JWT Bearer token might fail to validate: OnTokenValidated, OnMessageReceived, OnAuthenticationFailed, and OnChalleenge events.

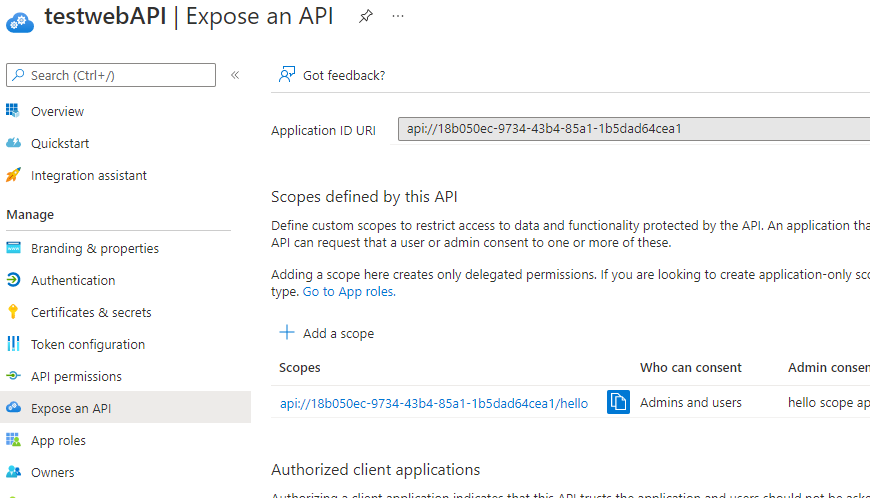
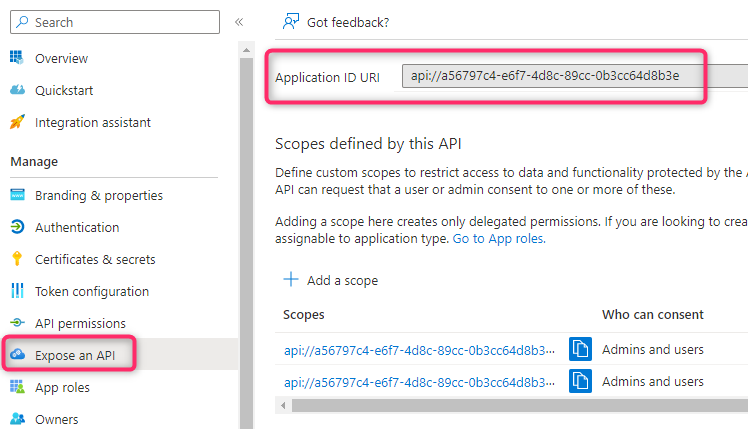
Here is how I configure the App ID URI for my Web API

You can find the source code for this project on github. Below is my Program.cs file showing how to set up logging for the above events:

using Microsoft.AspNetCore.Authentication;
using Microsoft.AspNetCore.Authentication.JwtBearer;
using Microsoft.Identity.Web;
using Microsoft.IdentityModel.Logging;
using System.Diagnostics;
using Serilog;


// https://github.com/datalust/dotnet6-serilog-example

Log.Logger = new LoggerConfiguration()
    .WriteTo.Console()
    .CreateBootstrapLogger();

Log.Information("starting up");
try
{
    var builder = WebApplication.CreateBuilder(args);

    builder.Host.UseSerilog((ctx, lc) => lc
        .WriteTo.Console()
        .ReadFrom.Configuration(ctx.Configuration));

    // Add services to the container.
    builder.Services.AddAuthentication(JwtBearerDefaults.AuthenticationScheme)
        .AddMicrosoftIdentityWebApi(builder.Configuration.GetSection("AzureAd"));

    // Enable PII for logging
    IdentityModelEventSource.ShowPII = true;
    // Configure middleware events
    builder.Services.Configure<JwtBearerOptions>(JwtBearerDefaults.AuthenticationScheme, options =>
    {
        options.TokenValidationParameters = new Microsoft.IdentityModel.Tokens.TokenValidationParameters
        {
            ValidAudiences = new List<string> { "api://a56797c4-e6f7-4d8c-89cc-0b3cc64d8b3e", "a56797c4-e6f7-4d8c-89cc-0b3cc64d8b3e" },
            ValidIssuers = new List<string> { "https://sts.windows.net/<tenant ID>/", "https://login.microsoftonline.com/<tenant ID>/v2.0" }
        };
        options.Events = new JwtBearerEvents
        {
            OnTokenValidated = ctx =>
            {
                string message = "[OnTokenValidated]: ";
                message += $"token: {ctx.SecurityToken.ToString()}";
                Log.Information(message); 
                return Task.CompletedTask;
            },
            OnMessageReceived = ctx =>
            {
                string message = "[OnMessageReceived]: ";
                ctx.Request.Headers.TryGetValue("Authorization", out var BearerToken);
                if (BearerToken.Count == 0)
                    BearerToken = "no Bearer token sent\n";
                message += "Authorization Header sent: " + BearerToken + "\n";
                Log.Information(message);
                return Task.CompletedTask;
            },
            OnAuthenticationFailed = ctx =>
            {
                ctx.Response.StatusCode = StatusCodes.Status401Unauthorized;
                string message = $"[OnAuthenticationFailed]: {ctx.Exception.ToString()}";
                Log.Error(message);
                // Debug.WriteLine("[OnAuthenticationFailed]: Authentication failed with the following error: ");
                // Debug.WriteLine(ctx.Exception);
                return Task.CompletedTask;
            },
            OnChallenge = ctx =>
            {
                // Debug.WriteLine("[OnChallenge]: I can do stuff here! ");
                Log.Information("[OnChallenge]");
                return Task.CompletedTask;
            },
            OnForbidden = ctx =>
            {
                Log.Information("[OnForbidden]");
                return Task.CompletedTask;
            }
        };
    });

    builder.Services.AddControllers();
    // Learn more about configuring Swagger/OpenAPI at https://aka.ms/aspnetcore/swashbuckle
    // builder.Services.AddEndpointsApiExplorer();
    // builder.Services.AddSwaggerGen();

    var app = builder.Build();

    app.UseSerilogRequestLogging();
    // Configure the HTTP request pipeline.
    if (app.Environment.IsDevelopment())
    {
        // app.UseSwagger();
        // app.UseSwaggerUI();
        // do something
    }

    app.UseHttpsRedirection();

    app.UseAuthentication();
    app.UseAuthorization();

    app.MapControllers();

    app.Run();
}
catch (Exception ex)
{
    Log.Fatal(ex, "Unhandled exception");
}
finally
{
    Log.Information("Shut down complete");
    Log.CloseAndFlush();
}

To run this sample change the following section with your own app registration info:

  • the AzureAD section in appsettings.json file
  • TokenValidationParameters’s ValidAudiences and ValidIssuers in Program.cs

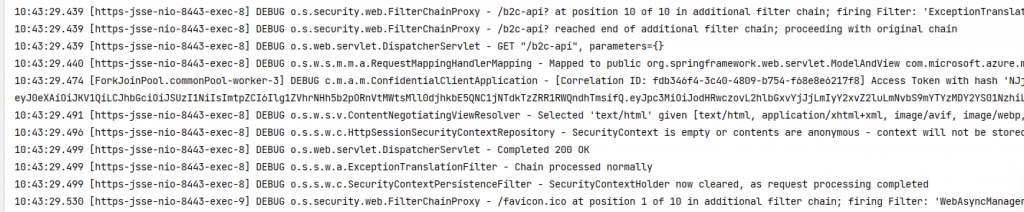
The sample writes log output to both a console window and local file whose path is specified in appsettings.json

Using Azure Identity Client with VB.Net or C# to get a KeyVault secret

This blog post will show you how to use the Azure Identity Client library in VB.Net and C# to use a Managed Identity to access a secret in KeyVault. This is assuming that you already have a keyVault secret and the user has the proper access policy to read a keyvault secret. This post will not show you how to do those tasks, only how to implement the Azure Identity client library in a vb.net application and access a secret as well as generating an access token. I have based this blog post on the following documents:


You can find the VB.Net sample in my GitHub here. Also, there is a C# version of the sample in my Github here.

Before we start, lets set up a resource, a system assigned identity for that resource, and then a user managed identity that has access to the resource. The resource that I will set up is simply a VM in Azure ( so I can run visual studio there and have my code work ). The key to this is the code must run in the resource you have configured in order to be able to use the managed identity. You cannot run a desktop app from your local machine and have it use a managed identity in an Azure VM, for example. So, I have setup a VM in Azure with a pretty basic plan ( 8 gb memory ) so that I can install the community edition of Visual Studio and compile and run my code.

The next step is to create the system assigned managed identity. This is pretty straight forward, after creating the VM, go to the “Identity” blade on the VM and the under System assigned, just click the status to “On” and the object ID will be listed for that identity.

We will be coming back here later to assign our User assigned identity to this resource ( the VM ). To create a user assigned credential, you will need to go to the Managed Identities blade in the portal. Click on the “+ Create” button.

You will need to select the subscription to use, the Resource group, region and name ( the name is going to be the name for your Managed Identity ).

You can then continue to add tags or simply press the Review + Create button. You will need to consent but then the MSI will be created. Once created, click the “Go to resource” button and you will be able to get the Client ID on that blade, which will be needed for the User Assigned Managed Id in code:

We are not quite done with the User assigned id because you still need to assign it to both the VM ( or where the code is going to run from ) and also create an access policy in KeyVault for both of our MSI’s. To assign the User assigned MSI, go to the VM, click on the User assigned tab, and then add the MSI here.

You will be able to find the User assigned managed identity, then select it, click add and it will be added.

Now, both of our managed identities ( the system assigned and the user assigned ) need to have an access policy in KeyVault created. So, lets go to the KeyVault resource in Azure ( assuming you already have one created and a secret added )..Click the KeyVault, then go to Access policies:

Then, you will need to click the “+ Add Access Policy” to create a new policy for our MSI’s. We need the Get for Key and Secret permissions for this blog:

Next, we need to click on the “Select Principal” to add our MSI’s ( you can search by name ) — you can only add one at a time. You should see each MSI listed in the Access Policies blade now. If not, then it hasn’t been added and won’t have access to the keyvault:

Now for the code: to start, you will need to install the following nuget libraries along with the dependencies that are automatically installed when you choose the packages:


  • Azure.Identity
  • Azure.Security.KeyVault.Secrets

You will then need the following Imports at the top of your code file:


  • Imports Azure.Core
  • Imports Azure.Identity
  • Imports Azure.Security.KeyVault.Secrets

The key to using the Managed Identities ( system assigned or user assigned ) is setting a ManagedIdentityCredential. For a system assigned one, you just need to set a credential variable to a New ManagedIdentityCredential. For a user assigned credential, you will need to set the credential variable to a New ManagedIdentityCredential( id ) with the id = to the client id for the user assigned credential.

    Sub Get_Secret_With_UserAssigned_MSI()
        Console.WriteLine($"{vbCrLf}Getting secret with user assigned msi:")

        Dim credential As New ManagedIdentityCredential(userAssignedClientId)

        Dim client As SecretClient = New SecretClient(keyVaultUri, credential)
        Dim secret As KeyVaultSecret = client.GetSecret(keyVaultSecretName).Value

        Console.WriteLine($"KeyVault Secret = {secret.Value}{vbCrLf}")

    End Sub

    Sub Get_Secret_With_SystemAssigned_MSI()
        Console.WriteLine($"{vbCrLf}Getting secret with system assigned msi:")

        Dim credential As New ManagedIdentityCredential()

        Dim client As SecretClient = New SecretClient(keyVaultUri, credential)
        Dim secret As KeyVaultSecret = client.GetSecret(keyVaultSecretName).Value

        Console.WriteLine($"KeyVault Secret = {secret.Value}{vbCrLf}")
    End Sub

The equivalent in C#:

        static void Get_Secret_With_UserAssigned_MSI()
        {
            Console.WriteLine($"\nGetting secret with user assigned msi:");

            ManagedIdentityCredential credential = new ManagedIdentityCredential(userAssignedClientId);

            SecretClient client = new SecretClient(keyVaultUri, credential);
            KeyVaultSecret secret = client.GetSecret(keyVaultSecretName).Value;

            Console.WriteLine($"KeyVault Secret = {secret.Value}\n");
        }

        static void Get_Secret_With_SystemAssigned_MSI()
        {
            Console.WriteLine($"\nGetting secret with system assigned msi:");

            ManagedIdentityCredential credentail = new ManagedIdentityCredential();

            SecretClient client = new SecretClient(keyVaultUri, credentail);
            KeyVaultSecret secret = client.GetSecret(keyVaultSecretName).Value;

            Console.WriteLine($"KeyVault secret = {secret.Value}\n");
        }

Download both samples from my GitHub ( linked at the beginning of this blog ) and plug in your MSI information and give it a try after configuring the resource, the keyvault and the MSI’s! In both samples, you will need to change the values for the variables userAssignedClientId, keyVaultSecretName and keyVaultUri to match your environment.

Sample Output:

For more reading, see this document about the Managed Identities — there is also a good video on that page.

Using Microsoft Graph PowerShell SDK to manage user consented permissions

The oAuth2PermissionGrant object keeps a record of user consented permissions (Delegated Permissions) in a tenant. There is one OAuth2PermissionGrant object (identified by Consent ID) for each combination of client application, resource application, and user. The sample PowerShell script in this post will perform the following tasks:

  1. Remove all MS Graph Delegated permissions (if any) for the user
  2. Perform user consent for an initial set of MS Graph permission
  3. Update the consented permission list with some additional permissions
  4. Remove some permissions from the consented permission list
  5. Remove (revoke) all consented permissions for the user

Pre-Requisite

This post assumes you already have an app registration created in your tenant and a user you intend to perform consent on.

Note: There might be a short time delay for the permissions to get updated in the portal
[gist id=”9bbae0c0660a83ddf2aadb844b03a454″ file=”OAuth2PermissionGrant.ps1″]

For removing Admin Consented Delegated permission refer to Revoke Admin Consent for a delegated permission on a Service Principal with the MS Graph PowerShell SDK | Azure Active Directory Developer Support Team (aaddevsup.xyz) for more info

Update your Azure AD-integrated applications to use TLS 1.2

Recently our support team has seen quite a few cases where customer applications have been working for years and recently started failing with one of the following error messages:. These errors are often seen in applications targeting an old version of .Net Framework.

AADSTS1002016: You are using TLS version 1.0, 1.1 and/or 3DES cipher which are deprecated to improve the security posture of Azure AD
IDX20804: Unable to retrieve document from: ‘[PII is hidden]’
IDX20803: Unable to obtain configuration from: ‘[PII is hidden]’
IDX10803: Unable to create to obtain configuration from: ‘https://login.microsoftonline.com/{Tenant-ID}/.well-known/openid-configuration’
IDX20807: Unable to retrieve document from: ‘System.String’
System.Net.Http.Headers.HttpResponseHeaders RequestMessage {Method: POST, RequestUri: ‘https://xxx.b2clogin.com/xxx.onmicrosoft.com/B2C_1_xxx_Signin/oauth2/v2.0/token’, Version: 1.1, Content: System.Net.Http.FormUrlEncodedContent, Headers: { Content-Type: application/x-www-form-urlencoded Content-Length: 970 }} System.Net.Http.HttpRequestMessage StatusCode UpgradeRequired This service requires use of the TLS-1.2 protocol

What’s going on?

For security and industry standards compliance reasons, starting from January 31st, 2022 Microsoft started enforcing client applications connecting to various Azure AD services on Microsoft Identity Platform (aka Azure AD) used TLS 1.2 secure protocol. You can read more about this change here and here. Applications running on older platforms and/or older version of the .Net framework may not have TLS 1.2 enabled, therefore fails to retrieve the OpenID Connect metadata document resulting in failed authentication.

Resolution:

To enable TLS 1.2 support, you can try the following:

  1. Upgrade the applications to use .Net Framework 4.7 or later where TLS 1.2 is enabled by default
  2. Make the following code change to the application should the .Net Framework upgrade may not be feasible (courtesy of Brent on this StackOverflow post):
Option 1

You can add the following in Global.asax.cs:

using System.Net;
.
.
protected void Application_Start()
{
    ServicePointManager.SecurityProtocol = SecurityProtocolType.Tls12 | SecurityProtocolType.Ssl3; // only allow TLSV1.2 and SSL3

    //The rest of your startup code goes here
}

Option 2

There's another method as well using web.config that doesn't involve code changes. If .NET 4.7.2 is available (which it is on Azure), you can add the following:

<system.web>
  <httpRuntime targetFramework="4.7.2" />
</system.web>
This may not work if using the 4.7.2 runtime causes breaking changes to your app. It doesn't require updating the compilation version and in the scenarios I tested it caused no issues.

If you are getting the above AADSTS error from running the PowerShell commandlets Connect-MSolService, Connect-AzureAD, or Connect-MSGraph (from the Microsoft Intune PowerShell SDK module) you can try the following to set TLS 1.2 version before calling any of those Connect commands:

[Net.ServicePointManager]::SecurityProtocol = [Net.SecurityProtocolType]::Tls12
Connect-MSolService

References:

Transport Layer Security (TLS) best practices with the .NET Framework – .NET Framework | Microsoft Docs

Troubleshooting 403 Authorization error when calling Microsoft Graph Security API

You may get the following 403 error when using Microsoft Graph Security API to call various end points (https://graph.microsoft.com/v1.0/security/alert, https://graph.microsoft.com/beta/security/secoreScores, etc…)

“Auth token does not contain valid permissions or user does not have valid roles”

Root Cause

The above error can occur if the access token is missing the following requirement:

  1. The token does not have the required Microsoft Graph permission for the https://graph.microsoft.com/v1.0 (or beta)/security/xxx entity endpoint being used
  2. The authenticating user obtaining the access token is not in one of the required Azure AD admin roles (for delegated permission type token)

Microsoft Graph permission

As a quick refresher, there are two types of tokens: Delegated and Application permission token. Refer to this blog for more info. For delegated case, MS Graph permission is in the ‘scp’ claim and for Application type, the permission is in the ‘roles’ claim. Refer to the security entity documentation here and here for the required permission. There is also a nice summary table in the link below:

Authorization and the Microsoft Graph Security API – Microsoft Graph | Microsoft Docs

Azure AD Admin roles

For delegated permission token, the authenticating user needs to be in one of the following admin roles

Azure AD RoleRole Template ID
Security Reader5d6b6bb7-de71-4623-b4af-96380a352509
Security Administrator194ae4cb-b126-40b2-bd5b-6091b380977d
Global Administrator62e90394-69f5-4237-9190-012177145e10

Refer to the following documentation for more info:

Azure AD built-in roles – Azure Active Directory – Microsoft Entra | Microsoft Docs

Authorization and the Microsoft Graph Security API – Microsoft Graph | Microsoft Docs

The ‘wids’ claim in the token contains the Azure AD Role info, which is used to determine if the user has sufficient privilege.

Note: the ‘wids’ claim may not exist if the token is obtained via Implicit grant flow. See Microsoft identity platform access tokens – Microsoft Entra | Microsoft Docs for more info. Use a different OAuth 2 grant flow for example Auth Code Grant flow to obtain the access token instead of.

How to Solve Failed Authentication After Publishing App to Google Play Store

Issue Description

You successfully implemented Azure AD Authentication in your Android app with the Microsoft Authentication Library. The application built and executed perfectly and passed all QA testing with flying colors. And then you published the application on Google Play. And authentication doesn’t work after installing the app.

If you exposed authentication error messages to the user, or had them sent to your team, then you might see an error like this:

“The redirect URI in the configuration file doesn’t match with the one generated with the package name and signature hash. Please verify the uri in the config file and your app registration in Azure portal.”

Another potential behavior that might indicate this problem is this: During development and QA testing, you successfully set up your app to use a supported broker to handle authentication and SSO. However, after deployment through Google Play and installation, the app no longer uses the broker for authentication.

The Cause

When an Android application is built for installation on a device, it is built as an “apk” compressed package and then signed by a certificate. This certificate signing ensures that the person who built the application was the one who owns the private signing key. This prevents potential impersonation attempts where a hacker might modify the application in a harmful way since the hacker will not be able to sign their version of the application with the original private signing key.

In the past, Android developers owned and maintained their own private signing keys. However, now, Google Play Services generate and maintain their own private signing key for an Android Developer. This is actually a good thing, since the key will be securely stored by Google. The developer still maintains an upload key so that Google Play Services can verify the authenticity of an uploaded app bundle, but the actual signing is done by the Google-owned signing certificate when a user installs the app on their device.

How is this relevant? The Microsoft Authentication Library (MSAL) for Android Native and Microsoft Supported Authentication Brokers use the public signature hash of an installed application to identify it during interaction through the Android Operating system necessary during authentication. The public signature hash of an application installed by Google Play will be different from the same application installed before publishing to Google Play. Because of this, Msal will be configured to use the incorrect signature hash.

How To Fix It

Generally, there are three major steps in solving this issue.

  • Find out the new Signature Hash resulting from Google Play Installation
  • Add a new Redirect URI to the App Registration in the Azure Portal with the new signature hash
  • Adapt the Msal Configuration within the application code to use the new Redirect URI and Signature Hash.

Each of these three steps are covered in more detail below:

Step 1:

Find the New Signature Hash

There are two ways to get the new Signature Hash: Use Msal’s “Package Inspector” tool and to get the Signature Hash from the Google Play Console.

For details on how to install and use the Msal Package Inspector, see my article here:
https://blogs.aaddevsup.xyz/2022/03/package-inspector-for-msal-android-native-guide/

Google Play Console

To get the Signature Hash from the Google Play Console, first go to the Console and log in with your Google Developer account.

Once you are in the Google Play Console, select the app you are working on, then look to the left side of the screen. Under the “Release” category, expand “Setup” and click on “App Integrity”.

Now click on the “App signing” tab and you will see the “fingerprint” of the app signing key in three different variations. Copy the one indicated in the screenshot below:

PowerShell Script to Encode the Signature Hash

Copy the “SHA-1” fingerprint and paste it into the following PowerShell script as the value of the $Thumbprint variable. Run the script to obtain the base64 encoded fingerprint that Msal needs.

$Thumbprint = "paste your fingerprint here"
$Thumbprint = $Thumbprint.Replace(":", "")

$Bytes = [byte[]]::new($Thumbprint.Length / 2)

For($i=0; $i -lt $Thumbprint.Length; $i+=2){
    $Bytes[$i/2] = [convert]::ToByte($Thumbprint.Substring($i, 2), 16)
}

$hashedString =[Convert]::ToBase64String($Bytes)

Write-Host $hashedString

Step 2:

Add a new Redirect URI to the App Registration in the Azure Portal with the new signature hash

If you have come this far in developing an Android App using Msal, you likely already understand how to complete this step; however, I will provide basic guidance here.

Note: I highly recommend adding a new redirect URI rather than modifying the existing redirect URI. Your app registration can contain many redirect URIs. Additionally, modifying the existing redirect URI might result in problems with the development version of your app. This could create headaches while troubleshooting, developing updates, etc.

Log in to your Azure Portal at portal.azure.com and navigate to the App registrations portal. This can be done quickly and easily by searching for “App registrations” at the top of the portal screen as indicated in the following screenshot:

Select the app registration for your Android app, click on “Authentication” on the left side of the screen, and then click to “Add a platform”. Select “Android” as indicated in the following screenshot.

Enter the package name of your Android app and the new signature hash in the indicated fields and then click “Configure”. Note that it is fine to have the same package name in multiple Android Redirect URIs as long as the signature hash is different.

Step 3:

Adapt the Msal Configuration within the application code to use the new Redirect URI and Signature hash

As previously mentioned, at this point in the development process, you are likely already familiar with this process. I will cover the basics here.

There are two things you need to change in the application code: The Msal configuration file and the Android Manifest file.

Msal Configuration File:

The only thing to change is the Redirect URI. Copy and paste this directly from the Azure Portal. In the Azure Portal, you will notice that the signature hash portion of the redirect URI is http encoded. It should remain http encoded.

Android Manifest File:

The only thing to change in the Android Manifest File is the android:path property within the tag for the “com.microsoft.identity.client.BrowserTabActivity” activity indicated in the following screenshot. Paste the signature hash as the value for this property.

Important Notes:
-make sure to include the forward slash at the front of the signature hash as seen in the above screenshot
-In contrast to the Redirect URI, the signature hash here is not http encoded

How to use Microsoft Graph SDK for PowerShell to update a registered Device’s Extension Attribute

Below is a sample PowerShell script showing how to update a registered device’s extension attribute. The sample uses extensionAttriubte3. You can easily swap this out to a different one. Refer to the Update Device documentation for more info.

Import-Module Microsoft.Graph.Identity.DirectoryManagement
# Log in with the correct scope
Connect-MgGraph -Scopes "Directory.AccessAsUser.All"

$DeviceId = "<Device ObjectId>"
$params = @{
   "extensionAttributes" = @{
      "extensionAttribute3" = "hello2"
   }
}
# Update Device
Update-MgDevice  -DeviceId $DeviceId  -BodyParameter ($params | ConvertTo-Json)

<# 
The following technique to create json payload also works.  Thanks to my colleague Will Fiddes for the idea
$json = '{ "extensionAttributes": { "extensionAttribute1": "BYOD-Device" } }'
Update-MgDevice -DeviceId $DeviceId -BodyParameter $json
#>

# Query Device
Get-MgDeviceById -DeviceId $DeviceId

Note: The above device update operation requires the signed in user to be in either the Intune Administrator role or Global Administrator role.

How to enable MSAL for Java (MSAL4J) logging in a Spring Boot application

In this blog, I’ll show how to enable MSAL4J logging using the logback framework in a spring boot web application. I’ll use our Azure AD B2C web sample here. The complete code for this blog is on github. Refer to the MSAL for Java logging documentation for more info. There are 3 main things you need to do for logging to work

1) Include the logback package in the pom.xml file

		<dependency>
			<groupId>ch.qos.logback</groupId>
			<artifactId>logback-classic</artifactId>
			<version>1.2.3</version>
		</dependency>

2) Add a file called ‘logback.xml’ with the following content to the resources folder.

This configuration (aka appender) logs to the console. There are other example appenders here you can use as well. You can change the logging level to a different level (error, warning, info, verbose) in your application since debug level is quite chatty.

<?xml version = "1.0" encoding = "UTF-8"?>
<configuration>
    <appender name="STDOUT" class="ch.qos.logback.core.ConsoleAppender">
        <encoder>
            <pattern>%d{HH:mm:ss.SSS} [%thread] %-5level %logger{36} - %msg%n</pattern>
        </encoder>
    </appender>
    <root level="debug">
        <appender-ref ref="STDOUT" />
    </root>
</configuration>

3) Set the logging.config property to the location of the logback.xml file before the main method:

@SpringBootApplication
public class MsalB2CWebSampleApplication {

	static { System.setProperty("logging.config", "C:\\Users\\<your path>\\src\\main\\resources\\logback.xml");}
	public static void main(String[] args) {
		// Console.log("main");
		// System.console().printf("hello");
		// System.out.printf("Hello %s!%n", "World");
		System.out.printf("%s%n", "Hello World");
		SpringApplication.run(MsalB2CWebSampleApplication.class, args);
	}
}

HTTPS support

The sample uses https. I follow step 2 from ‘Configure the Web App‘ section to generate a self-signed certificate and place the keystore.p12 file in the resources folder.

App Registration

Make sure you have 2 different app registrations in your Azure AD B2C tenant. One for the web app and one for the web API. Expose the scope in the web API (refer to this documentation if you are not familiar with how to expose web API scope) and configure the web API scope in the ‘API Permission’ blade for the web app. You should also grant admin consent to all the configured permission in the web app. You can also follow this tutorial for app registrations covered in this blog. Below is my set up:

Below is how logging should look like when done correctly:

Using Microsoft.Identity.Web to request multiple different Azure AD Access Tokens

There are times a web application may need to log in a user and call different backend Azure AD protected web APIs. The web application would need to obtain different Access Tokens, one for each web API. In this post I will attempt to demonstrate how this can be done using MIcrosoft.Identity.Web nuget package. This sample shows how to get tokens for Microsoft Graph resource and a custom web API resource. The project was developed using Visual Studio 2022 and .Net 6 framework.

App Registrations

I have both a web application and a web API registered in my Azure AD tenant with the following configuration:

Web App

Redirect URI: set the redirect URI for Web platform

Secret: create a client secret in the ‘Certificates & secrets’ blade

API permission is set as followed

Web API

scope defined for the web API:

Application Code

Add .EnableTokenAcquistionToCallDownstreamApi() in Program.cs file to expose the ITokenAcquisition Service to acquire access tokens for the downstream API (See https://docs.microsoft.com/en-us/azure/active-directory/develop/scenario-web-app-call-api-app-configuration?tabs=aspnetcore#startupcs for more info). Complete code for the project is at this github link.

using Microsoft.AspNetCore.Authorization;
using Microsoft.AspNetCore.Mvc.Authorization;
using Microsoft.Identity.Web;
using Microsoft.Identity.Web.UI;

var builder = WebApplication.CreateBuilder(args);

// Add services to the container.
/*
builder.Services.AddAuthentication(OpenIdConnectDefaults.AuthenticationScheme)
    .AddMicrosoftIdentityWebApp(builder.Configuration.GetSection("AzureAd"));
*/

builder.Services.AddMicrosoftIdentityWebAppAuthentication(builder.Configuration)
    .EnableTokenAcquisitionToCallDownstreamApi()
    .AddInMemoryTokenCaches();

builder.Services.AddAuthorization(options =>
{
    options.FallbackPolicy = options.DefaultPolicy;
});
builder.Services.AddControllersWithViews(options =>
{
    var policy = new AuthorizationPolicyBuilder()
        .RequireAuthenticatedUser()
        .Build();
    options.Filters.Add(new AuthorizeFilter(policy));
});
builder.Services.AddRazorPages()
    .AddMicrosoftIdentityUI();

var app = builder.Build();

// Configure the HTTP request pipeline.
if (!app.Environment.IsDevelopment())
{
    app.UseExceptionHandler("/Home/Error");
    // The default HSTS value is 30 days. You may want to change this for production scenarios, see https://aka.ms/aspnetcore-hsts.
    app.UseHsts();
}

app.UseHttpsRedirection();
app.UseStaticFiles();

app.UseRouting();

app.UseAuthentication();
app.UseAuthorization();

app.MapControllerRoute(
    name: "default",
    pattern: "{controller=Home}/{action=Index}/{id?}");
app.MapRazorPages();
app.MapControllers();
app.Run();

The sample uses ITokenAcqisition to get the access token for the downstream API as followed. The AuthorizeForScopes atrribute decoration on the controller is for handling dynamic consent if the requested API permission has not been consented yet. It’s important to have the same scopes defined in both the AuthorizeForScopes attribute and the GetAccessTokenForUserAsync call in the controller in order for consent to work correctly if needed.

Note: The web app should call GetAccessTokenForUserAsync each time an access token is needed.

using Microsoft.AspNetCore.Authorization;
using Microsoft.AspNetCore.Mvc;
using Microsoft.Identity.Web;

namespace WebAppWebAPIs.Controllers
{
    // https://docs.microsoft.com/en-us/aspnet/core/tutorials/first-mvc-app/adding-controller?view=aspnetcore-6.0&tabs=visual-studio
    [Authorize]
    public class WebAPIController : Controller
    {
        private readonly ILogger<HomeController> _logger;
        readonly ITokenAcquisition tokenAcquisition;
        private IConfiguration _configuration;
        public WebAPIController(ILogger<HomeController> logger, ITokenAcquisition tokenAcquisition, IConfiguration configuration)
        {
            _logger = logger;
            this.tokenAcquisition = tokenAcquisition;
            _configuration = configuration;
        }

        [AuthorizeForScopes(ScopeKeySection = "ApiScope:CalledApiScopes")]
        public async Task<IActionResult> Api()
        {
            string[] scopes = _configuration.GetValue<string>("ApiScope:CalledApiScopes").Split(" "); ;
            string token = await tokenAcquisition.GetAccessTokenForUserAsync(scopes);
            ViewBag.ApiToken = token;
            return View();
        }
...

In the sample I define all my web API scopes in the appsettings.json file:

  "GraphScope": {
    "CalledApiScopes": "user.read.all application.read.all",
    "CalledApiUrl": "https://graph.microsoft.com/v1.0"
  },
  "ApiScope": {
    "CalledApiScopes": "api://18b050ec-9734-43b4-85a1-1b5dad64cea1/hello",
    "CalledApiUrl": "https://myapi.com"
  },

Running the sample:

Change the values in the following sections of the appsettings.json file with your own web application’s registration value and the scopes for your downstream web APIs:

  "AzureAd": {
    "Instance": "https://login.microsoftonline.com/",
    "Domain": "[Enter the domain of your tenant, e.g. contoso.onmicrosoft.com]",
    "TenantId": "[Enter the tenant ID of the registered web app]",
    "ClientId": "[Enter the Client Id (Application ID obtained from the Azure portal), e.g. ba74781c2-53c2-442a-97c2-3d60re42f403]",
    "CallbackPath": "/signin-oidc",
    "SignedOutCallbackPath": "/signout-callback-oidc",
    "ClientSecret": "[Enter the web application Client Secret]"
  },
  "GraphScope": {
    "CalledApiScopes": "user.read.all application.read.all",
    "CalledApiUrl": "https://graph.microsoft.com/v1.0"
  },
  "ApiScope": {
    "CalledApiScopes": "api://18b050ec-9734-43b4-85a1-1b5dad64cea1/hello",
    "CalledApiUrl": "https://myapi.com"
  },

Run the project and browse to https://localhost:7035 and click on either ‘Graph Token’ link or the ‘WebAPI Token’ link in the menu to see the Access Token:

Other Sample

Take a look at https://github.com/Azure-Samples/active-directory-aspnetcore-webapp-openidconnect-v2/tree/master/3-WebApp-multi-APIs for a different sample using Microsoft Graph SDK for .Net to call both Microsoft Graph and Azure Resource Manager endpoint.

Package Inspector for MSAL Android Native Guide

Package Inspector for MSAL Android Native Guide

The Microsoft Authentication Library (MSAL) for Android Native contains a tool called Package Inspector. This tool presents a list of packages installed on an Android device and allows the user to view, copy, and paste the signature hash used to sign the application’s package. It can be very useful in troubleshooting and verifying the signature hash for applications installed on an Android device. Below is a guide on the installation, use, and common issues of the Package Inspector.

Some scenarios where the Package Inspector will be useful are:

  • You have successfully developed your application to use MSAL, but after deploying the app to the Google Play Store, the app fails to perform authentication. In this case, the Package Inspector will be useful to discover the new signature hash used by Google to sign the app package.
  • You are implementing MSAL in your Android application, but encounter the following error:
    “The redirect URI in the configuration file doesn’t match with the one generated with the package name and signature hash. Please verify the uri in the config file and your app registration in Azure portal.”
    In this case, you can use the Package Inspector to verify what the package signature hash is and correctly configure both the Azure Portal and application to use the correct signature hash.
  • You are implementing MSAL in your Android application, but encounter the following error:
    “Intent filter for: BrowserTabActivity is missing”
    This error can occur because the signature hash specified in the AndroidManifest.xml file does not match the signature hash actually used to sign the apk file. In this case, the Package Inspector will be useful to verify what the signature hash actually is.

Note: The best place to learn about MSAL for Android Native is the github page at the following link. The readme is a very good start.
https://github.com/AzureAD/microsoft-authentication-library-for-android

Prerequisites

You should have:

Installation

Option 1: Clone the repository directly into Android Studio

  1. Open Android Studio and close any open projects
  2. Click on “Get From Version Control”


  3. Make sure that “Git” is selected at the top of the window, paste in the repository url:
    https://github.com/AzureAD/microsoft-authentication-library-for-android.git
    and click “Clone


Option 2: Download as a zip file and open in Android Studio

  1. Download the repository at:
    https://github.com/AzureAD/microsoft-authentication-library-for-android/archive/refs/heads/dev.zip
  2. Extract the zip file to the directory of your choice.
  3. Open Android Studio and close any projects that are open.
  4. Click on “Open an Existing Project”


  5. Find and select the Root Package for the entire Android MSAL Repository; do not choose the ‘package-inspector’ directory (This small detail is important) and click “OK”. (I renamed the directory to ‘msal-android’, but it will be “microsoft-authentication-library-for-android-dev” by default)


Using the Package Inspector

  1. With the Android MSAL project open in Android Studio, connect the desired Android device. This can be a physical device connected to the computer’s USB port, or an emulator booted from Android Studio’s AVD manager. Make sure that your device appears in the drop-down list at the top of Android Studio and select it.
  2. To the left of the device drop-down, there is another drop-down list. Click this and select “package-inspector”


  3. Click the green “play” button (indicated in the screenshot above with a green circle all the way to the right) to build, install, and run the package inspector on the desired device.
  4. Look through the list of packages in the package-inspector app and click on a package for which you want to see the signature hash. All packages on the device that the package-inspector has permission to access will appear in this list.

Common Issues

Problems loading the tool into Android Studio:
It is very important to make sure that you are loading the root package from the MSAL repository and not individually the package inspector.

Make sure that the project you are loading into Android Studio is not package-inspector, but should be named this:
“microsoft-authentication-library-for-android-dev” or whatever you may have renamed the root repository on your system. See step 4 under Option 2 of the installation section of this blog post.

Not all packages appear in the Package Inspector:
This is a very likely issue to run into. You are able to install and open Package Inspector fine, and a list of packages appear in the app; however, you do not see packages for any of the apps you have installed on the device.

An explanation for the reason behind this can be found in Google’s documentation on a change that was introduced in Android 11 (API 30):
https://developer.android.com/training/package-visibility

How to fix it –
The way to fix the issue is to first open the AndroidManifest.xml file within the ‘package-inspector’ directory found on the left side of Android Studio.


And then add the following permission and query between the <manifest></manifest> tags:

<manifest xmlns:android="http://schemas.android.com/apk/res/android"
    package="com.microsoft.inspector">

    ...

    <permission android:name="android.permission.QUERY_ALL_PACKAGES" />

    <queries>
        <intent>
            <action android:name="android.intent.action.MAIN" />
        </intent>
    </queries>

</manifest>

Rerun the application from Android Studio, and the changes will be installed. Now you should be able to see the packages you have installed.