In my last blog post I talked about how to use PowerShell to instantiate an MSAL Confidential Client Application to acquire an access token using Client Credentials Grant flow. In this post we will use PowerShell to instantiate an MSAL Public Client Application to perform an Authorization Code Grant flow to obtain a delegated permission Access Token for Microsoft Graph. We will then use that access token to call Microsoft Graph to configure a signing certificate for our SAML Application Service Principal. Just a quick refresher that a certificate is always required when setting up SAML Sigle Sign-On feature for an Enterprise App in Azure AD.
Pre-requisites
To run the script in this blog you should have the following:
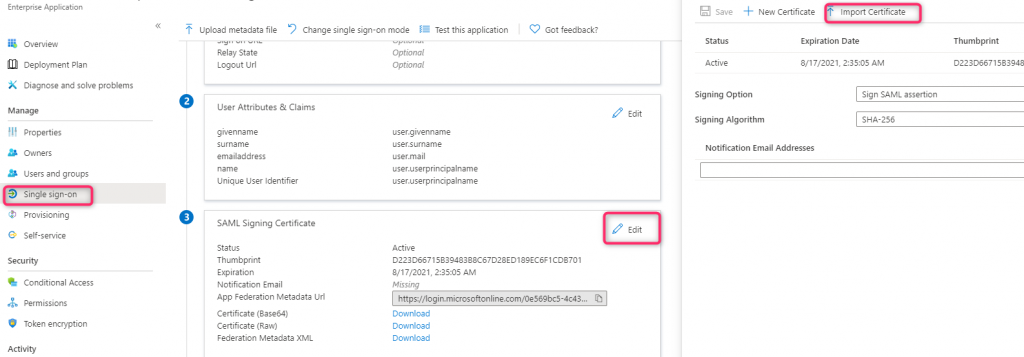
1) A SAML-based SSO Enterprise Application you want to configure a signing certificate for. Get the Object ID of this Application in the Properties blade of the Enterprise App – we will need it for the script. The script in this blog performs the same thing as doing the following UI action in the portal:
Azure Active Directory -> Enterprise Application -> Pick the correct App -> Single sign-on -> click ‘Edit’ link in the SAML Signing Certificate section -> Import Certificate
If you are trying to automate a SAML-based SSO Application, take a look at the documentation Automate SAML-based SSO app configuration with Microsoft Graph API. This blog can help with step 4, Configure Signing Certifcate, of that article.
2) An app registration to sign in a user and get an access token for Microsoft Graph. Get the Application (client) ID of this app in the Overview section – we will need it for the script. This application should have the following App Registration configuration:
| Supported account types | Accounts in this organizational directory only |
| Redirect URIs | http://localhost under ‘Mobile and desktop applications’ platform |
| API permissions | Microsoft Graph – Delegated permissions: Application.ReadWrite.All and User.Read (Make sure you grant Admin consent to these permissions) |
3) The user who logs in to get the MS Graph Access Token should be one of the following Azure AD Administrative Role – this is required in order to make a change to the Service Principal:
- Cloud Application Administrator
- Application Administrator
- Global Administrator
Signing Certificate
We will need to have a certificate to configure for our application. You can either create a self-signed certificate (using either PowerShell or OpenSSL as shown below) or obtain one from your Trusted Certificate Authority. We will need the following certificate components for our script:
- public key (typically a .cer file)
- private key in PKCS#12 format (in .pfx file)
- password for the private key (pfx file)
Note: It is important to have the private key in PKCS#12 format since Azure AD does not support other format types. Using the wrong format can result in the the error “Invalid certificate: Key value is invalid certificate” when using MS Graph to PATCH the Service Principal with a keyCredentials containing the certificate info
Using PowerShell to create a self-signed certificate
The following PowerShell script can be used to create a self-signed certificate and then export both the private key and public key out to a .pfx and and a .cer files
# fqdn - this is used for the 'issued to' and 'issued by' field of the certificate
# pwd - password for exporting the certificate private key
# location - path to folder where both the pfx and cer file will be written to, for example C:\users\john\Documents

Param(
    [Parameter(Mandatory=$true)]
    [string]$fqdn,
    [Parameter(Mandatory=$true)]
    [string]$pwd,
    [Parameter(Mandatory=$true)]
    [string]$location
)

if (!$PSBoundParameters.ContainsKey('location'))
{
    $location = "."
}

$cert = New-SelfSignedCertificate -certstorelocation cert:\currentuser\my -DnsName $fqdn
$pwdSecure = ConvertTo-SecureString -String $pwd -Force -AsPlainText
$path = 'cert:\currentuser\my\' + $cert.Thumbprint
$cerFile = $location + "\\" + $fqdn + ".cer"
$pfxFile = $location + "\\" + $fqdn + ".pfx"

Export-PfxCertificate -cert $path -FilePath $pfxFile -Password $pwdSecure
Export-Certificate -cert $path -FilePath $cerFile
Using OpenSSL to create a self-signed certificate
If you don’t have OpenSSL installed already, refer to the OpenSSL documentation for building and installation instruction. For Windows users, this StackOverflow discussion has some useful information on how to download OpenSSL for Windows.
1) Run the following openssl command to create a public key file (crt) and private key file (pem) with your info.  See https://www.digicert.com/kb/ssl-support/openssl-quick-reference-guide.htm for some openssl reference guide.

openssl req-x509 -sha256 -days 365 -newkey rsa:2048 -keyout "C:\Users\path\privateKey.key" -out "C:\Users\path\certificate.crt" -subj '/C=your country/ST=your state/L=your locality/O=Your Company, Inc./OU=your Organizational Unit/CN=yourdomain.com'

2) convert the pem file to pfx file with your info:

openssl pkcs12 -export -out "C:\Users\path\certificate.pfx" -inkey "C:\Users\path\privateKey.key" -in "C:\Users\path\certificate.crt" -passout pass:your password -passin pass:your password
3) convert the crt file to DER encoded binary X.509 .cer file:
On Windows, double-click on the crt file to launch the certificate wizard. Go to ‘Details’ tab and click on ‘Copy to File…’ button:
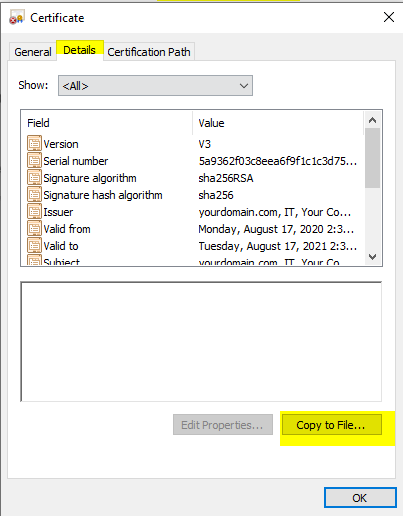
Click ‘Next’ on the ‘Welcome to the Certificate Export Wizard’ page. Choose ‘DER encoded binary X.509 (cer)’ option and save to cer file.

Configuring the signing certificate using the MS Graph request
At this point we should have a pfx file, a cer file, and a pfx file password. We will use all of this information to construct the following MS Graph request:
PATCH https://graph.microsoft.com/v1.0/serviceprincipals/<Service Principal Object ID>
Request body:
Note: This is not a complete request body. For brevity, I am only emphasizing the main part related to private and public key.
{
    "keyCredentials":[
        {
	    ...
            "type": "AsymmetricX509Cert",
            "usage": "Sign",
            "key": Base64-encoded private key

        },
        {
	    ...
            "type": "AsymmetricX509Cert",
            "usage": "Verify",
            "key": Base64-encoded public key

        }
    ],
    "passwordCredentials": [
        {
	    ...
            "secretText": "password for the pfx file"
        }
    ]
}
Note: the passwordCredentials is required in the above request. Omitting it may result in the error “The value for the property \”usage\” in one of your credentials is invalid. Acceptable values are Sign, Verify.”
There is also a PowerShell script to generate the above json body from the certificate files located here.
Use the following PowerShell script with your info to send a PATCH request to configure the signing certificate for this SAML Application. The script will attempt to download MSAL.Net module if it does not already exist on the machine and then use MSAL.Net to sign in to Azure AD. You may need to run the following commands first to update both Nuget package and PowerShellGet.
## Update Nuget Package and PowerShellGet Module
Install-PackageProvider NuGet -Force
Install-Module PowerShellGet -Force
Note: this script will replace the current keyCredentials and passwordCredentials configured for this Service Principal. If you need to do an append operation, you will need to get the current selection first and append it to the payload.
$ClientID = "<client ID>"
$loginURL       = "https://login.microsoftonline.com"
$tenantdomain   = "<tenant>.onmicrosoft.com"
$redirectURL = "http://localhost" # this reply URL is needed for PowerShell Core
[string[]] $Scopes = "https://graph.microsoft.com/.default"
$pfxpath = "C:\Users\path\certificate.pfx" # path to pfx file
$cerpath = "C:\Users\path\certificate.cer" # path to cer file
$SPOID = "<Service Principal Object ID>"
$graphuri = "https://graph.microsoft.com/v1.0/serviceprincipals/$SPOID"
$password = "<password for pfx file>"  # password for the pfx file
$CertDisplayName = "CN = <Your Cert Display Name>" # "CN=contoso"


# choose the correct folder name for MSAL based on PowerShell version 5.1 (.Net) or PowerShell Core (.Net Core)
# script is tested on both PS 5.1 and PS Core 7

if ($PSVersionTable.PSVersion.Major -gt 5)
    {
        $core = $true
        $foldername =  "netcoreapp2.1"
    }
else
    {
        $core = $false
        $foldername = "net45"
    }


# Download MSAL.Net module to a local folder if it does not exist there
if ( ! (Get-ChildItem $HOME/MSAL/lib/Microsoft.Identity.Client.* -erroraction ignore) ) {
    install-package -Source nuget.org -ProviderName nuget -SkipDependencies Microsoft.Identity.Client -Destination $HOME/MSAL/lib -force -forcebootstrap | out-null
}

# Load the MSAL assembly -- needed once per PowerShell session
[System.Reflection.Assembly]::LoadFrom((Get-ChildItem $HOME/MSAL/lib/Microsoft.Identity.Client.*/lib/$foldername/Microsoft.Identity.Client.dll).fullname) | out-null

$global:app = $null

$ClientApplicationBuilder = [Microsoft.Identity.Client.PublicClientApplicationBuilder]::Create($ClientID)
[void]$ClientApplicationBuilder.WithAuthority($("$loginURL/$tenantdomain"))
[void]$ClientApplicationBuilder.WithRedirectUri($redirectURL)


$global:app = $ClientApplicationBuilder.Build()

Function Get-GraphAccessTokenFromMSAL {
    [Microsoft.Identity.Client.AuthenticationResult] $authResult  = $null
    $AquireTokenParameters = $global:app.AcquireTokenInteractive($Scopes)
    [IntPtr] $ParentWindow = [System.Diagnostics.Process]::GetCurrentProcess().MainWindowHandle
    if ($ParentWindow)
    {
        [void]$AquireTokenParameters.WithParentActivityOrWindow($ParentWindow)
    }
    try {
        $authResult = $AquireTokenParameters.ExecuteAsync().GetAwaiter().GetResult()
    }
    catch {
        $ErrorMessage = $_.Exception.Message
        Write-Host $ErrorMessage
    }

    return $authResult
}

$myvar = Get-GraphAccessTokenFromMSAL
if ($myvar)
{
    $GraphAccessToken = $myvar.AccessToken
    Write-Host "Access Token: " $myvar.AccessToken

    #  this is for PowerShell Core
    $Secure_String_Pwd = ConvertTo-SecureString $password -AsPlainText -Force

    # reading certificate files and creating Certificate Object
    if ($core)
    {
        $pfx_cert = get-content $pfxpath -AsByteStream -Raw
        $cer_cert = get-content $cerpath -AsByteStream -Raw
        $cert = Get-PfxCertificate -FilePath $pfxpath -Password $Secure_String_Pwd
    }
    else
    {
        $pfx_cert = get-content $pfxpath -Encoding Byte
        $cer_cert = get-content $cerpath -Encoding Byte
        # Write-Host "Enter password for the pfx file..."
        # calling Get-PfxCertificate in PowerShell 5.1 prompts for password
        # $cert = Get-PfxCertificate -FilePath $pfxpath
        $cert = [System.Security.Cryptography.X509Certificates.X509Certificate2]::new($pfxpath, $password)
    }

    # base 64 encode the private key and public key
    $base64pfx = [System.Convert]::ToBase64String($pfx_cert)
    $base64cer = [System.Convert]::ToBase64String($cer_cert)

    # getting id for the keyCredential object
    $guid1 = New-Guid
    $guid1 = $guid1.ToString()
    $guid2 = New-Guid
    $guid2 = $guid2.ToString()

    # get the custom key identifier from the certificate thumbprint:
    $hasher = [System.Security.Cryptography.HashAlgorithm]::Create('sha256')
    $hash = $hasher.ComputeHash([System.Text.Encoding]::UTF8.GetBytes($cert.Thumbprint))
    $customKeyIdentifier = [System.Convert]::ToBase64String($hash)

    # get end date and start date for our keycredentials
    $endDateTime = ($cert.NotAfter).ToUniversalTime().ToString( "yyyy-MM-ddTHH:mm:ssZ" )
    $startDateTime = ($cert.NotBefore).ToUniversalTime().ToString( "yyyy-MM-ddTHH:mm:ssZ" )

    # building our json payload
    $object = [ordered]@{
    keyCredentials = @(
         [ordered]@{
            customKeyIdentifier = $customKeyIdentifier
            endDateTime = $endDateTime
            keyId = $guid1
            startDateTime = $startDateTime
            type = "AsymmetricX509Cert"
            usage = "Sign"
            key = $base64pfx
            displayName = $CertDisplayName
        },
        [ordered]@{
            customKeyIdentifier = $customKeyIdentifier
            endDateTime = $endDateTime
            keyId = $guid2
            startDateTime = $startDateTime
            type = "AsymmetricX509Cert"
            usage = "Verify"
            key = $base64cer
            displayName = $CertDisplayName
        }
        )
    passwordCredentials = @(
        [ordered]@{
            customKeyIdentifier = $customKeyIdentifier
            keyId = $guid1
            endDateTime = $endDateTime
            startDateTime = $startDateTime
            secretText = $password
        }
    )
    }

    $json = $object | ConvertTo-Json -Depth 99
    Write-Host "JSON Payload:"
    Write-Output $json

    # Request Header
    $Header = @{}
    $Header.Add("Authorization","Bearer $($GraphAccessToken)")
    $Header.Add("Content-Type","application/json")

    try
    {
        Invoke-RestMethod -Uri $graphuri -Method "PATCH" -Headers $Header -Body $json
    }
    catch
    {
        # Dig into the exception to get the Response details.
        # Note that value__ is not a typo.
        Write-Host "StatusCode:" $_.Exception.Response.StatusCode.value__
        Write-Host "StatusDescription:" $_.Exception.Response.StatusDescription
    }

    Write-Host "Complete Request"
}
else
{
    Write-Host "Fail to get Access Token"
}
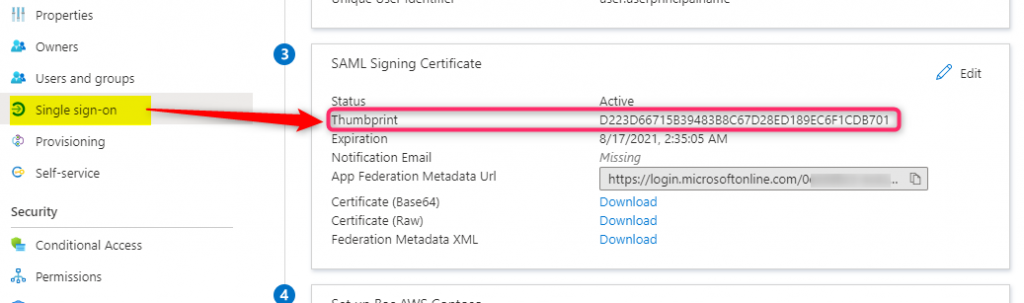
If the script completes successfully we should see the thumbprint of our certificate showing up for this application:
Last Updated on 8/19/2022