The sample files for this post can be found in this GitHub repository: https://github.com/RayGHeld/NetCore_ClientCredentials_withCert
There is also a Powershell script there to create a certificate for this sample.
You can perform the OAuth2 client_credentials grant flow to sign in as an application for your automated type of services. This flow does not require an interactive user to authenticate and should only be run in secure environments. There are 2 methods to handle securing the authentication portion: 1) use a client secret and 2) use a certificate. This blog post will show you how to authenticate using this flow in a .NetCore console application and a certificate.
The flow that is being followed is documented here. To begin the process, you will need a certificate and for this post, I will be using a self signed certificate using Powershell. I borrowed the Powershell example from this blog post and made modifications for this post so that the certificate that is created lines up with code since I am demonstrating multiple ways to get the certificate from the certificate store.
The first step is to create the certificate. You can find the Powershell script in the GitHub link at the start of this post. I have masked my tenant id and client id. Please remember to use your own. Also, note the folder location that the cert is created in ( you can change that value as well ) but you will need that in the .NetCore app.
# Create self-signed certificate and export pfx and cer files.  You will need to run the script in PowerShell Admin window to create this self-signed certificate

# please be aware that running this script will create a new cert each time in your certificate store.
# If you need to rerun it, I recommend deleting the previous certs first in the store.
# Duplicates are only really an issue if you are using the GetCertByName method

$tenant_id = 'xxxx' # tenant id is used for the cert name / subject name and matches the .netcore code sample that goes with this script
$client_id = 'xxxx' # client id is used for the cert name / subject name and cert password and matches the .netcore code sample that goes with this script
# Change the following file path to your own
$FilePath = 'C:\Users\myuser\OneDrive - Microsoft\Documents\Certs\'
$StoreLocation = 'CurrentUser' # be aware that LocalMachine requires elevated privileges
$expirationYears = 1

$SubjectName = $tenant_id + '.' + $client_id
$cert_password = $client_id

$pfxFileName = $SubjectName + '.pfx'
$cerFileName = $SubjectName + '.cer'

$PfxFilePath = $FilePath + $pfxFileName
$CerFilePath = $FilePath + $cerFileName

$CertBeginDate = Get-Date
$CertExpiryDate = $CertBeginDate.AddYears($expirationYears)
$SecStringPw = ConvertTo-SecureString -String $cert_password -Force -AsPlainText
$Cert = New-SelfSignedCertificate -DnsName $SubjectName -CertStoreLocation "cert:\$StoreLocation\My" -NotBefore $CertBeginDate -NotAfter $CertExpiryDate -KeySpec Signature
Export-PfxCertificate -cert $Cert -FilePath $PFXFilePath -Password $SecStringPw
Export-Certificate -cert $Cert -FilePath $CerFilePath
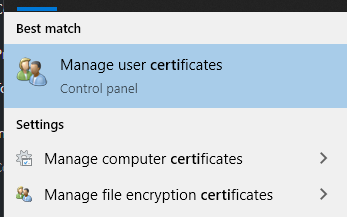
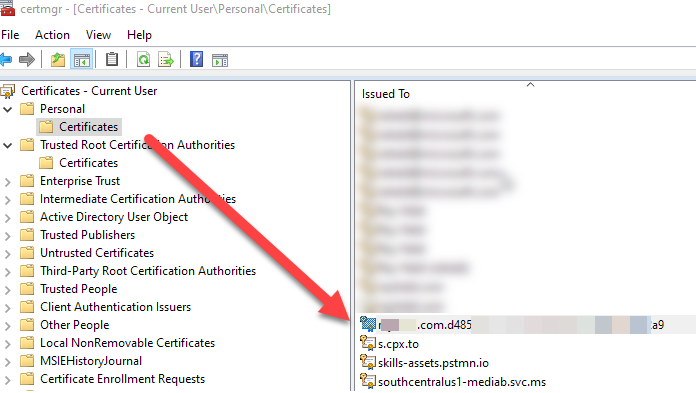
Once the certificate is created, you can find it in your certificate store on the computer the script was ran from. To get to the certificate store on the computer, I simply did a search in the tool bar search for “Certificate” and then used the Manage user certificates link that appeared.
Once the certificate is created, you can upload that to an app registration in the Azure portal.

For the .netcore application, you will need to make similar changes to the client id, tenant id and also the folder path. Also, you can enter the thumbprint here as well since there is a method to search for the certificate by thumbprint ( which is actually the best way of doing this ).
        static String accessToken = string.Empty;
        static String client_id = "xxxx";
        static String cert_password = client_id;
        static String tenant_id = "xxxx";
        static String authority = $"https://login.microsoftonline.com/{tenant_id}";
        static List<String> scopes = new List<String>() { $"https://graph.microsoft.com/.default" };
        static String thumbprint = "xxxxxx";
There are 3 methods that will search for the certificate. I have 2 of them commented out ( you can only use one method here so choose one, comment the other 2 out when testing ) and they are part of the confidential client builder class — see the method called GetToken.
            IConfidentialClientApplication ica = ConfidentialClientApplicationBuilder.Create(client_id)
                .WithCertificate(GetCert(@"C:\Users\myuser\OneDrive - Microsoft\Documents\Certs\"))
                //.WithCertificate(GetCertByThumbprint( StoreLocation.CurrentUser, thumbprint ) )
                //.WithCertificate( GetCertByName( StoreLocation.CurrentUser, $"{tenant_id}.{client_id}" ) )
                .WithTenantId(tenant_id)
                .WithAuthority(authority)
                .Build();
And, that is it. Your application will perform the client credentials flow using the certificate you created. This demo app does not make any api calls. It is only getting a access token. You can copy that access token and decode it at http://jwt.ms to see what it contains.
The full module with the functions being called to get a certificate:
using Microsoft.Identity.Client;

using System;
using System.Collections.Generic;
using System.Runtime.ConstrainedExecution;
using System.Security.Cryptography.X509Certificates;
using System.Threading.Tasks;

namespace MSAL_ClientCred_Cert
{

    /*
     * Reference: https://blogs.aaddevsup.xyz/2019/01/console_keyvault_clientcredentials/ -- for instructions on how to create a certificate
     */
    class Program
    {
        static String accessToken = string.Empty;
        static String client_id = "xxx";
        static String cert_password = client_id;
        static String tenant_id = "xxx.com";
        static String authority = $"https://login.microsoftonline.com/{tenant_id}";
        static List<String> scopes = new List<String>() { $"https://graph.microsoft.com/.default" };
        static String thumbprint = "xxx";

        static void Main(string[] args)
        {

            Console.WriteLine("Hello World!");
            GetToken();
            Console.ReadKey();
        }

        static async void GetToken()
        {
            accessToken = string.Empty;

            IConfidentialClientApplication ica = ConfidentialClientApplicationBuilder.Create(client_id)
                .WithCertificate(GetCert(@"C:\Users\myuser\OneDrive - Microsoft\Documents\Certs\"))
                //.WithCertificate(GetCertByThumbprint( StoreLocation.CurrentUser, thumbprint ) )
                //.WithCertificate( GetCertByName( StoreLocation.CurrentUser, $"{tenant_id}.{client_id}" ) )
                .WithTenantId(tenant_id)
                .WithAuthority(authority)
                .Build();

            AuthenticationResult authResult = null;

            try
            {
                authResult = await ica.AcquireTokenForClient(scopes).ExecuteAsync();
                accessToken = authResult.AccessToken;

                Console.WriteLine($"Access Token: {accessToken}");
            }
            catch (Exception ex)
            {
                Console.WriteLine($"MSAL Error: {ex.Message}");
            }


        }

        /// <summary>
        /// Gets a certificate by the .pfx name from the file system
        /// </summary>
        /// <param name="basePath">The folder where the cert is stored -- filename is derived from the settings in this application</param>
        /// <returns></returns>
        static X509Certificate2 GetCert(String basePath)
        {
            String certPath = $"{basePath}{tenant_id}.{client_id}.pfx";
            X509Certificate2 cer = new X509Certificate2(certPath, cert_password, X509KeyStorageFlags.EphemeralKeySet);

            return cer;
        }

        /// <summary>
        /// Gets a certificate based on the name -- please note, there is an issue using this method
        /// if there are multiple certs with the same name.
        /// </summary>
        /// <param name="storeLoc"></param>
        /// <param name="subjectName"></param>
        /// <returns></returns>
        static X509Certificate2 GetCertByName(StoreLocation storeLoc, String subjectName)
        {

            //String certPath = @"C:\Users\myuser\OneDrive - Microsoft\Documents\Certs\MSAL_ClientCred_Cert.cer";
            //X509Certificate2 cer = new X509Certificate2( certPath, client_id, X509KeyStorageFlags.EphemeralKeySet );
            //store.Certificates.Add( cer ); -- use this to import the certificate to the store

            // read certificates already installed
            X509Store store = new X509Store(storeLoc);
            X509Certificate2 cer = null;

            store.Open(OpenFlags.ReadOnly);

            // look for the specific cert by subject name -- returns the first one found, if any.  Also, for self signed, set the valid parameter to 'false'
            X509Certificate2Collection cers = store.Certificates.Find(X509FindType.FindBySubjectName, subjectName, false);
            if (cers.Count > 0)
            {
                cer = cers[0];
            };
            store.Close();

            return cer;

        }

        /// <summary>
        /// Gets a certificate by Thumbprint -- this is the preferred method
        /// </summary>
        /// <param name="storeLoc"></param>
        /// <param name="thumbprint"></param>
        /// <returns></returns>
        static X509Certificate2 GetCertByThumbprint(StoreLocation storeLoc, String thumbprint)
        {
            X509Store store = new X509Store(storeLoc);
            X509Certificate2 cer = null;

            store.Open(OpenFlags.ReadOnly);

            // look for the specific cert by thumbprint -- Also, for self signed, set the valid parameter to 'false'
            X509Certificate2Collection cers = store.Certificates.Find(X509FindType.FindByThumbprint, thumbprint, false);
            if (cers.Count > 0)
            {
                cer = cers[0];
            };
            store.Close();

            return cer;
        }
    }
}