Introduction
This article is meant to show how one can set up a client application to obtain a service to service access token, to get access to a web API from a web App. This document will be following the grant type client credential flow to do this, and will utilize Postman to get the access token via client credentials. This tutorial will not set up the backend web API, and assumes that web API is validating the token, you can click this link on validating the JWT token here. Also in addition to that, the link included assumes that the Audience has the correct permissions. As the client credentials flow can get a different audience within your tenant, the end of this article will review what additional steps, to make sure that the access token has the correct permissions.
Creating the AAD Application Registrations in the Portal
First we are going to want to create the AAD Application registrations in the portal. For this we will implement the application to be able to work with Postman so that we can display getting the access token pretty easily. First we go to the Azure Active Directory Blade, go to App Registrations, and then create a new application registration.

From there we are going to want to create a web app with any name. Here I have set the name as web app and then we want to set the callback url to : https://www.getpostman.com/oauth2/callback and set the application type to web app/ API.

You will have to click out of the sign-on URL to make it check whether or not if it’s correct.
After that we have created our web app, we will want to create a secret. Please keep track of the secret as you won’t be able to see the secret again. You will have to press save in order for the secret to generate.

With this information in hand, we will be able to move forward and connect to this AAD registration. But without the correct permissions we won’t be able to connect to the web API registration with an access token from this web API.

So here I create the API registration, with the sign-on URL as the localhost. How you plan on setting up your application will change what the sign-on URL will be.
Modifying the Application Manifest to Add Your Own Permissions
Since we are utilizing Client Credentials, we will need to add the permission in the Web API as an Application Permission as the Client Credential doesn’t utilize the delegated permissions. In addition to that we will most likely want to define what sort of permissions the web app should have for the web API. In order to do this we will have to add these permissions directly into the web API’s application manifest. You can do this by going to the AAD Application registration, clicking on Manifest and then adding the field “approles” into it. This is shown below.
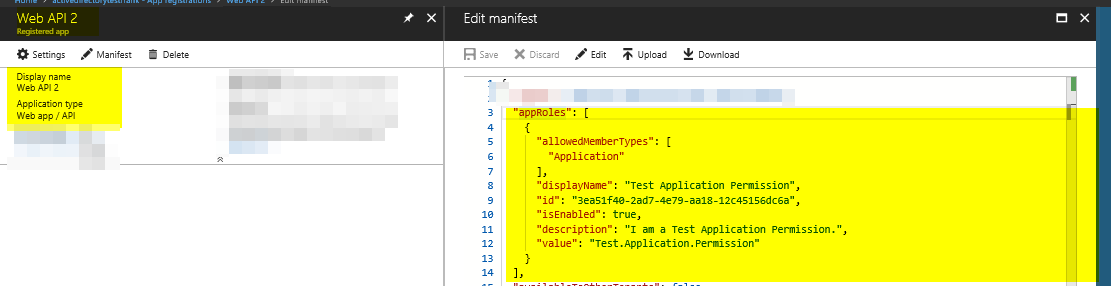
The approle I added here is below. By setting the allowedmembertypes to “Application” we are setting it as an application role.
“appRoles”: [
{
“allowedMemberTypes”: [
“Application”
],
“displayName”: “Test Application Permission”,
“id”: “3ea51f40-2ad7-4e79-aa18-12c45156dc6a”,
“isEnabled”: true,
“description”: “I am a Test Application Permission.”,
“value”: “Test.Application.Permission”
}
]
To learn more about these values you can go to the link here describing the application manifest :
To learn more about the App roles for an application please go here:
https://docs.microsoft.com/en-us/azure/architecture/multitenant-identity/app-roles
That being said, the one thing to note is that the allowedmembertypes isn’t described fully in the documentation above. By setting it to User, we set it as a delegated permission and have to ability to do RBAC access with the delegated permission. By setting it to an Application, we are able to set it as an application permission, letting anyone who can access the application to be able to access web API with the permissions granted to the web app.
You can learn more about the differences between delegated and application permissions here.
If you are interested in utilizing RBAC to control access in a service to service scenario you can follow this guide :
https://azure.microsoft.com/en-us/resources/samples/active-directory-dotnet-webapp-roleclaims/
In addition to that, the ID is created by utilizing the method below in PowerShell.
[System.Guid]::NewGuid()
Adding the Permission into the Web App
After adding the application permission in the application manifest, we are able to add the required permission to the web app in order to get an access token with the correct claims saying that this web app has application access to the web api.


Now we have the Application permission and we will be able to get it in the claims when we authenticate with the web app. Make sure to grant permissions, otherwise you won’t see the role in the access token as the application technically hasn’t been given permission yet as it requires a global admin to give the application access to the permission. Notice how it says yes under require admin in the last picture.

Getting the Access Token with Postman
After granting permissions for the application, we are now able to authenticate with the application and get the correct claims and audience in the access token. We will utilize client credentials to get an access token from Web App’s application ID with the secret and then with the resource set as the app ID URI for the web API, we will get the audience as the app id uri, and the roles for whatever permissions were granted to the web app.


From here, you can access the web api, assuming that you have set it up to authorize based on the audience, role, iss, and signature is correct (i.e. the access token hasn’t been tampered with and it is issued from the AAD tenant with the AAD Application registration in it). For more information on validating a JWT token you can find that here.
Conclusion
We have now gone through all the steps to set up the AAD application registration, modify the application manifest in the web API to create the permissions, add permissions in the web app aad application registration, grant permissions, and get the Access token using Postman to see if all the claims in the JWT token are correct. After all of this your web api will need to still manually validate that the jwt token hasn’t been tampered with and that all the claims are correct. After doing all these steps you should have now setup a service to service authorization using client credentials.
Is the screenshot in the section ‘Modifying the Application Manifest to Add Your Own Permissions’ correct? The manifest of the web API Azure AD registration should be changed, not the Azure AD registration of the web application (Postman), right?
You should be changing then Application Manifest of whatever API registration you are trying to access. So imagining you have two Applications here, one “Postman” and the other “Web API”, you will want to modify the manifest of “Web API” to add the permission. Then in Postman’s “Required Permissions” you can add “Web API” and then choose the permission you added into the manifest of “Web API”.
Hey Ramon, after rereading your comment and looking at the picture again, I see what you mean. The picture was really just to show what I meant by application manifest, but the actual picture is in the wrong App Registration. You are correct, I am making the changes now. Thank you for pointing this out.
Using the Graph Api I’m able to create an application, a service principal and a “requiredResourceAccess” permission with my webApi resourceAppId.
I can see this setting in the Manifest and in the “RequiredPermission” section, but it’s not checked and of course I cannot see this role in the token back.
I think I’m missing something for allowing the grant permissions.
Is it tecnically possible to do it programmatically? Or do I need to manually use the Azure Portal?
Hello, I’m following up on this, you can look at possible ways to grant admin consent in this blog : https://blogs.msdn.microsoft.com/aaddevsup/2018/05/08/receiving-aadsts90094-the-grant-requires-admin-permission/
Unfortunately you will need some admin interactivity in order to grant permissions and you cannot do this programmatically from my understanding.
I found this blog post where it’s described how to do it for Native application:
https://blogs.msdn.microsoft.com/arsen/2017/07/30/azure-ad-how-to-create-oauth2permissiongrant-using-graph-api-grant-permissions-and-consent-for-application/
It uses delegated permissions (OAuth2PermissionGrants) and not application permissions (AppRoleAssignment).
Hope this gives you some hint 🙂
Ah Yes, you are correct. It is possible to get the service principal and then to create an oauth2permissiongrant for the service principal.
I used the wrong Resource token in postman request at first. It has to be Application ID URI of Web APP and not Application ID URI for Web API 2 (the fist picture in postman section). I got the error: azure ad bearer error=”invalid_token”, error_description=”the audience is invalid” when try to access my API. Once the right resource was set – all start working!
Thank you
I used the wrong resource parameter at first (from the first picture in postman section). It has to point to Web APP Application ID URI and not Web API URI. I got the following error when accessing my API: azure ad bearer error=”invalid_token”, error_description=”the audience is invalid”. Once the right Resource was set – all start working!!!
Thank you
[…] task with Postman, however, it does require the extra step of obtaining an access token. Please see this blog about how to get an access token but use the app registration you’ve created in this […]